てくなべ (tekunabe)

ansible / network automation / 学習メモ

Vagrant で手軽に VM ごと StackStorm の環境を準備する

■ はじめに

StackStorm の環境を準備するには、インストールスクリプトを実行する方法や Ansible の Playbook を実行する方法などがありますが、先日の公式ブログでは vagrantVMごと StackStorm の環境を準備する方法が紹介されていました。

stackstorm.com

公式ドキュメントの「Vagrant & Virtual Appliance」にも、記載されていましたので、これらの情報をもとに試しに、環境を準備して、ごく簡単な動作確認をします。

環境:

※ Ansible で StackStorm にインストールする場合はこちら http://tekunabe.hatenablog.jp/entry/2018/03/12


■ StackStorm 入りのVMの準備と起動

以下の2行だけです。

vagrant init stackstorm/st2
vagrant up

vagrant init stackstorm/st2 で最低限の Vagrantfile が生成され、その情報をもとに vagrant upVMを起動するという流れです。

akirapc:st2 akira$ vagrant init stackstorm/st2
A `Vagrantfile` has been placed in this directory. You are now
ready to `vagrant up` your first virtual environment! Please read
the comments in the Vagrantfile as well as documentation on
`vagrantup.com` for more information on using Vagrant.
akirapc:st2 akira$ vagrant up
Bringing machine 'default' up with 'virtualbox' provider...
==> default: Box 'stackstorm/st2' could not be found. Attempting to find and install...
    default: Box Provider: virtualbox
    default: Box Version: >= 0
==> default: Loading metadata for box 'stackstorm/st2'
    default: URL: https://vagrantcloud.com/stackstorm/st2
==> default: Adding box 'stackstorm/st2' (v2.7.2-20180523) for provider: virtualbox
    default: Downloading: https://vagrantcloud.com/stackstorm/boxes/st2/versions/2.7.2-20180523/providers/virtualbox.box
==> default: Successfully added box 'stackstorm/st2' (v2.7.2-20180523) for 'virtualbox'!
==> default: Importing base box 'stackstorm/st2'...
==> default: Matching MAC address for NAT networking...
==> default: Checking if box 'stackstorm/st2' is up to date...
==> default: Setting the name of the VM: stackstorm
==> default: Clearing any previously set network interfaces...
==> default: Preparing network interfaces based on configuration...
    default: Adapter 1: nat
    default: Adapter 2: hostonly
==> default: Forwarding ports...
    default: 443 (guest) => 9000 (host) (adapter 1)
    default: 22 (guest) => 2222 (host) (adapter 1)
==> default: Running 'pre-boot' VM customizations...
==> default: Booting VM...
==> default: Waiting for machine to boot. This may take a few minutes...
    default: SSH address: 127.0.0.1:2222
    default: SSH username: vagrant
    default: SSH auth method: private key
    default:
    default: Vagrant insecure key detected. Vagrant will automatically replace
    default: this with a newly generated keypair for better security.
    default:
    default: Inserting generated public key within guest...
    default: Removing insecure key from the guest if it's present...
    default: Key inserted! Disconnecting and reconnecting using new SSH key...
==> default: Machine booted and ready!
[default] GuestAdditions 5.2.12 running --- OK.
==> default: Checking for guest additions in VM...
==> default: Setting hostname...
==> default: Configuring and enabling network interfaces...
==> default: Mounting shared folders...
    default: /vagrant => /Users/akira/Documents/git/python_test/vagrant/st2
==> default: Running provisioner: st2-version (shell)...
    default: Running: inline script
    default: st2 2.7.2, on Python 2.7

==> default: Machine 'default' has a post `vagrant up` message. This is a message
==> default: from the creator of the Vagrantfile, and not from Vagrant itself:
==> default:
==> default:   ███████╗████████╗██████╗      ██████╗ ██╗  ██╗
==> default:   ██╔════╝╚══██╔══╝╚════██╗    ██╔═══██╗██║ ██╔╝
==> default:   ███████╗   ██║    █████╔╝    ██║   ██║█████╔╝
==> default:   ╚════██║   ██║   ██╔═══╝     ██║   ██║██╔═██╗
==> default:   ███████║   ██║   ███████╗    ╚██████╔╝██║  ██╗
==> default:   ╚══════╝   ╚═╝   ╚══════╝     ╚═════╝ ╚═╝  ╚═╝
==> default:
==> default:   To access the Web UI, head to:
==> default:     https://10.10.10.10/
==> default:     Username: st2admin
==> default:     Password: Ch@ngeMe
==> default:
==> default:   Thanks for trying StackStorm!


CLIの確認

SSHログイン

そのまま vagrant ssh コマンドでログインできます。

akirapc:st2 akira$ vagrant ssh
Welcome to StackStorm v2.7.2 (Ubuntu 16.04 LTS GNU/Linux x86_64)

 * Documentation: https://docs.stackstorm.com/
 * Community: https://stackstorm.com/community-signup
 * Forum: https://forum.stackstorm.com/
 * Enterprise: https://stackstorm.com/#product

Last login: Wed Jun  6 11:59:12 2018 from 10.0.2.2
vagrant@stackstorm:~$ hostname
stackstorm
vagrant@stackstorm:~$ uname -a
Linux stackstorm 4.4.0-116-generic #140-Ubuntu SMP Mon Feb 12 21:23:04 UTC 2018 x86_64 x86_64 x86_64 GNU/Linux
vagrant@stackstorm:~$

ログインできました。Ubutuを利用しているようです。

なお、VirtualBoxVM として SSH へポートフォワーディングは 2222/TCP に設定されますので、ssh コマンドやターミナルソフトでログインする場合は、 2222/TCP を指定します。 ユーザー名、パスワードともに vagrant です。秘密鍵を利用する場合は .vagrant/machines/default/virtualbox/private_key を指定します。

akirapc:st2 akira$ ssh vagrant@localhost -p 2222
vagrant@localhost's password:
Welcome to StackStorm v2.7.2 (Ubuntu 16.04 LTS GNU/Linux x86_64)

 * Documentation: https://docs.stackstorm.com/
 * Community: https://stackstorm.com/community-signup
 * Forum: https://forum.stackstorm.com/
 * Enterprise: https://stackstorm.com/#product

vagrant@stackstorm:~$ hostname
stackstorm

StackStorm ログイン(認証)

StackStormの各種操作には、StackStormへのログインが必要です。ここでは環境変数トークンを仕込む方法でログインと同等の状態にします。 ユーザーは st2admin、パスワードは Ch@ngeMe です。

vagrant@stackstorm:~$ export ST2_AUTH_TOKEN=`st2 auth -t -p Ch@ngeMe st2admin`

st2 run 動作確認

簡単な動作確認として st2 run コマンドで date コマンドを実行します。

vagrant@stackstorm:~$ st2 run core.local -- date -R
.
id: 5b17d02802ebd505e4388361
status: succeeded
parameters:
  cmd: date -R
result:
  failed: false
  return_code: 0
  stderr: ''
  stdout: Wed, 06 Jun 2018 12:14:33 +0000
  succeeded: true

正常に実行できました。


GUI(Web)の確認

ログイン

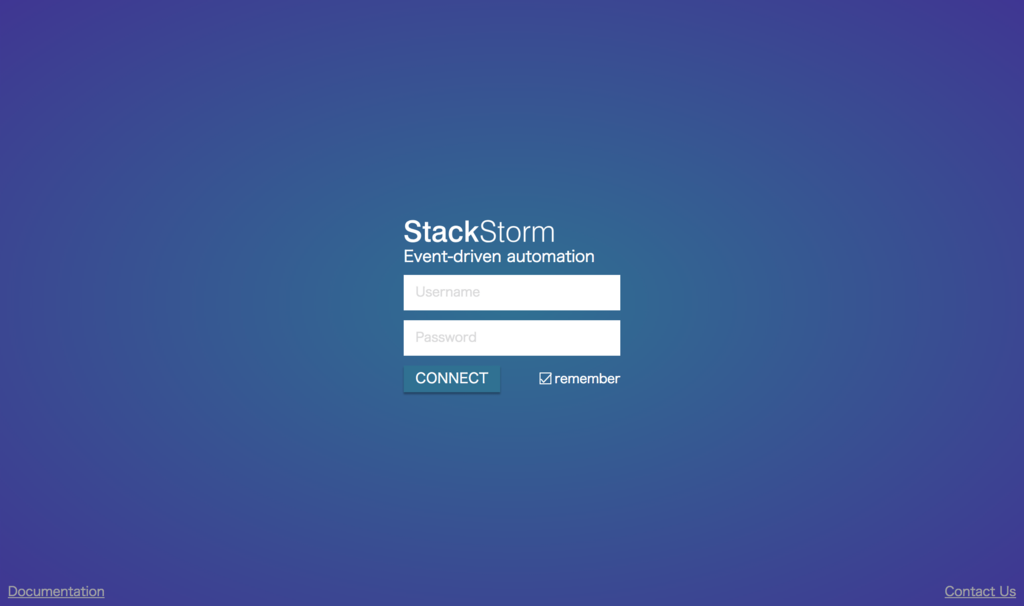
今度は、Web画面の確認をします。 VMの設定で、9000/TCP から 443/TCP へのポートフォワーディングが設定されていますので、ホストOSのブラウザから https://localhost:9000 にアクセスします。 CLI と居と同じく、ユーザーは st2admin、パスワードは Ch@ngeMe です。 f:id:akira6592:20180606212440p:plain
ログ確認

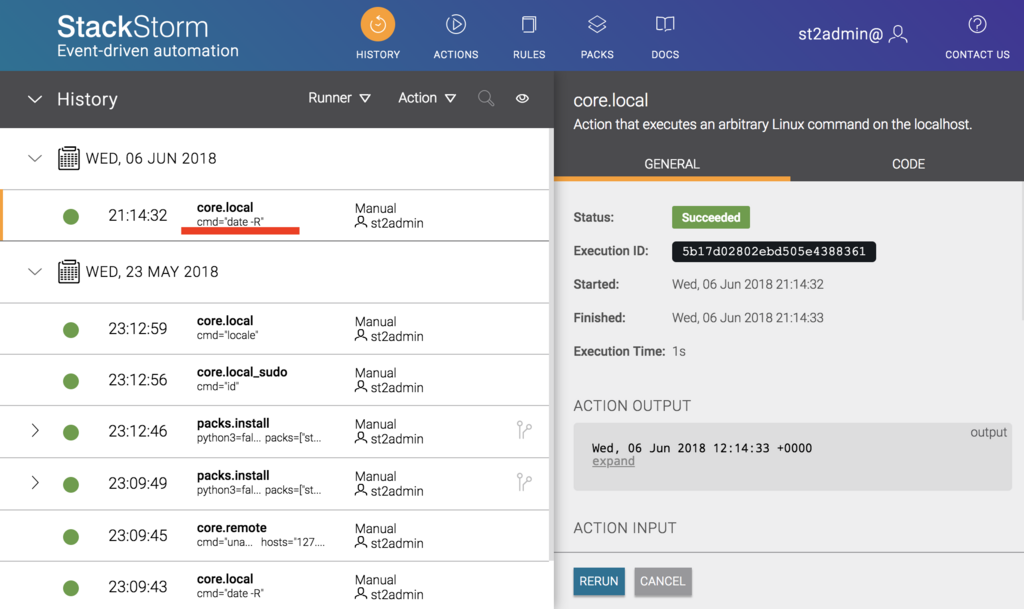
ログイン後トップ画面の左の方で、先程CLIから実行した st2 run core.local -- date -R のログが確認できます。 f:id:akira6592:20180606212652p:plain

■ ログイン情報まとめ

初期のログイン情報は以下のとおりです。

ログイン方法 ポート番号 ユーザー名 パスワード 備考
SSH 2222 vagrant vagrant 秘密鍵 .vagrant/machines/default/virtualbox/private_key
Web 9000 st2admin Ch@ngeMe https://localhost:9000
st2 login - st2admin Ch@ngeMe


■ まとめ

VagrantVirtualBox で艱難に OSごと StackStorm の環境を準備できることが確認できました。 特に OS/ディストリビューションにこだわりがなく、とにかく手軽にローカルに StackStorm の独立した環境を準備するには、この Vagnrant の方法が良いのではないかと思います。

日本のネットワーク機器ベンダーの Ansible 対応状況(Alaxala・APRESIA・古河電工)

■ はじめに

Ansible は Cisco、Juniper、ARISTAなどのネットワーク機器にも対応しています。 公式ドキュメント上のネットワークモジュールの一覧ページを確認すると分かりますが、日本のネットワーク機器に対応するモジュールは標準モジュールにはありません。 ただ、今年に入って日本のネットワーク機器ベンダーが Ansible に対応する動きが見られます。

この記事では、Alaxalaと、APRESIAの対応状況について調べた範囲でご紹介します。(いずれも本記事執筆時点)


■ Alaxala はサードパーティモジュールを提供済み

Alaxala は、対応モジュールを提供済みです。

Ansibleを活用したITインフラの運用自動化ソリューションを強化:アラクサラネットワークス株式会社

会員専用サイトから無償でダウンロード可能で、日本語マニュアルも用意されています。

提供モジュールは以下。

  • ax_command
  • ax_config
  • ax_facts

パッと見、オプション含めて既存の標準モジュールに合わせた仕様で作られているようでした。

また、Interop Tokto 2018 で、デモの展示があるそうです。

OSSである運用自動化ツールAnsibleを活用したプロビジョニングのデモを行います。

Interop Tokyo 2018:出展のご案内:アラクサラネットワークス株式会社

Interopレポート (2019/02/06 追記) tekunabe.hatenablog.jp


■ APRESIA は "将来実装予定" → 提供開始

2018年5月23日:APRESIA Systemsが次世代モバイル向けにネットワーク装置を発表|ニュースリリース|APRESIA | APRESIA Systems株式会社

上記 Apresia22000シリーズのニュースリリースに、将来実装予定と注釈がついていますが

– 収集した情報を更に詳細に分析するためのツールやOSS、AI、機械学習との連携を容易にするTelemetryやansibleなどの標準技術やAPIの実装

とありました。

詳細は不明ですが、こちらもサードパーティモジュールとして提供されるのかもしれません。

[2022/10/21 追記] 提供されたことがアナウンスされました。

古河電工 は JANOG43 のブースで展示 (2019/02/06 追記)

2019年1月に開催された、JANOG43 Meeting in Yamanasi のブースで、Ansible モジュールを使ったデモをされていました。

デモの内容は、Zabbixで機器の障害を検出したら予備機(マネジメントIPだけ設定済み)にコンフィグを投入して、切り替えるといったものでした。

モジュールの提供方法については検討中とのことでした。


■ まとめ

他にもあるかもしれませんが、 日本のネットワーク機器ベンダーの Ansible 対応状況についてまとめました。 もしかしたら今後も対応するベンダーが現れるかもしれませんので、引き続きにしていこうと思います。

Ansible の loop は flatten されない(with_items ではなく with_list と同じ)

■ はじめに

Ansible 2.5 で with_* の代わりに利用できる loop キーワードが利用できるようになりました。

今まで with_items と同じと思い込んでいたのですが、そうではなく with_list と同じ、ということに気がついたのでまとめます。 違いは、一段階flatten(ネストを平らにして展開)されるか、されないかです。

キーワード  flatten
with_items 一段階 flatten される
with_listloop flatten されない

■ 検証

違いを確認するために、簡単な Playbook で検証します。

Playbook

- hosts: localhost
  gather_facts: no
  connection: local

  vars:
    testitems:
      - [1, 2]
      - 3

  tasks:
    - name: with_items
      debug:
        msg: "{{ item }}"
      with_items: "{{ testitems }}"

    - name: with_list
      debug:
        msg: "{{ item }}"
      with_list: "{{ testitems }}"

    - name: normal loop
      debug:
        msg: "{{ item }}"
      loop: "{{ testitems }}"

実行結果

akira:~/environment $ ansible-playbook -i inventory looptest.yml 

PLAY [localhost] ***********************************************

TASK [with_items] **********************************************
ok: [localhost] => (item=None) => {
    "msg": 1
}
ok: [localhost] => (item=None) => {
    "msg": 2
}
ok: [localhost] => (item=None) => {
    "msg": 3
}

TASK [with_list] ***********************************************
ok: [localhost] => (item=None) => {
    "msg": [
        1, 
        2
    ]
}
ok: [localhost] => (item=None) => {
    "msg": 3
}

TASK [normal loop] *********************************************
ok: [localhost] => (item=None) => {
    "msg": [
        1, 
        2
    ]
}
ok: [localhost] => (item=None) => {
    "msg": 3
}

PLAY RECAP *****************************************************
localhost       : ok=3    changed=0    unreachable=0    failed=0   

このように、 [[1, 2], 3] というネストされたリストが、

  • with_items は flatten されて、 123 という3回のループ
  • with_listloop は flatten されず、 [1, 2]3 という2回のループ

になったことが確認できました。

with_items を loop で置き換えるなら、| flatten(levels=1) する

loop でも flatten フィルターを通すと flatten されて、 with_items と同じ動作になります。

    - name: loop with flatten
      debug:
        msg: "{{ item }}"
      loop: "{{ testitems | flatten(levels=1) }}"
akira:~/environment $ ansible-playbook -i inventory looptest.yml 

PLAY [localhost] ***********************************************

TASK [loop with flatten] ***************************************
ok: [localhost] => (item=None) => {
    "msg": 1
}
ok: [localhost] => (item=None) => {
    "msg": 2
}
ok: [localhost] => (item=None) => {
    "msg": 3
}

PLAY RECAP ************************************************************************************
localhost                  : ok=1    changed=0    unreachable=0    failed=0   


■ まとめ

  • 通常の loop は、with_list と同じく、 flatten されない

  • フィルター| flatten(levels=1)| を通すと、with_items と同じく一段階 flatten される

ということが分かりました。これから Playbook のサンプルは with_* ではなく、 loop が増えてくるのではないかと思います。

参考

Ansible 2.5 へのポーティングガイドで with_x から loop への以降方法が記載されています。 https://docs.ansible.com/ansible/latest/porting_guides/porting_guide_2.5.html#migrating-from-with-x-to-loop

StackStorm で Slack 投稿時に特定のアクションをするルールを作ってみた

■ はじめに

以前のエントリで、 StackStorm の Slack Pack の Action を利用して、Slack への投稿を試しました。

tekunabe.hatenablog.jp

今回は、Action ではなく、Trigger や Sensor を使って Slack 上のイベントを拾って何かする、という機能を試してみます。


■ ためすこと

Slack の投稿を検出して、以下のようにテキストファイルに出力する、という簡単な処理をためすことにします。

名前: 投稿内容
名前: 投稿内容
名前: 投稿内容
名前: 投稿内容


■ 準備

トークンの取得

連携のためには Slack のトークンが必要です。 Slack Pack の GitHub リポジトリの README に説明があります。 今回は、とにかく簡単に試したかったため、「For testing purposes..」の下りで説明されている方法でトークンを取得しました。

Slack Pack の設定

先程取得したトークンを、st2 pack config slack コマンドで設定します。

今回は以下の値にして、他はデフォルトのままにしました。

設定項目 備考
post_message_action.username akira6592 任意の名前
post_message_action.webhook_url (着信WebフックのURL)
sensor.token (先程控えたトークン)
admin.organization admin 任意の名前

途中、以下のように聞かれますのでエンターを押します。

Do you want to preview the config in an editor before saving? [y]:

設定内容がテキストとしてエディタで開かれるので、確認後エディタを終了します。

最後に

Do you want me to save it? [y]: 

と聞かれるのでエンターを押します。


■ Slack Trigger の仕様調査

後で必要になる情報を調べておきます。

Slack Pack に含まれる Trigger を調べます。

[ec2-user@ip-172-31-4-147 ~]$ st2 trigger list -p slack
+---------------+-------+------------------------------------------------------+
| ref           | pack  | description                                          |
+---------------+-------+------------------------------------------------------+
| slack.message | slack | Trigger which indicates a new message has been       |
|               |       | posted to a channel                                  |
+---------------+-------+------------------------------------------------------+

slack.message という Trigger があり、新着メッセージを拾えるようです。

次に、この Trigger の詳細を調べます。

[ec2-user@ip-172-31-4-147 ~]$ st2 trigger get slack.message
+-------------------+--------------------------------------------------------------+
| Property          | Value                                                        |
+-------------------+--------------------------------------------------------------+
| id                | 5b0b5b426fb12304dc0e014f                                     |
| ref               | slack.message                                                |
| pack              | slack                                                        |
| name              | message                                                      |
| description       | Trigger which indicates a new message has been posted to a   |
|                   | channel                                                      |
| parameters_schema |                                                              |
| payload_schema    | {                                                            |
|                   |     "type": "object",                                        |
|                   |     "properties": {                                          |
|                   |         "text": {                                            |
|                   |             "type": "string"                                 |
|                   |         },                                                   |
|                   |         "timestamp_raw": {                                   |
|                   |             "type": "string"                                 |
|                   |         },                                                   |
|                   |         "user": {                                            |
|                   |             "type": "object"                                 |
|                   |         },                                                   |
|                   |         "channel": {                                         |
|                   |             "type": "object"                                 |
|                   |         },                                                   |
|                   |         "timestamp": {                                       |
|                   |             "type": "integer"                                |
|                   |         }                                                    |
|                   |     }                                                        |
|                   | }                                                            |
| tags              |                                                              |
| uid               | trigger_type:slack:message                                   |
+-------------------+--------------------------------------------------------------+

例えば、投稿内容そのものは text で取得できそうです。

Slack Pack の GitHub リポジトリの README の slack.message trigger に、ペイロードのサンプルが載っていました。

(引用)

{
    "user": {
        "first_name": "Tomaz",
        "last_name": "Muraus",
        "is_owner": false,
        "name": "kami",
        "real_name": "Tomaz Muraus",
        "is_admin": false,
        "id": "U0CCCCC"
    },
    "channel": {
        "topic": "",
        "id": "C0CCCCCC",
        "name": "test"
    },
    "timestamp": 1419164091,
    "timestamp_raw": "1419164091.00005",
    "text": "This is a test message."
}

例えば、投稿者の名前は user.name で取得できそうです。


■ ルールの作成

何が起きたときに何をする、というルールを作成します。

ルールの書き方は、公式ドキュメントの Quick Start の Define a Ruleを参考にしました。後でわかりましたが、ここでの ~/slack.log/home/stanley/slack.log になります。

r_slack.yml

---
name: "r_slack"
pack: "test"
description: "test rule for slack"
enabled: true

trigger:
  type: "slack.message"
  parameters: {}
action:
  ref: "core.local"
  parameters:
    cmd: "echo \"{{trigger.user.name}}: {{trigger.text}}\" >>  ; sync"

続いて、ルールを登録します。

[ec2-user@ip-172-31-4-147 ~]$ st2 rule create r_slack.yml 
+-------------+--------------------------------------------------------------+
| Property    | Value                                                        |
+-------------+--------------------------------------------------------------+
| id          | 5b128cfd6fb12304f47d825c                                     |
| name        | r_slack                                                      |
| pack        | test                                                         |
| description | test rule for slack                                          |
| action      | {                                                            |
|             |     "ref": "core.local",                                     |
|             |     "parameters": {                                          |
|             |         "cmd": "echo "{{trigger.user.name}}:                 |
|             | {{trigger.text}}" >> ~/slack.log ; sync"                     |
|             |     }                                                        |
|             | }                                                            |
| criteria    |                                                              |
| enabled     | True                                                         |
| ref         | test.r_slack                                                 |
| tags        |                                                              |
| trigger     | {                                                            |
|             |     "type": "slack.message",                                 |
|             |     "ref": "slack.message",                                  |
|             |     "parameters": {}                                         |
|             | }                                                            |
| type        | {                                                            |
|             |     "ref": "standard",                                       |
|             |     "parameters": {}                                         |
|             | }                                                            |
| uid         | rule:test:r_slack                                            |
+-------------+--------------------------------------------------------------+

念の為、ルールのリストを確認します。

[ec2-user@ip-172-31-4-147 ~]$ st2 rule list -p test
+--------------+------+---------------------+---------+
| ref          | pack | description         | enabled |
+--------------+------+---------------------+---------+
| test.r_slack | test | test rule for slack | True    |
+--------------+------+---------------------+---------+

無事に登録されたようです。


■ おためし

それではいよいよ試してみます。

Slack の general チャンネルに Hello, Slack! と投稿すると、/home/stanley/slack.log

yokochi: Hello, Slack!

と書き込まれました。

デモ動画 f:id:akira6592:20180603133910g:plain

試した限り、今回利用したトークンでは、いずれかのユーザーが general に投稿したイベントを取得することができるようです。他のチャンネルではイベントを取得することができませんでした。


■ まとめ

簡単な例ですが、Slack Pack の Trigger を利用して、Slack に投稿があったら何かする、というルールの動作の確認ができました。 chatops Pack でも色々できそうなので調べてみたいと思います。

はじめて StackStorm の Action を作ってみた

■ はじめに

2018/05/29 に開催された、Tech Night @ Shiodome # 8の中で「明日からできる、st2のActionの作り方」という発表がありました。 まだActionは作ったことがなかったのですが、これを聞いて簡単なものを作ってみようと思ってやってみました。

speakerdeck.com


■ つくるもの

何でもよかったのですが、GoogleDNS-over-HTTPSを利用して、パラメータ name で与えられた名前のAレコードをリストで返すActionを作ることにしました。


■ コードの準備

まずは、Actionの肝になるコードの準備です。 Packの作成方法がまだ理解不足だったため、default配下にしました。また、環境構築を単純化するため、 requests など別途インストールが必要なものは使わないようにしておきました。名前解決失敗時は空のリストを返すようにしました。

パス:/opt/stackstorm/packs/default/actions/dnsquery.py

from st2common.runners.base_action import Action
import json
import urllib2

class DnsQueryAction(Action):
    def run(self, name):

        url = "https://dns.google.com/resolve?name=" + name

        req = urllib2.Request(url)
        res = urllib2.urlopen(req)
        res_json  = json.loads(res.read())

        if "Answer" in res_json:
            # successed
            records = [v["data"] for v in res_json["Answer"]]
            return (True, records)
        else:
            # failed
            return (False, [])


■ metadataファイルの準備

続いて、Actionがどういうパラメータを持つかなどの情報を定義する、metadataファイルの準備です。YAML形式です。

パス:/opt/stackstorm/packs/default/actions/dnsquery.yml

---
name: "dnsquery"
runner_type: "python-script"
entry_point: "dnsquery.py"
description: "resolve dns query"
enabled: true
parameters:
    name:
        type: "string"
        description: "dns query name for type A"
        required: true


■ Actionの作成

各ファイルを作っただけでは StackStorm はまだ認識しません。st2 action create コマンドで metadata ファイルを元に Action を作成します。

[ec2-user@ip-172-31-4-147 actions]$ st2 action create /opt/stackstorm/packs/default/actions/dnsquery.yml
+-------------+----------------------------------------------------+
| Property    | Value                                              |
+-------------+----------------------------------------------------+
| id          | 5b10a7a96fb12304de15a1d2                           |
| name        | dnsquery                                           |
| pack        | default                                            |
| description | resolve dns query                                  |
| enabled     | True                                               |
| entry_point | dnsquery.py                                        |
| notify      |                                                    |
| parameters  | {                                                  |
|             |     "name": {                                      |
|             |         "required": true,                          |
|             |         "type": "string",                          |
|             |         "description": "dns query name for type A" |
|             |     }                                              |
|             | }                                                  |
| ref         | default.dnsquery                                   |
| runner_type | python-script                                      |
| tags        |                                                    |
| uid         | action:default:dnsquery                            |
+-------------+----------------------------------------------------+

作成できたようなので、 st2 action list のリストで確認します。

[ec2-user@ip-172-31-4-147 actions]$ st2 action list --pack=default
+---------------------+---------+-----------------------------------+
| ref                 | pack    | description                       |
+---------------------+---------+-----------------------------------+
| default.dnsquery    | default | resolve dns query                 |
+---------------------+---------+-----------------------------------+

認識されているようです。


■ 実行

はじめての実行(失敗・・)

それでは、st2 run による単発の実行で試してみます。

[ec2-user@ip-172-31-4-147 actions]$ st2 run default.dnsquery name=www.stackstorm.com
.
id: 5b10a8036fb12304de15a1d4
status: failed
parameters:
  name: www.stackstorm.com
result:
  error: '
    The virtual environment (/opt/stackstorm/virtualenvs/default) for pack "default" does not exist. Normally this is
    created when you install a pack using "st2 pack install". If you installed your pack by some other
    means, you can create a new virtual environment using the command:
    "st2 run packs.setup_virtualenv packs=default"
    '
  traceback: "  File "/opt/stackstorm/st2/lib/python2.7/site-packages/st2actions/container/base.py", line 119, in _do_run
    (status, result, context) = runner.run(action_params)
  File "/opt/stackstorm/runners/python_runner/python_runner/python_runner.py", line 143, in run
    raise Exception(msg)
"

おっと・・・、default pack向けの virtualenv が無いためエラーになってしまいました。

エラーメッセージに親切に書かれているコマンドで virtualenv を用意します。

[ec2-user@ip-172-31-4-147 actions]$ st2 run packs.setup_virtualenv packs=default
..
id: 5b10a8cf6fb12304de15a1d7
status: succeeded
parameters:
  packs:
  - default
result:
  exit_code: 0
  result: 'Successfuly set up virtualenv for the following packs: default'
  stderr: 'st2.actions.python.SetupVirtualEnvironmentAction: DEBUG    Setting up virtualenv for pack "default" (/opt/stackstorm/packs/default)
    st2.actions.python.SetupVirtualEnvironmentAction: INFO     Virtualenv path "/opt/stackstorm/virtualenvs/default" doesn''t exist
    st2.actions.python.SetupVirtualEnvironmentAction: DEBUG    Creating virtualenv for pack "default" in "/opt/stackstorm/virtualenvs/default"
    st2.actions.python.SetupVirtualEnvironmentAction: DEBUG    Creating virtualenv in "/opt/stackstorm/virtualenvs/default" using Python binary "/opt/stackstorm/st2/bin/python"
    st2.actions.python.SetupVirtualEnvironmentAction: DEBUG    Running command "/opt/stackstorm/st2/bin/virtualenv -p /opt/stackstorm/st2/bin/python --no-download /opt/stackstorm/virtualenvs/default" to create virtualenv.
    st2.actions.python.SetupVirtualEnvironmentAction: DEBUG    Installing base requirements
    st2.actions.python.SetupVirtualEnvironmentAction: DEBUG    Installing requirement six>=1.9.0,<2.0 with command /opt/stackstorm/virtualenvs/default/bin/pip install six>=1.9.0,<2.0.
    st2.actions.python.SetupVirtualEnvironmentAction: DEBUG    No pack specific requirements found
    st2.actions.python.SetupVirtualEnvironmentAction: DEBUG    Virtualenv for pack "default" successfully created in "/opt/stackstorm/virtualenvs/default"
    '
  stdout: ''

無事に /opt/stackstorm/virtualenvs/default として virtualenvが作成されたようです。

もう一度実行(名前解決成功)

気を取り直してもう一度 Action を実行します。

[ec2-user@ip-172-31-4-147 actions]$ st2 run default.dnsquery name=www.stackstorm.com
.
id: 5b10b23e6fb12304de15a1f0
status: succeeded
parameters:
  name: www.stackstorm.com
result:
  exit_code: 0
  result:
  - 104.28.16.123
  - 104.28.17.123
  stderr: ''
  stdout: ''

無事、status: succeeded となり、2つのIPアドレスが返ってきました。

もう一度実行(名前解決失敗)

今度は、名前解決ができないパターンで試します。

[ec2-user@ip-172-31-4-147 actions]$ st2 run default.dnsquery name=hogehogehoge.stackstorm.com
.
id: 5b10b3016fb12304de15a1f3
status: failed
parameters:
  name: hogehogehoge.stackstorm.com
result:
  exit_code: 0
  result: []
  stderr: ''
  stdout: ''

無事、status: failed となり、空のリストが返ってきました。


■ まとめ

非常に簡単な例ではありますが、初めてPythonによる Action を作成して動作を確認してみました。今のところは、そこまで覚えることも多くない印象です。 基本的には既存の Action を中心に使っていきますが、それでは実現できないものについては、カスタムのActionを作って見たいと思います。

参考資料

https://docs.stackstorm.com/actions.html#writing-custom-python-actions

StackStorm 経由で Slack に投稿する(準備 ~ st2 run編)

■ はじめに

StackStorm には Slack と連携するための Pack が用意されています。 この記事では、環境の準備と、簡単な動作確認としてSlackへの手動投稿を試します。


■ 環境の準備

StackStorm 本体のインストール

今回は 以下の方法でインストールします。 tekunabe.hatenablog.jp 2.7.2 というバージョンがインストールされました。

Slack Pack のインストール

まず st2 login コマンドでログインします。

[ec2-user@ip-172-31-4-147 ~]$ st2 login testu
Password:
Logged in as testu

Note: You didn't use --write-password option so the password hasn't been stored in the client config and you will need to login again in 24 hours when the auth token expires.
As an alternative, you can run st2 login command with the "--write-password" flag, but keep it mind this will cause it to store the password in plain-text in the client config file (~/.st2/config).

続いて st2 pack install slack コマンドで Slack Pack をインストールします。

[ec2-user@ip-172-31-4-147 ~]$ st2 pack install slack

For the "slack" pack, the following content will be registered:

rules     |  0
sensors   |  1
triggers  |  0
actions   |  113
aliases   |  0

Installation may take a while for packs with many items.

        [ succeeded ] download pack
        [ succeeded ] make a prerun
        [ succeeded ] install pack dependencies
        [ succeeded ] register pack

+-------------+------------------------------------------------+
| Property    | Value                                          |
+-------------+------------------------------------------------+
| name        | slack                                          |
| description | st2 content pack containing slack integrations |
| version     | 0.10.0                                         |
| author      | StackStorm, Inc.                               |
+-------------+------------------------------------------------+

Slack Pack の内容確認

Slack Pack がインストールされたことを確認します。

[ec2-user@ip-172-31-4-147 ~]$ st2 pack show slack
+-------------+---------------------------------------------------------+
| Property    | Value                                                   |
+-------------+---------------------------------------------------------+
| name        | slack                                                   |
| description | st2 content pack containing slack integrations          |
| author      | StackStorm, Inc.                                        |
| content     | {                                                       |
|             |     "sensors": {                                        |
|             |         "count": 1,                                     |
|             |         "resources": [                                  |
|             |             "SlackSensor"                               |
|             |         ]                                               |
|             |     },                                                  |
|             |     "actions": {                                        |
|             |         "count": 113,                                   |
|             |         "resources": [                                  |
|             |             "dnd.endSnooze",                            |
(略)
|             |             "post_message",                             |
|             |             "dnd.info",                                 |
|             |             "team.billableInfo",                        |
|             |             "channels.replies",                         |
|             |             "groups.setPurpose",                        |
|             |             "channels.list",                            |
|             |             "groups.rename",                            |
|             |             "im.replies",                               |
|             |             "im.list",                                  |
(略)
|             |             "stars.add"                                 |
|             |         ]                                               |
|             |     }                                                   |
|             | }                                                       |
| email       | info@stackstorm.com                                     |
| keywords    | [                                                       |
|             |     "slack",                                            |
|             |     "chat",                                             |
|             |     "messaging",                                        |
|             |     "instant messaging"                                 |
|             | ]                                                       |
| ref         | slack                                                   |
| repo_url    | https://github.com/StackStorm-Exchange/stackstorm-slack |
| version     | 0.10.0                                                  |
+-------------+---------------------------------------------------------+

多くのActionがあるようです。

メッセージを投稿するには、 slack.post_message という Action を利用すればよさそうなので、slack.post_message のヘルプを参照します。

[ec2-user@ip-172-31-4-147 ~]$ st2 action get slack.post_message
+-------------+--------------------------------------------------------------+
| Property    | Value                                                        |
+-------------+--------------------------------------------------------------+
| id          | 5b0b5b446fb12304dc0e0199                                     |
| uid         | action:slack:post_message                                    |
| ref         | slack.post_message                                           |
| pack        | slack                                                        |
| name        | post_message                                                 |
| description | Post a message to the Slack channel.                         |
| enabled     | True                                                         |
| entry_point | post_message.py                                              |
| runner_type | python-script                                                |
| parameters  | {                                                            |
|             |     "username": {                                            |
|             |         "required": false,                                   |
|             |         "type": "string",                                    |
|             |         "description": "Bot username."                       |
|             |     },                                                       |
|             |     "disable_formatting": {                                  |
|             |         "default": false,                                    |
|             |         "required": false,                                   |
|             |         "type": "boolean",                                   |
|             |         "description": "Disable formatting, don't parse the  |
|             | message and treat it as raw text"                            |
|             |     },                                                       |
|             |     "icon_emoji": {                                          |
|             |         "required": false,                                   |
|             |         "type": "string",                                    |
|             |         "description": "Bot icon"                            |
|             |     },                                                       |
|             |     "webhook_url": {                                         |
|             |         "required": false,                                   |
|             |         "type": "string",                                    |
|             |         "description": "Optional Webhook url"                |
|             |     },                                                       |
|             |     "message": {                                             |
|             |         "required": true,                                    |
|             |         "type": "string",                                    |
|             |         "description": "Message to send."                    |
|             |     },                                                       |
|             |     "channel": {                                             |
|             |         "required": false,                                   |
|             |         "type": "string",                                    |
|             |         "description": "Optional channel to post to. Note    |
|             | channel must contain leading #"                              |
|             |     }                                                        |
|             | }                                                            |
| notify      |                                                              |
| tags        |                                                              |
+-------------+--------------------------------------------------------------+

Slack Pack の 設定

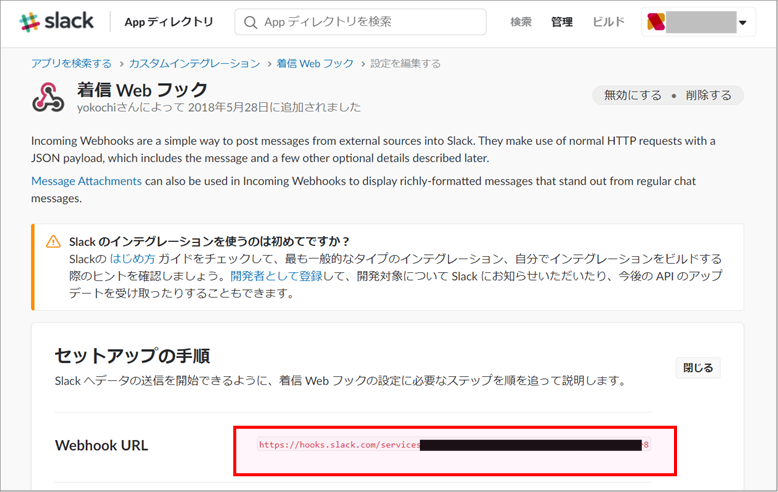
予め 投稿したい先の Slack の着信WebフックのURLを控えておきます。 f:id:akira6592:20180528183246p:plain

続いて、 st2 pack config slack コマンドで Slack Pack の設定を行います。 いくつか対話形式で設定項目が聞かれます。

今回は以下の値にして、他はデフォルトのままにしました。

設定項目 備考
post_message_action.username akira6592 任意の名前
post_message_action.webhook_url (先ほど控えた着信WebフックのURL)
post_message_action.icon_emoji :smiley: 投稿時のアイコン。省略時は :panda:
admin.organization admin 任意の名前

途中、以下のように聞かれますのでエンターを押します。

Do you want to preview the config in an editor before saving? [y]:

設定内容がテキストとしてエディタで開かれるので、確認後エディタを終了します。

最後に

Do you want me to save it? [y]: 

と聞かれるのでエンターを押します。

設定が完了すると以下のように、設定内容が出力されます。

+----------+--------------------------------------------------------------+
| Property | Value                                                        |
+----------+--------------------------------------------------------------+
| id       | 5b0b5b466fb12304dc0e01c3                                     |
| pack     | slack                                                        |
| values   | {                                                            |
|          |     "action_token": "********",                              |
|          |     "admin": {                                               |
|          |         "organization": "admin",                             |
|          |         "attempts": 1,                                       |
|          |         "admin_token": "",                                   |
|          |         "auto_join_channels": null,                          |
|          |         "set_active": true                                   |
|          |     },                                                       |
|          |     "sensor": {                                              |
|          |         "strip_formatting": false,                           |
|          |         "token": ""                                          |
|          |     },                                                       |
|          |     "post_message_action": {                                 |
|          |         "username": "akira6592",                             |
|          |         "webhook_url": "https://hooks.slack.com/services/xxx |
|          | xxxxxxxxxxxxxxxxxxxxxxxxxxxxxxxxxxxxxxxxx",                  |
|          |         "icon_emoji": ":smiley:",                            |
|          |         "channel": null                                      |
|          |     }                                                        |
|          | }                                                            |
+----------+--------------------------------------------------------------+

設定内容は /opt/stackstorm/configs/slack.yaml に保存されています。

[ec2-user@ip-172-31-4-147 ~]$ cat /opt/stackstorm/configs/slack.yaml
action_token: null
admin:
  admin_token: ''
  attempts: 1
  auto_join_channels: null
  organization: admin
  set_active: true
post_message_action:
  channel: null
  icon_emoji: ':smiley:'
  username: akira6592
  webhook_url: https://hooks.slack.com/services/xxxxxxxxxxxxxxxxxxxxxxxxxxxxxxxxxxxxxxxxxxxx
sensor:
  strip_formatting: false
  token: ''


■ StackStorm から Slack への投稿

それでは実際に StackStorm から Slack へ投稿してみます。 手動での投稿は st2 run slack.post_message コマンドを利用し、 message オプションで投稿したいテキストを指定します。

[ec2-user@ip-172-31-4-147 ~]$ st2 run slack.post_message message="Hello, St2! :tada:"
.
id: 5b0bca1b6fb12304dc0e01d4
status: succeeded
parameters:
  message: 'Hello, St2! :tada:'
result:
  exit_code: 0
  result: true
  stderr: 'st2.actions.python.PostMessageAction: INFO     Message successfully posted
    '
  stdout: ''

無事、以下のようにSlackに投稿されました。 f:id:akira6592:20180528183318p:plain


■ まとめ

StackStorm と Slack を連携するための準備と、手動でSlackに投稿するところまで確認できました。 Notification先として便利そうです。 また、 slack.SlackSensor というセンサーも含まれているようなので、今度こちらも試してみたいと思います。

StackStorm の Ansible Pack で利用するPythonパッケージの追加インストール方法

はじめに

StackStorm の Ansible Pack を利用して Junos のルーターに接続しようとしたところ、 ncclient is not installed というエラーになってしまいました。

このエラー自身はAnsible 単体で利用した時にも見かけたことがあったので対処方法を知っていました。

しかし、Ansible Pack の実行環境は virtualenv で隔離されおり、パッケージのインストール方法に少しだけコツがあったので、対処した方法をご紹介します。

結論としては、以下のコマンドを利用しました。

sudo /opt/stackstorm/virtualenvs/ansible/bin/pip install ncclient jxmlease


■ やりたかったこと

以下のような Playbook で Junos のバージョン情報を表示させる処理を試そうとしました。

- hosts: junos
  gather_facts: no
  connection: netconf

  tasks:
    - name: show
      junos_command:
        commands:
          - show version
      register: result

    - name: debug
      debug:
        msg: "{{ result.stdio_lines[0] }}"

  vars:
    ansible_network_os: junos
    ansible_user: testuser
    ansible_ssh_pass: testpass

■ 遭遇したエラー

ところが、以下のようなエラーになりました。

[ec2-user@ip-172-31-4-147 ~]$ st2 run ansible.playbook playbook=/home/ec2-user/junos_show.yml inventory_file=/home/ec2-user/inventory
.
id: 5b0011b76fb12304eceb1b8b
status: failed
parameters:
  cwd: /opt/stackstorm/packs/ansible
  inventory_file: /home/ec2-user/inventory
  playbook: /home/ec2-user/junos_show.yml
result:
  failed: true
  return_code: 2
  stderr: Executed command "/opt/stackstorm/virtualenvs/ansible/bin/ansible-playbook --inventory-file=/home/ec2-user/inventory /home/ec2-user/junos_show.yml"
  stdout: "
PLAY [junos] *******************************************************************

TASK [show] ********************************************************************
fatal: [10.1.1.110]: FAILED! => {"msg": "ncclient is not installed"}
    to retry, use: --limit @/home/ec2-user/junos_show.retry

PLAY RECAP *********************************************************************
10.1.1.110               : ok=0    changed=0    unreachable=0    failed=1
"
  succeeded: false

ncclient というPythonパッケージが不足しているようです。


■ 対処

必要パッケージのインストール

Playbook 内で利用した、junos_commandモジュールのドキュメントを参照すると、ncclientjxmlease が必要とのことなのでこの2つをインストールすることにしました。

[ec2-user@ip-172-31-4-147 ~]$ sudo /opt/stackstorm/virtualenvs/ansible/bin/pip install ncclient jxmlease
(略)
Successfully installed jxmlease-1.0.1 ncclient-0.5.3

Ansible Pack を st2 pack install ansible でインストールした時に自動的に入った他のパッケージと site-packages 配下の権限を比較すると、以下のように異なります。

[ec2-user@ip-172-31-4-147 ~]$ ls -ls  /opt/stackstorm/virtualenvs/ansible/lib/python2.7/site-packages/
(略)
  4 drwxrwxr-x. 17 root st2packs   4096  5月 19 04:43 ansible
  0 drwxrwxr-x.  2 root st2packs    131  5月 19 04:43 ansible-2.5.3.dist-info
(略)
  0 drwxr-xr-x.  5 root root        243  5月 19 12:11 ncclient
  0 drwxr-xr-x.  2 root root        147  5月 19 12:11 ncclient-0.5.3.dist-info
(略)
  4 drwxrwxr-x.  2 root st2packs   4096  5月 19 04:43 paramiko
  0 drwxrwxr-x.  2 root st2packs    150  5月 19 04:43 paramiko-2.4.1.dist-info

補足

以下の方法でパッケージをインストールしても、Ansible Pack から ncclient は利用できませんでした。

# グローバル環境にインストールされ、Ansible Pack から利用できない
[ec2-user@ip-172-31-4-147 ~]$ pip install ncclient jxmlease
# 権限エラー
[ec2-user@ip-172-31-4-147 ~]$ source /opt/stackstorm/virtualenvs/ansible/bin/activate
(ansible) [ec2-user@ip-172-31-4-147 ~]$ pip install ncclient jxmlease
(略)
OSError: [Errno 13] 許可がありません: '/opt/stackstorm/virtualenvs/ansible/lib/python2.7/site-packages/ncclient'
# これもグローバル環境にインストールされてしまう
[ec2-user@ip-172-31-4-147 ~]$ source /opt/stackstorm/virtualenvs/ansible/bin/activate
(ansible) [ec2-user@ip-172-31-4-147 ~]$ sudo pip install ncclient jxmlease


■ 再実行

必要なパッケージをインストールしたので再実行します。

[ec2-user@ip-172-31-4-147 ~]$ st2 run ansible.playbook playbook=/home/ec2-user/junos_show.yml inventory_file=/home/ec2-user/inventory
........
id: 5b0014ee6fb12304eceb1b94
status: succeeded
parameters:
  cwd: /opt/stackstorm/packs/ansible
  inventory_file: /home/ec2-user/inventory
  playbook: /home/ec2-user/junos_show.yml
result:
  failed: false
  return_code: 0
  stderr: ''
  stdout: "
PLAY [junos] *******************************************************************

TASK [show] ********************************************************************
ok: [10.1.1.110]

TASK [debug] *******************************************************************
ok: [10.1.1.110] => {
    "msg": [
        "Hostname: ip-172-31-43-152",
        "Model: vmx",
        "Junos: 17.4R1-S2.2",
        "JUNOS OS Kernel 64-bit  [20180127.fdc8dfc_builder_stable_11]",
        "JUNOS OS libs [20180127.fdc8dfc_builder_stable_11]",
        "JUNOS OS runtime [20180127.fdc8dfc_builder_stable_11]",
(略)
    ]
}

PLAY RECAP *********************************************************************
10.1.1.110               : ok=2    changed=0    unreachable=0    failed=0
"
  succeeded: true

正常に実行でき、無事にJunosのバージョン情報が取得できました。


■ まとめ

StackStorm は Python で書かれているため、 virtualenv などのPythonの環境について意識する必要があると感じました。

公式ドキュメントに、この手の順が見つからなかったのですが、もしご存じの方がいらっしゃいましたら、コメントまたは twitter: @akira6592 へお知らせいただけるとうれしいです。