てくなべ (tekunabe)

ansible / network automation / 学習メモ

[Ansible] 「つまずき Ansible 【Part20】VSCodeでいい感じにansible-lintしたい」ふりかえり

はじめに

2020/10/24 に、YouTube Live で「つまずき Ansible 【Part20】VSCodeでいい感じにansible-lintしたい」という配信をしました。

実際に作業しながら(ときには)エラーと戦って進めるシリーズです。

tekunabe.connpass.com

今回は、今回は、Playook の書きっぷりをチェックするツールである ansible-lint を Visual Studio Code からいい感じに呼び出す方法をました。

最終イメージ(ansible-lintとyamllint同時実行)

やったことをふりかえります。

  • 環境
    • ansible 2.9.14
    • ansible-lint 4.3.5

2023/08/02 追記

現在では VS CodeAnsible 拡張 の標準で類似のことができるため、本記事のような設定は不要です。

動画

www.youtube.com


■ やったこと

ansible-lint のインストール

ansible-lint は、Playbook の書き方がルールに沿っているかチェックするツールです。

https://ansible-lint.readthedocs.io/en/latest/index.html

デフォルトのルールとして、たとえば、行の末尾に余計なスペースがないか、タスクに name がついているかなどがあります。 デフォルトのルールは以下のページに記載されています。

index - Ansible Lint Documentation

インストールは pip でできます。

pip install ansible-lint

ansible-lint をコマンドで手動実行

まずは、以下のような Playbook を対象にします。(おそらく配信時と微妙にことなります)

- hosts: all
  gather_facts: no
  
  vars:
    msg: greeting

  tasks:
    - debug:
        msg: "{{msg}}"

    - name: Create a directory if it does not exist
      file:
        path: /etc/some_directory
        state: directory
        mode: 755

    - name: Send summary mail
      local_action:
        module: debug
        msg: hello

ansible-lint ファイル名 でチェックします。

(a2914) [root@centos7 stumble2]# ansible-lint test01.yml 
[201] Trailing whitespace
test01.yml:3
  

[206] Variables should have spaces before and after: {{ var_name }}
test01.yml:9
        msg: "{{msg}}"

[202] Octal file permissions must contain leading zero or be a string
test01.yml:11
Task/Handler: Create a directory if it does not exist

[504] Do not use 'local_action', use 'delegate_to: localhost'
test01.yml:18
      local_action:

...(略)...

いくつかのメッセージが表示されました。

VS Code のタスクに登録

コマンドで実行するのは少々面倒に思い、VS Code の「タスク」に登録することにします。

さらに、lint結果を problem matcher で解析して、VS Code の問題として認識させるようにします。

問題として認識することで、エディター画面で問題箇所を示してくれたり、「問題」を一覧表示してくれたりします。

.vscode/tasks.json に、以下のように定義します。

  • .vscode/tasks.json
{
  // See https://go.microsoft.com/fwlink/?LinkId=733558
  // for the documentation about the tasks.json format
  "version": "2.0.0",
  "tasks": [
    {
      "label": "ansible-lint current file",
      "type": "shell",
      "command": "/root/envs/a2914/bin/ansible-lint",  // 環境に応じて変える
      "args": [
        "${file}",
        "-p"
      ],
      "detail": "現在開いているファイルを ansible-lint する",
      "presentation": {
        "reveal": "never",
      },
      "problemMatcher": {
        "owner": "ansible-lint",
        "fileLocation": "autoDetect",
        "pattern":[
            {
                // sample
                // 01_show.yml:10: [E201] Trailing whitespace
                "regexp": "^(.+):(\\d+): (.+)$",
                "file": 1,
                "line": 2,
                "message": 3,
            }
          ],
      },
    }
  ]
}

これで、タスク ansible-lint current file を実行すると、今開いているファイルにたいして ansible-lint ファイル名 -p を実行し、問題を表示してくれます。

-p を付けたのは、problem matcher の正規表現で拾いやすくするためです。

タスクの定義方法の詳細は、VS Code の公式ドキュメントを参照してください。

エディタで対象の Playbook を開いている状態で、コマンドパレット(mac: Command + Shift + P / win: Ctrl + Shift + P )から、「タスク: タスクの実行」を選択します。

コマンドパレットからタスクの実行を選択

タスクの一覧の中から、先程 tasks.json に定義した ansible-lint current file を選択します。

タスク ansible-lint current file を選択

すると、開いていた Playbook に対して ansible-lint が実行され、問題の箇所に波線が引かれたり、問題の一覧が表示されたります。

ansible-lint 結果がエディタ内や問題一覧に表示される

ファイル保存時に自動 ansible-lint

ここまでで、タスク経由で ansible-lint を実行して問題として扱えるようになりました。

しかしまだ、都度タスクを実行するが手間と感じため、ファイル保存時に ansible-lint ができるようにしようと考えました。 (本当はリアルタイムにやりたい)。

ファイル保存をトリガーにしてタスクを実行する機能は標準にはないようなので、「Trigger Task on Save」という拡張を利用しました。

インストールした上で、.vscode/settings.jsontasks.jsonではなく)に、以下の設定を追加します。

  • .vscode/settings.json
{
    // 既存設定は省略

    "triggerTaskOnSave.on": true,
    "triggerTaskOnSave.tasks": {
        "ansible-lint current file": [
            "*.yml",
            "*.yaml"
        ]
    }
}

これで、*.yml*.yaml のファイルを保存するときに、さきほどのタスク ansible-lint current file を実行するようになります。

さらに yamllint も同時に自動実行

ansible-lint と似た linter に yamllint があります。(pip install yamllint でインストール)

ansible-lintyamllint のルールをカバーしているわけではないので、両者を組み合わせて利用されているかたも多いのではないでしょうか。

同じような設定することで、yamllint も同時に自動実行できるようになります。

両方実行する、tasks.jsonsettings.json はそれぞれ以下の通りです。

  • .vscode/tasks.json
{
  // See https://go.microsoft.com/fwlink/?LinkId=733558
  // for the documentation about the tasks.json format
  "version": "2.0.0",
  "tasks": [
    // {
    //   "label": "echo",
    //   "type": "shell",
    //   "command": "echo Hello"
    // },
    {
      "label": "ansible-lint current file",
      "type": "shell",
      "command": "/root/envs/a2914/bin/ansible-lint",
      "args": [
        "${file}",
        "-p"
      ],
      "detail": "現在開いているファイルを ansible-lint する",
      "presentation": {
        "reveal": "never",
      },
      "problemMatcher": {
        "owner": "ansible-lint",
        "fileLocation": "autoDetect",
        "pattern":[
            {
                // sample
                // 01_show.yml:10: [E201] Trailing whitespace
                "regexp": "^(.+):(\\d+): (.+)$",
                "file": 1,
                "line": 2,
                "message": 3,
            }
          ],
      },
    },
    {
      "label": "yamllint current file",
      "type": "shell",
      "command": "/root/envs/a2914/bin/yamllint",
      "args": [
        "-f",
        "parsable",
        "${file}",
      ],
      "detail": "現在開いているファイルを yamllint する",
      "presentation": {
        "reveal": "never",
      },
      // "isBackground": true,
      "problemMatcher": {
        "owner": "yamlllint",
        "fileLocation": "autoDetect",
        "pattern":[
            {
                // sample
                /// /home/sakana/01_show.yml:8:1: [error] too many blank lines (8 > 0) (empty-lines)
                "regexp": "^(.+):(\\d+):(\\d+): \\[(.+?)\\] (.+)$",
                "file": 1,
                "line": 2,
                "column": 3,
                "severity": 4,
                "message": 5,
            }
          ],
      },
    },
  ]
}
  • .vscode/settings.json
{
    // 既存設定は省略

    "triggerTaskOnSave.on": true,
    "triggerTaskOnSave.tasks": {
        "ansible-lint current file": [
            "*.yml",
            "*.yaml"
        ],
        "yamllint current file": [
            "*.yml",
            "*.yaml"
        ],
    }
}

これで、ファイル保存時に ansible-lintyamllint が実行されます。

ansible-lintとyamllint同時実行

ansible-lint では引っかからなかった、 真偽値は falsetrue で指定してね、というメッセージが表示されるようになったことが分かります。


さらに(妄想レベル)

さらに、ansible-playook コマンドの --syntax-check オプションの結果も扱えるようにできたらいいなと思っています。

また、ファイル保存時ではなく、もっと早くリアルタイムに「問題」として検出できる方法があれば知りたいです。


Part21 にむけて

以下のネタを検討中です。気が向いたものをやります。

  • Ansible 2.10 関連ほかにも
  • connection: local ななにか
  • Ansible Toewr / AWX をコマンドがら操作する
  • ansible.cfg
  • Jinja2、フィルター
  • Windows
  • ESXi で VM作成
  • parsee_cli モジュール(Part15 の続き)

[Ansible] Best Practice に記載されていた Directory Layout は Sample Ansible setup へ移動した

Ansible 2.10 のリリースに合わせて、公式ドキュメントの一部で、ページ構成ごと変わるような変更がありました。

代表的なのは「Best Practice」というページです(2.9 版ドキュメントはこちら)、このページには Directory Layoutや、Alternative Directory Layoutが掲載されていたため、「ベストプラクティのディレクトリ構成」と呼ばれる傾向があったように思います。

Ansible 2.10 のドキュメントでは、Best Practice のページのタイトルは Tips and tricks に変更されました。

docs.ansible.com

また、各 Directory Layout は Sample Ansible setupという新規ページに移動しました。

docs.ansible.com

探している方もいらっしゃったようなので、まとめておきます。

[Ansible] Ansible Tower / AWX の API で情報取得する汎用 lookup plugin の tower_api

はじめに

Ansible には、Ansible Tower や AWX の情報を取得したり、設定を行うモジュールが多数あります。

docs.ansible.com

バージョンを追うごとに増えていて、対応範囲が広がっていますが、それでもまだのものもあります。

そんなときに便利そうなのが、tower_api lookup plugin です。CHANGELOG には見当たりませんでしたが、awx.awx collection 14.0 で追加されたようです。

おそらくGETのみとなりますが、モジュールがなくてもAPI のエンドポイントやフィルターを直接指定して、情報を取得できます。

モジュールがない場合の代替手段は、uri モジュール あたりになりますが、それよりは楽に URL を組み立てられたりするかと思います。

この記事では簡単なサンプルで説明します。

  • 動作確認環境
    • Ansible 2.9.14
    • AWX 15.0

サンプル Playbook

ここでは、ワークフロージョブの結果を取得して画面に表示する Playbook を作成します。

ジョブであれば、tower_job_list モジュール が利用できますが、ワークフロージョブに対応するモジュールは現状ないようです。

そのため、awx.awx.tower_api lookup plugin を利用します。

---
- hosts: awx01
  gather_facts: false
  connection: local

  tasks:
    - name:
      debug:
        msg: "{{ res }}"
      vars:
        res: "{{ query('awx.awx.tower_api', 'workflow_jobs', query_params={'id': 38}, 
                  host='http://10.0.0.90',username='admin', password='password') }}"

queryawx.awx.tower_api を指定します。

次の引数で、対象の API エンドポイントを指定します。 予め、実機の http://tower/api/v2/ や、API リファレンスなどで調べておきます。

ワークフロージョブの実行結果(テンプレートではなく)の場合は、workflow_jobs です。

query_params には、フィルターを指定します。なくても構いません。ここでは、 id38 のものと指定しています。利用できるフィルターは、API リファレンスなどを参照してください。

他は、接続や認証情報です。サンプルのためベタ書きしています。後述の環境変数で指定する方法がうまくいけば指定不要になるでしょう。

すべてのオプショの説明は awx.awx.tower_api lookup plugin のページを参照してください。

接続・認証情報についての補足

なお、awx.awx.tower_api lookup plugin のページには TOWER_HOST などの環境変数でも指定できると記載がありますが、私が以下のように試したところ反映されずに、デフォルト設定で接続(localhostへ)しようとしていました。lookup plugin ではなく、他の tower_* モジュールではこの方法でうなくいったのですが。

---
- hosts: awx01
  gather_facts: false
  connection: local
  environment:   # うまくいかなかった指定例
    TOWER_USERNAME: admin
    TOWER_PASSWORD: password
    TOWER_HOST: http://10.0.0.90

  tasks:
    # ...(略)... awx.awx.tower_api 利用タスク

実行

Playbook を実行します。

$ANSIBLE_KEEP_REMOTE_FILES=1 ansible-playbook -i inventory.ini job.yml     

PLAY [all] ************************************************************************************************************

TASK [debug] **********************************************************************************************************
ok: [lolcahost] => {
    "msg": [
        {
            "allow_simultaneous": false,
            "canceled_on": null,
            "created": "2020-10-18T16:17:54.013277Z",
            "description": "",
            "elapsed": 8.067,
            "extra_vars": "{\"wf_extra\": \"val1\", \"wf_extra_list\": [111, 222, 333], \"wr_survey_var1\": \"ttttttttt\"}",
            "failed": false,
            "finished": "2020-10-18T16:18:02.282742Z",
            "id": 38,
            "inventory": null,
            "is_sliced_job": false,
            "job_explanation": "",
            "job_template": null,
            "launch_type": "manual",
            "limit": null,
            "modified": "2020-10-18T16:17:54.218539Z",
            "name": "wf_test",
            "related": {
                "activity_stream": "/api/v2/workflow_jobs/38/activity_stream/",
                "cancel": "/api/v2/workflow_jobs/38/cancel/",
                "created_by": "/api/v2/users/1/",
                "labels": "/api/v2/workflow_jobs/38/labels/",
                "modified_by": "/api/v2/users/1/",
                "notifications": "/api/v2/workflow_jobs/38/notifications/",
                "relaunch": "/api/v2/workflow_jobs/38/relaunch/",
                "unified_job_template": "/api/v2/workflow_job_templates/8/",
                "workflow_job_template": "/api/v2/workflow_job_templates/8/",
                "workflow_nodes": "/api/v2/workflow_jobs/38/workflow_nodes/"
            },
            "scm_branch": null,
            "started": "2020-10-18T16:17:54.215745Z",
            "status": "successful",
            "summary_fields": {
                "created_by": {
                    "first_name": "",
                    "id": 1,
                    "last_name": "",
                    "username": "admin"
                },
                "labels": {
                    "count": 0,
                    "results": []
                },
                "modified_by": {
                    "first_name": "",
                    "id": 1,
                    "last_name": "",
                    "username": "admin"
                },
                "unified_job_template": {
                    "description": "",
                    "id": 8,
                    "name": "wf_test",
                    "unified_job_type": "workflow_job"
                },
                "user_capabilities": {
                    "delete": true,
                    "start": true
                },
                "workflow_job_template": {
                    "description": "",
                    "id": 8,
                    "name": "wf_test"
                }
            },
            "type": "workflow_job",
            "unified_job_template": 8,
            "url": "/api/v2/workflow_jobs/38/",
            "webhook_credential": null,
            "webhook_guid": "",
            "webhook_service": "",
            "workflow_job_template": 8
        }
    ]
}

PLAY RECAP ************************************************************************************************************
lolcahost                  : ok=1    changed=0    unreachable=0    failed=0    skipped=0    rescued=0    ignored=0 

無事に表示されました。

AWX の画面でいうとこの画面に相当する情報です。

f:id:akira6592:20201019094348p:plain
ワークフロージョブ実行結果画面

おわりに

仮に、対応するモジュールがあったとしても、情報取得するだけあれば、わざわざ1タスクにする必要がない awx.awx.tower_api lookup plugin は便利かもしれません。

[Ansible] 「つまずき Ansible 【Part19】モジュールのコードをデバッグしたい」ふりかえり

はじめに

2020/10/17 に、YouTube Live で「つまずき Ansible 【Part19】モジュールのコードをデバッグしたい」という配信をしました。

実際に作業しながらエラーと戦って進めるシリーズです。

tekunabe.connpass.com

今回は、ANSIBLE_KEEP_REMOTE_FILES の設定を有効にして Playbook を実行して残った Python のコードをもとにしてデバッグをしてみます。

やったことや、わかったことをふりかえります。

  • 環境

動画

youtu.be

チャプターもつけてます。


■ やったこと

ANSIBLE_KEEP_REMOTE_FILES を有効にして実行

利用した Playbook は以下のとおりです。

NetBox にサイトというオブジェクトを作成する APIuri モジュールで叩きます。

本当は専用のモジュールがあるのですが、ここではよりメジャーなモジュールとして uri を取り上げました。

---
- hosts: netbox01
  gather_facts: false
  connection: local

  vars:
    url: http://192.168.1.145:32769/api/dcim/sites/
    
  tasks:
    - name: 
      uri:
        url: "{{ url }}"
        method: POST
        headers:
          Authorization: "Token {{ token }}"
        # body: "{{ lookup('file', 'body.json') }}"
        body:
          name: test1
          slug: test1
        status_code:
          - 200
          - 201
        body_format: json

実行コマンド

ANSIBLE_KEEP_REMOTE_FILES=1 ansible-playbook -i inventory.ini uri.yml 

この場合は、一回限りの環境変数としての指定指定です。

他の設定と同様に、ansible.cfg にも定義できます。詳細は 公式ドキュメントを参照してください。

残ったファイルの確認

先程のように ANSIBLE_KEEP_REMOTE_FILES を有効にして Playbook を実行すると、ターゲットノードの ~/.ansible/tmp ディレクトリ配下の、実処理を実行するための Python ファイルが残されます。

通常であれば、このファイルは実行後に削除されるのですが、それを残すのが ANSIBLE_KEEP_REMOTE_FILES の設定ということです。

今回は、connection: local なので、Ansible コントロールノード自身の ~/.ansible/tmp ディレクトリ配下に残ります。

(a2100) [root@centos7 tmp]# ls -al
合計 0
drwx------. 3 root root 66 10月 17 20:10 .
drwx------. 5 root root 66 10月  7 19:48 ..
(a2100) [root@centos7 ansible-tmp-1602933024.2020504-20448-161437222207769]# ls -al
合計 156
drwx------. 3 root root     47 10月 17 20:14 .
drwx------. 3 root root     66 10月 17 20:10 ..
-rwxr--r--. 1 root root 157816 10月 17 20:10 AnsiballZ_uri.py

AnsiballZ_モジュール名.py というファイル名で残りリます。

残ったファイルを普通に実行

AnsiballZ_uri.py は、Ansible は不要で、通情の Python ファイルとして実行できます。

(a2100) [root@centos7 ansible-tmp-1602933024.2020504-20448-161437222207769]# python AnsiballZ_uri.py

{"redirected": false, "url": "http://192.168.1.145:32769/api/dcim/sites/", "status": 201, "server": "nginx", "date": "Sat, 17 Oct 2020 11:13:19 GMT", "content_type": "application/json", "content_length": "467", "connection": "close", "location": "http://192.168.1.145:32769/api/dcim/sites/9/", "vary": "Accept, Cookie, Origin", "allow": "GET, POST, HEAD, OPTIONS", "api_version": "2.9", "x_content_type_options": "nosniff", "referrer_policy": "same-origin", "x_frame_options": "SAMEORIGIN", "p3p": "CP=\"ALL DSP COR PSAa PSDa OUR NOR ONL UNI COM NAV\"", "cookies_string": "", "cookies": {}, "msg": "OK (467 bytes)", "elapsed": 0, "changed": false, "json": {"id": 9, "url": "http://192.168.1.145:32769/api/dcim/sites/9/", "name": "test1", "slug": "test1", "status": {"value": "active", "label": "Active"}, "region": null, "tenant": null, "facility": "", "asn": null, "time_zone": null, "description": "", "physical_address": "", "shipping_address": "", "latitude": null, "longitude": null, "contact_name": "", "contact_phone": "", "contact_email": "", "comments": "", "tags": [], "custom_fields": {}, "created": "2020-10-17", "last_updated": "2020-10-17T11:13:19.879794Z"}, "invocation": {"module_args": {"url": "http://192.168.1.145:32769/api/dcim/sites/", "method": "POST", "headers": {"Authorization": "Token 0123456789abcdef0123456789abcdef01234567", "Content-Type": "application/json"}, "body": {"name": "test1", "slug": "test1"}, "status_code": [200, 201], "body_format": "json", "force": false, "http_agent": "ansible-httpget", "use_proxy": true, "validate_certs": true, "force_basic_auth": false, "return_content": false, "follow_redirects": "safe", "timeout": 30, "remote_src": false, "unsafe_writes": false, "url_username": null, "url_password": null, "client_cert": null, "client_key": null, "dest": null, "src": null, "creates": null, "removes": null, "unix_socket": null, "mode": null, "owner": null, "group": null, "seuser": null, "serole": null, "selevel": null, "setype": null, "attributes": null}}}

ただし、中身の大半がエンコードされているためデバッグがまともにできません。

AnsiballZ_uri.py を普通に実行するのはた、ただの Playbook のタスクの再現用という感じです。

explode て展開する

AnsiballZ_uri.py 内の、エンコードされた部分を展開するのが explode オプションです。

(a2100) [root@centos7 ansible-tmp-1602933024.2020504-20448-161437222207769]# python AnsiballZ_uri.py explode
Module expanded into:
/root/.ansible/tmp/ansible-tmp-1602933024.2020504-20448-161437222207769/debug_dir

debug_dir の中に、タスクのオプションを JSON 化した arg や、モジュールのコードの本体や、それが利用するファイル一式が含まれます。

(a2100) [root@centos7 ansible-tmp-1602933024.2020504-20448-161437222207769]# tree debug_dir/
debug_dir/
├── ansible
│   ├── __init__.py
│   ├── __pycache__
│   │   └── __init__.cpython-36.pyc
│   ├── module_utils
│   │   ├── __init__.py
│   │   ├── __pycache__
│   │   │   ├── __init__.cpython-36.pyc
│   │   │   ├── _text.cpython-36.pyc
│   │   │   ├── basic.cpython-36.pyc
│   │   │   ├── pycompat24.cpython-36.pyc
│   │   │   └── urls.cpython-36.pyc
│   │   ├── _text.py
│   │   ├── basic.py
│   │   ├── common
│   │   │   ├── __init__.py
│   │   │   ├── __pycache__
│   │   │   │   ├── __init__.cpython-36.pyc
│   │   │   │   ├── _collections_compat.cpython-36.pyc
│   │   │   │   ├── _json_compat.cpython-36.pyc
│   │   │   │   ├── _utils.cpython-36.pyc
│   │   │   │   ├── collections.cpython-36.pyc
│   │   │   │   ├── file.cpython-36.pyc
│   │   │   │   ├── parameters.cpython-36.pyc
│   │   │   │   ├── process.cpython-36.pyc
│   │   │   │   ├── sys_info.cpython-36.pyc
│   │   │   │   ├── validation.cpython-36.pyc
│   │   │   │   └── warnings.cpython-36.pyc
│   │   │   ├── _collections_compat.py
│   │   │   ├── _json_compat.py
│   │   │   ├── _utils.py
│   │   │   ├── collections.py
│   │   │   ├── file.py
│   │   │   ├── parameters.py
│   │   │   ├── process.py
│   │   │   ├── sys_info.py
│   │   │   ├── text
│   │   │   │   ├── __init__.py
│   │   │   │   ├── __pycache__
│   │   │   │   │   ├── __init__.cpython-36.pyc
│   │   │   │   │   ├── converters.cpython-36.pyc
│   │   │   │   │   └── formatters.cpython-36.pyc
│   │   │   │   ├── converters.py
│   │   │   │   └── formatters.py
│   │   │   ├── validation.py
│   │   │   └── warnings.py
│   │   ├── compat
│   │   │   ├── __init__.py
│   │   │   ├── __pycache__
│   │   │   │   ├── __init__.cpython-36.pyc
│   │   │   │   └── selectors.cpython-36.pyc
│   │   │   ├── _selectors2.py
│   │   │   └── selectors.py
│   │   ├── distro
│   │   │   ├── __init__.py
│   │   │   ├── __pycache__
│   │   │   │   ├── __init__.cpython-36.pyc
│   │   │   │   └── _distro.cpython-36.pyc
│   │   │   └── _distro.py
│   │   ├── parsing
│   │   │   ├── __init__.py
│   │   │   ├── __pycache__
│   │   │   │   ├── __init__.cpython-36.pyc
│   │   │   │   └── convert_bool.cpython-36.pyc
│   │   │   └── convert_bool.py
│   │   ├── pycompat24.py
│   │   ├── six
│   │   │   ├── __init__.py
│   │   │   └── __pycache__
│   │   │       └── __init__.cpython-36.pyc
│   │   └── urls.py
│   └── modules
│       ├── __init__.py
│       ├── __pycache__
│       │   ├── __init__.cpython-36.pyc
│       │   └── uri.cpython-36.pyc
│       └── uri.py
└── args

18 directories, 60 files

args を編集して再実行する

args でタスクのオプションにあたる値を編集できます。今回は body の中を編集しました。

{
  "ANSIBLE_MODULE_ARGS": {
    "url": "http://192.168.1.145:32769/api/dcim/sites/",
    "method": "POST",
    "headers": {
      "Authorization": "Token 0123456789abcdef0123456789abcdef01234567"
    },
    "body": {
      "name": "test3",
      "slug": "test3"
    },
  ...(略)...
  }
}

編集した args など、debug_dir 配下のファイルを利用して再実行するには、execute オプションを付けます。

(a2100) [root@centos7 ansible-tmp-1602933024.2020504-20448-161437222207769]# python AnsiballZ_uri.py execute
...(略)...

execute オプションを付けないと、AnsiballZ_uri.py 単体の実行となります。

ここまでが、Ansible 固有の仕様です。

VS Codeブレークポイントをはってステップ実行する

ここからは 一般的な Pythonデバッグの手法と同じです。

ここでは、モジュールの本体のファイルである debug_dir/ansible/modules/uri.pymain() 呼び出し箇所にブレークポイントをはります。

ブレークポイントをはる

execute オプションを付けてデバッグを開始するために、~/.vscode/launch.json に追記します。

{
  // IntelliSense を使用して利用可能な属性を学べます。
  // 既存の属性の説明をホバーして表示します。
  // 詳細情報は次を確認してください: https://go.microsoft.com/fwlink/?linkid=830387
  "version": "0.2.0",
  "configurations": [
    {
      "name": "Python: Current File",
      "type": "python",
      "request": "launch",
      "program": "${file}",
      "console": "integratedTerminal"
    },
    // 以下追加
    {
      "name": "Python: Current File with execute",
      "type": "python",
      "request": "launch",
      "program": "${file}",
      "args": [
        "execute"
      ],
      "console": "integratedTerminal"
    }
  ]
}

AnsiballZ_uri.py を開いている状態で、先程 launch.json に定義した定義した Python: Current File with executeデバッグを始めます。

デバッグの開始

処理が始まり、ブレークポイントをはった debug_dir/ansible/modules/uri.pymain() の呼び出し箇所で止まりました。

ブレークポイントで止まった

ここからステップ実行ができます。

たとえば、モジュールのオプションで与えた値は、モジュールのコード内でこのように変数に格納されます。

body オプションに与えた値

途中で変数の値を変更して、処理を続けることもできます。

test3(変更前)

test4 (変更後)
VS Code によるデバッグは、公式ドキュメント などを参照にしてください。

モジュールの処理を細かく追いいたいときに便利だと思います。


Part20 にむけて

以下のネタを検討中です。気が向いたものをやります。

  • Ansible 2.10 関連ほかにも
  • connection: local ななにか
  • Ansible Toewr / AWX をコマンドがら操作する
  • ansible.cfg
  • Jinja2、フィルター
  • Windows
  • ESXi で VM作成
  • parsee_cli モジュール(Part15 の続き)

[Ansible] Ansible 2.10 で pip install ansible --upgarade するとセットの collection もアップグレードされる

はじめに

このブログでも何度か触れましたが、Ansible 2.10 から Python のパッケージとしては、ansibleansible-base の2つができました。

ansible-base は基本機能と約70の標準モジュールです。ansibleansible-base と、元標準モジュール相当の collection のセットです。

ansible は 9月に 2.10.0 がリリースされ、10月に 2.10.1 がリリースされました。pip--upgrade するさいに、セットだったコレクションがどうなるか気になったのですが、試したところアップグレードされました。

あくまでも ansible-build-data の定義に基づくようです。

この記事では具体的なログを掲載します。


■ 事前状態 (ansible 2.10.0)

インストール済み Python パッケージの確認

% pip freeze
ansible==2.10.0
ansible-base==2.10.2
cffi==1.14.3
cryptography==3.1.1
Jinja2==2.11.2
MarkupSafe==1.1.1
packaging==20.4
pycparser==2.20
pyparsing==2.4.7
PyYAML==5.3.1
six==1.15.0

記憶が正しければ、ansible-base 2.10.2 のリリース前は、ansible 2.10.0ansible-base 2.10.1 だった気がします。

セットの collection の確認

ansible-build-dataansible-2.10.0.deps のとおりです。

(デフォルトで ~/.ansible/ansible_collection インストールされるものとは別です)

% ansible-galaxy collection list -p ~/envs/a210/lib/python3.8/site-packages/ansible_collections/

# /Users/sakana/envs/a210/lib/python3.8/site-packages/ansible_collections
Collection                Version
------------------------- -------
amazon.aws                1.2.0  
ansible.netcommon         1.2.1  
ansible.posix             1.1.1  
ansible.windows           1.0.0  
arista.eos                1.0.3  
awx.awx                   14.1.0 
azure.azcollection        1.0.0  
check_point.mgmt          1.0.6  
chocolatey.chocolatey     1.0.2  
cisco.aci                 1.0.0  
cisco.asa                 1.0.3  
cisco.intersight          1.0.8  
cisco.ios                 1.0.3  
cisco.iosxr               1.0.5  
cisco.meraki              2.0.0  
cisco.mso                 1.0.0  
cisco.nxos                1.1.0  
cisco.ucs                 1.5.0  
cloudscale_ch.cloud       1.1.0  
community.aws             1.2.0  
community.azure           1.0.0  
community.crypto          1.1.1  
community.digitalocean    1.0.0  
community.general         1.1.0  
community.grafana         1.0.0  
community.kubernetes      1.0.0  
community.libvirt         1.0.0  
community.mongodb         1.0.0  
community.mysql           1.0.0  
community.network         1.1.0  
community.proxysql        1.0.0  
community.rabbitmq        1.0.1  
community.skydive         1.0.0  
community.vmware          1.2.0  
community.windows         1.0.0  
community.zabbix          1.0.0  
containers.podman         1.2.0  
cyberark.conjur           1.0.7  
cyberark.pas              1.0.5  
dellemc.os10              1.0.1  
dellemc.os6               1.0.2  
dellemc.os9               1.0.2  
f5networks.f5_modules     1.5.0  
fortinet.fortimanager     1.0.5  
fortinet.fortios          1.0.15 
frr.frr                   1.0.3  
gluster.gluster           1.0.1  
google.cloud              1.0.0  
hetzner.hcloud            1.0.0  
ibm.qradar                1.0.3  
infinidat.infinibox       1.2.3  
junipernetworks.junos     1.1.0  
mellanox.onyx             1.0.0  
netapp.aws                20.8.0 
netapp.elementsw          20.8.0 
netapp.ontap              20.8.0 
netapp_eseries.santricity 1.0.8  
netbox.netbox             1.0.2  
ngine_io.cloudstack       1.0.1  
ngine_io.exoscale         1.0.0  
ngine_io.vultr            1.0.0  
openstack.cloud           1.1.0  
openvswitch.openvswitch   1.0.5  
ovirt.ovirt               1.1.3  
purestorage.flasharray    1.4.0  
purestorage.flashblade    1.3.0  
servicenow.servicenow     1.0.2  
splunk.es                 1.0.2  
theforeman.foreman        1.1.0  
vyos.vyos                 1.0.4  
wti.remote                1.0.1  


■ アップグレード

% pip install ansible --upgrade
Collecting ansible
  Using cached ansible-2.10.1.tar.gz (25.9 MB)
Requirement already satisfied, skipping upgrade: ansible-base<2.11,>=2.10.2 in /Users/sakana/envs/a210/lib/python3.8/site-packages (from ansible) (2.10.2)
Requirement already satisfied, skipping upgrade: jinja2 in /Users/sakana/envs/a210/lib/python3.8/site-packages (from ansible-base<2.11,>=2.10.2->ansible) (2.11.2)
Requirement already satisfied, skipping upgrade: PyYAML in /Users/sakana/envs/a210/lib/python3.8/site-packages (from ansible-base<2.11,>=2.10.2->ansible) (5.3.1)
Requirement already satisfied, skipping upgrade: cryptography in /Users/sakana/envs/a210/lib/python3.8/site-packages (from ansible-base<2.11,>=2.10.2->ansible) (3.1.1)
Requirement already satisfied, skipping upgrade: packaging in /Users/sakana/envs/a210/lib/python3.8/site-packages (from ansible-base<2.11,>=2.10.2->ansible) (20.4)
Requirement already satisfied, skipping upgrade: MarkupSafe>=0.23 in /Users/sakana/envs/a210/lib/python3.8/site-packages (from jinja2->ansible-base<2.11,>=2.10.2->ansible) (1.1.1)
Requirement already satisfied, skipping upgrade: six>=1.4.1 in /Users/sakana/envs/a210/lib/python3.8/site-packages (from cryptography->ansible-base<2.11,>=2.10.2->ansible) (1.15.0)
Requirement already satisfied, skipping upgrade: cffi!=1.11.3,>=1.8 in /Users/sakana/envs/a210/lib/python3.8/site-packages (from cryptography->ansible-base<2.11,>=2.10.2->ansible) (1.14.3)
Requirement already satisfied, skipping upgrade: pyparsing>=2.0.2 in /Users/sakana/envs/a210/lib/python3.8/site-packages (from packaging->ansible-base<2.11,>=2.10.2->ansible) (2.4.7)
Requirement already satisfied, skipping upgrade: pycparser in /Users/sakana/envs/a210/lib/python3.8/site-packages (from cffi!=1.11.3,>=1.8->cryptography->ansible-base<2.11,>=2.10.2->ansible) (2.20)
Using legacy setup.py install for ansible, since package 'wheel' is not installed.
Installing collected packages: ansible
  Attempting uninstall: ansible
    Found existing installation: ansible 2.10.0
    Uninstalling ansible-2.10.0:
      Successfully uninstalled ansible-2.10.0
    Running setup.py install for ansible ... done
Successfully installed ansible-2.10.1
WARNING: You are using pip version 20.1.1; however, version 20.2.3 is available.
You should consider upgrading via the '/Users/sakana/envs/a210/bin/python3 -m pip install --upgrade pip' command.

インストール済み Python パッケージの確認

ansible==2.10.0 だった箇所が ansible==2.10.1 になりました。

% pip freeze                                                                                    
ansible==2.10.1
ansible-base==2.10.2
cffi==1.14.3
cryptography==3.1.1
Jinja2==2.11.2
MarkupSafe==1.1.1
packaging==20.4
pycparser==2.20
pyparsing==2.4.7
PyYAML==5.3.1
six==1.15.0

セットの collection の確認

ansible-build-dataansible-2.10.1.deps のとおりです。

たとえば、cisco.ios collection は 1.0.3 から 1.1.0 になりました。

% ansible-galaxy collection list -p ~/envs/a210/lib/python3.8/site-packages/ansible_collections/

# /Users/sakana/envs/a210/lib/python3.8/site-packages/ansible_collections
Collection                Version
------------------------- -------
amazon.aws                1.2.1  
ansible.netcommon         1.3.0  
ansible.posix             1.1.1  
ansible.windows           1.0.1  
arista.eos                1.1.0  
awx.awx                   14.1.0 
azure.azcollection        1.2.0  
check_point.mgmt          1.0.6  
chocolatey.chocolatey     1.0.2  
cisco.aci                 1.0.0  
cisco.asa                 1.0.3  
cisco.intersight          1.0.8  
cisco.ios                 1.1.0  
cisco.iosxr               1.1.0  
cisco.meraki              2.0.0  
cisco.mso                 1.0.0  
cisco.nxos                1.2.0  
cisco.ucs                 1.5.0  
cloudscale_ch.cloud       1.2.0  
community.aws             1.2.1  
community.azure           1.0.0  
community.crypto          1.2.0  
community.digitalocean    1.0.0  
community.general         1.2.0  
community.grafana         1.0.0  
community.kubernetes      1.1.1  
community.libvirt         1.0.0  
community.mongodb         1.0.0  
community.mysql           1.1.0  
community.network         1.2.0  
community.proxysql        1.0.0  
community.rabbitmq        1.0.1  
community.skydive         1.0.0  
community.vmware          1.3.0  
community.windows         1.1.0  
community.zabbix          1.0.0  
containers.podman         1.3.1  
cyberark.conjur           1.0.7  
cyberark.pas              1.0.5  
dellemc.os10              1.0.1  
dellemc.os6               1.0.2  
dellemc.os9               1.0.2  
f5networks.f5_modules     1.5.0  
fortinet.fortimanager     1.0.5  
fortinet.fortios          1.0.15 
frr.frr                   1.0.3  
gluster.gluster           1.0.1  
google.cloud              1.0.1  
hetzner.hcloud            1.1.0  
ibm.qradar                1.0.3  
infinidat.infinibox       1.2.3  
junipernetworks.junos     1.1.1  
mellanox.onyx             1.0.0  
netapp.aws                20.9.0 
netapp.elementsw          20.10.0
netapp.ontap              20.10.0
netapp_eseries.santricity 1.0.8  
netbox.netbox             1.1.0  
ngine_io.cloudstack       1.0.1  
ngine_io.exoscale         1.0.0  
ngine_io.vultr            1.0.0  
openstack.cloud           1.2.0  
openvswitch.openvswitch   1.0.5  
ovirt.ovirt               1.1.4  
purestorage.flasharray    1.4.0  
purestorage.flashblade    1.3.0  
servicenow.servicenow     1.0.2  
splunk.es                 1.0.2  
theforeman.foreman        1.3.0  
vyos.vyos                 1.0.5  
wti.remote                1.0.1 


おわりに

もし、本体(ansible-base)をそのままにして、collection のみをアップグレードしたい場合は、個別に ansible-galaxy collection install するようになるのかなと思います。

[NetBox] カスタムリンクでオブジェクト(obj)のどんな値を参照できるかの調べ方

はじめに

以前の記事で、NetBox にカスタムリンクを作成する方法をご紹介しました。

tekunabe.hatenablog.jp

この中で、TextURL の項目では、オブジェクトの名前などの情報を参照できることに触れました。

画面内の説明には Reference the object as {{ obj }} とあり、たしかに {{ obj }} とするとオブジェクト名(デバイスならデバイス名)を参照できました。

{{ obj.site }} のようにすると、名前だけでなくその他の値も参照できます。

この記事では、カスタムリンクの TextURL の項目で、どのようなオブジェクトの値が参照できるかを調べ方をご紹介します。

調べ方が分かった経緯

どのようなオブジェクトの値が参照できるかは、ドキュメントには掲載されていません。

どうやったら分かるかなと思ったときに、雰囲気で {{ obj }} の代わりに {{ obj.pk }} を試しました(NetBox が Django で作られいることは分かっていました)。すると、オブジェクトのID (PrimaryKey)的なものが参照できたので、ここで指定するのは View の一部のようなもなんだろうと解釈しました。

対応する model を探す

ということで、画面に対応する model を参照すれば、その obj がどのような値を持つのか分かりそうです。

バイスの場合は、netbox/dcim/models/__init__.py にデバイスの model の定義 class Device があります。(2.9系だとnetbox/dcim/models/devices.py

IPアドレスの場合は、netbox/ipam/models.pyです。

デバイスの model の定義の中身を見ていくと、name の他、platformstatus などのフィールドがあることが分かります。 これにより、カスタムリンク側から、obj.name のようにすれば良いと推測できます。

具体的な指定と値の例です。

指定 値の例
obj.platform ios
obj.status active
obj.primary_ip4 192.168.1.11/24
obj.primary_ip4.address.ip 192.168.1.11

なお、値が空になっている項目を Text にした場合はリンクが表示されません。例えば、カスタムリンクの Text で {{ obj.comments }} とだけ指定した場合、Comments が空のデバイスのを開いたときは、リンク字体が画面に表示されません。

テンプレートも参考に

View に仕様しているテンプレートも参考になります。

例えば、デバイス画面であれば、netbox/templates/dcim/device.htmlです。IPアドレスならnetbox/templates/ipam/ipaddress.htmlです。

デバイス画面のテンプレートを見ると、

{{ device.site }}

のような記載があります。カスタムリンクとしては

{{ obj.site }}

のように、deviceobj に置き換えれば参照できます。

おわりに

カスタムリンクの TextURL で、オブジェクトのどうのような値を参照できるかを調べる方法をご紹介しました。もっと効率がいい調べ方があるかもしれませんが、現在のところ私はこうやりました、という位置づけです。

なお、カスタムフィールドなど少し特殊な項目は、もうひと工夫必要そうです。

[2020/10/16 追記] カスタムフィールドは obj.cf.カスタムフィールド名 で参照できました。Export Templateの書式が参考になりました。

[NetBox] ちょっとした連携に便利なカスタムリンクの作成方法

はじめに

NetBox には、各オブジェクトの画面ごとにカスタムリンクを作成できます。

netbox.readthedocs.io

f:id:akira6592:20201011143420p:plain
カスタムリンク

他のシステムへのリンクも作成できます。また、リンクやテキストにはオブジェクトの名前やJinja2構文を使って動的に変えることもできます。

活用例

例えば、以下のようなことが実現できます。

  • 例1. Git 系サービスへのリンク
    • 予め、GitHubhttps://github.com/ユーザー名/config/デバイス名.txt にデバイスのコンフィグを配置しておく
    • 予め、NetBox のデバイス画面に、現在開いているデバイス名を含む上記の URL のカスタムリンクを作成しておく
    • NetBox 利用者は、上記のカスタムリンクをクリックして現在開いているデバイスのコンフィグを GitHub 上で表示する
      • (この例に限って言えば NAPALM 連携でも似たようなことを実現可能です。)
  • 例2. デバイスの Web GUI へのリンク
    • 予め、NetBox のデバイス画面に、現在開いているデバイスの管理IPアドレス含むURL(https://{{ obj.primary_ip4.address.ip }})のカスタムリンクを作成しておく
    • NetBox 利用者は、現在開いているデバイスのWeb GUI を、上記のカスタムリンクをクリックして表示する

この記事では、カスタムリンクの作成方法をご紹介します。

  • 動作確認環境
    • NetBox 2.8.9


■ 基本的なカスタムリンクの作成方法

バイスの管理画面に、そのデバイスのコンフィグを表示するためののリンク(GitHub リポジトリ上)を作る例をもとに、カスタムリンクの作成方法を説明します。

カスタムフィールド追加画面を開く

ここでは、カスタムフィールドの追加と同様に admin ユーザーで作業します。ログイン後、右上のメニューから Admin をクリックします。

f:id:akira6592:20201011141808p:plain:w400
Admin をクリック

全体の管理画面で、Custom links をクリックします。

f:id:akira6592:20201011141936p:plain:w400
Custom links をクリック

カスタムフィールド一覧画面で ADD CUSTOM LINK をクリックします。

f:id:akira6592:20201011142025p:plain:w400
ADD CUSTOM LINK をクリック

カスタムフィールド追加画面が表示されます。

f:id:akira6592:20201011142101p:plain:w400
カスタムフィールド追加画面

カスタムリンクの内容を入力する

カスタムフィールド追加画面で内容を追加します

Content type

Content type では、カスタムリンクを作成したい対象のオブジェクトの種類を選択します。

f:id:akira6592:20201011142341p:plain:w400
対象オブジェクトを選択

例えばデバイスの画面に作成したい場合は dcim > devie を、IP アドレス画面に作成したい場合は、ipam > IP Address を選択します。

ここでは、dcim > devie を選択します。

Name

Name では、カスタムリンクの名前を入力します。リンクのテキストではなく、カスタムリンクそのものを区別するための名前です。

ここでは、config と入力します。

Group name (任意)

Group name では、このリンクを含めるグループの名前を入力します。

同じグループのリンクは、同じドロップダウンリストの 1つの項目になります。

以下の図は 、Group nameSelect link を入力して複数のカスタムリンクをまとめた場合の例です。

f:id:akira6592:20201011142508p:plain:w400
グループはドロップダウンリストになる

Group name を入力しない場合は、横並びの独立したリンクになります。

ここでは、未入力にします。

Weight

Weight では、同じ画面に複数のカスタムリンクを作成する場合の表示順を指定します。

Weight が小さいリンクが左に、大きいリンクが右に表示されます。

f:id:akira6592:20201011142615p:plain:w400
Weight 大きいものは右に

ここでは、デフォルトの 100 のままにします。

Button class

Button class では、リンクのボタンの意味合いや色を指定します。

選択できる class と実際の表示は以下の通りです。

f:id:akira6592:20201011142845p:plain
意味合いと色

ここでは、デフォルトの Default のままとします。

New window

New window では、リンクを新しいウィンドウ(タブ)で開くかどうかを指定します。デフォルトはオフなので、同じ画面で開きます。

ここでは、チェックをいれます。

Text

Text では、リンクの表示上の文字列を指定します。

オブジェクトの名前などの情報や、Jinja2 構文が利用して、動的に内容を変更できます。

画面内の説明には、Reference the object as {{ obj }}. とあり、 {{ obj }} でオブジェクト名(例えばデバイス名)を参照できます。

Jinja2 のフィルターを併用して、例えば、{{ obj | replace('-', '_') }} とすると、core-rt-01core_rt_01 になります。

他にも条件式や、ユーザー、権限情報も利用できるようです。詳細は公式ドキュメントを参照してください。

他、obj でオブジェクトのどんな情報が使えるかは、以下の記事を参照してください。

tekunabe.hatenablog.jp

ここでは config と入力します。

URL

URL では、実際のリンク先の URL を指定します。

http(s):// から始めると、外部のURLになります。

/hoge のように、/ から始めると、自サイトからのルートの指定になります。 例えば、http://netbox.example.com/dcim/devices/1/ を開いている場合は、リンクは http://netbox.example.com/hoge になります。

hoge のように、単純な文字列の指定だと、現在開いている URL の末尾に付加した URL になります。 例えば、http://netbox.example.com/dcim/devices/1/ を開いている場合は、リンクは http://netbox.example.com/dcim/devices/1/hoge になります。

また,先程の Text と同様に、オブジェクトの情報や Jinja2 構文が利用できます。

ここでは、https://github.com/akira6592/tekunabe/blob/master/config/{{ obj }}.txt を入力します。

この指定により、デバイス名が rt01 であれば{{{ obj }}.txt の部分が rt01.txt になります。

確認する

先程デバイス画面に対して作成したカスタムリンクを確認します。

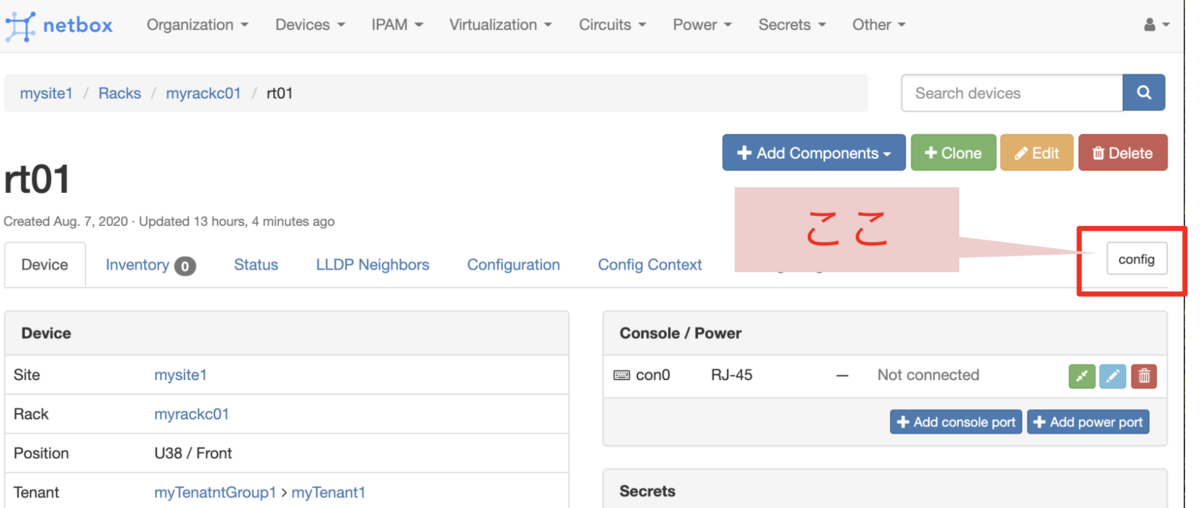
任意のデバイス画面を開きます。画面右にカスタムリンクがあることを確認します。

f:id:akira6592:20201011143054p:plain
カスタムリンク `config` が追加された

リンクを開くと、デバイス名を含む URL が新しい開いたことを確認します。

f:id:akira6592:20201011143153p:plain
別サイト(GitHub)で対象デバイスのコンフィグが表示された

※ このファイルはあとで削除するかもしれません。


■ おわりに

リンクがあるだけで、他システムとの連携がある程度できることもあるので、カスタムリンクは便利な機能だと思いました。