てくなべ (tekunabe)

ansible / network automation / 学習メモ

Red Hat Enterprise Linux 9.0 の Python 環境を少し探ってみた

はじめに

Red Hat Enterprise Linux 9.0 を、GUIでない方のサーバーとしてインストールしました。

[2022/05/19追記] Red Hat Enterprise Linux 9.0 正式版がリリースされたため、ベータだった箇所を正式版で確認した内容に更新しました。

Python 周りがどうのようになっているのか、試しながら調べてみました。あくまで私の環境で調べたという状態なので、お手元と異なるかもしれません。

python コマンドが使える

RHEL 8 系では、デフォルトで python コマンドが使えませんでしたが、使えました。

[admin@rhel90test ~]$ cat /etc/redhat-release 
Red Hat Enterprise Linux release 9.0 (Plow)
[admin@rhel90test ~]$ 
[admin@rhel90test ~]$ python --version
Python 3.9.10
[admin@rhel90test ~]$ 
[admin@rhel90test ~]$ which python
/usr/bin/python

/usr/bin/python3.9 へのシンボリックリンク

python* 系コマンドの関係は以下の通り

[admin@rhel90test ~]$ ls -al /usr/bin/python*
lrwxrwxrwx. 1 root root     9  211 22:59 /usr/bin/python -> ./python3
lrwxrwxrwx. 1 root root     9  211 22:51 /usr/bin/python3 -> python3.9
-rwxr-xr-x. 1 root root 16040  211 22:51 /usr/bin/python3.9

ドキュメントには

実稼働環境では、python3 または python3.9 を明示的に使用することが推奨されます。

とあります。

pip コマンドは利用不可

[admin@rhel90test ~]$ which pip
/usr/bin/which: no pip in (/home/admin/.local/bin:/home/admin/bin:/usr/local/bin:/usr/bin:/usr/local/sbin:/usr/sbin)
[admin@rhel90test ~]$ 
[admin@rhel90test ~]$ 
[admin@rhel90test ~]$ pip
-bash: pip: コマンドが見つかりません
[admin@rhel90test ~]$ 
[admin@rhel90test ~]$ 
[admin@rhel90test ~]$ 
[admin@rhel90test ~]$ pip3
-bash: pip3: コマンドが見つかりません

ドキュメントには、

バージョンを指定しないコマンド (python3-pip パッケージの /usr/bin/pip など) がいくつか利用できます。

とあります。

venv 内では利用可能でした。

[admin@rhel90test ~]$ python -m venv .venv
[admin@rhel90test ~]$ source .venv/bin/activate
(.venv) [admin@rhel90test ~]$ pi
pic         pidwait     pigz        ping        pinky       pip3        pivot_root  
pidof       pifconfig   pinfo       ping6       pip         pip3.9      
(.venv) [admin@rhel90test ~]$ pip    # tab
pip     pip3    pip3.9  
(.venv) [admin@rhel90test ~]$ python    # tab
python     python3    python3.9  

/usr/libexec/platform-python は健在

RHEL 8 からあった、/usr/libexec/platform-python はありました。/usr/bin/python3.9 へのシンボリックリンクです。

(.venv) [admin@rhel90test ~]$ ls -al /usr/libexec/platform-python
lrwxrwxrwx. 1 root root 18  211 22:51 /usr/libexec/platform-python -> /usr/bin/python3.9

dnf list --installed の結果

dnf list --installedgrep -i python した結果は以下のとおりです。前述の通りGUIでない方のサーバーとしてインストールした環境です。

libcap-ng-python3.x86_64                      0.8.2-7.el9                    @AppStream
policycoreutils-python-utils.noarch           3.3-6.el9_0                    @AppStream
python-unversioned-command.noarch             3.9.10-2.el9                   @AppStream
python3.x86_64                                3.9.10-2.el9                   @anaconda 
python3-audit.x86_64                          3.0.7-101.el9_0.2              @AppStream
python3-chardet.noarch                        4.0.0-5.el9                    @anaconda 
python3-cloud-what.x86_64                     1.29.26-3.el9_0                @anaconda 
python3-dasbus.noarch                         1.4-5.el9                      @AppStream
python3-dateutil.noarch                       1:2.8.1-6.el9                  @anaconda 
python3-dbus.x86_64                           1.2.18-2.el9                   @anaconda 
python3-decorator.noarch                      4.4.2-6.el9                    @anaconda 
python3-dmidecode.x86_64                      3.12.2-27.el9                  @anaconda 
python3-dnf.noarch                            4.10.0-5.el9_0                 @anaconda 
python3-dnf-plugins-core.noarch               4.0.24-4.el9_0                 @anaconda 
python3-ethtool.x86_64                        0.15-2.el9                     @anaconda 
python3-file-magic.noarch                     5.39-8.el9                     @AppStream
python3-firewall.noarch                       1.0.0-4.el9                    @anaconda 
python3-gobject-base.x86_64                   3.40.1-5.el9                   @anaconda 
python3-gpg.x86_64                            1.15.1-6.el9                   @anaconda 
python3-hawkey.x86_64                         0.65.0-5.el9_0                 @anaconda 
python3-idna.noarch                           2.10-7.el9                     @anaconda 
python3-iniparse.noarch                       0.4-45.el9                     @anaconda 
python3-inotify.noarch                        0.9.6-25.el9                   @anaconda 
python3-libcomps.x86_64                       0.1.18-1.el9                   @anaconda 
python3-libdnf.x86_64                         0.65.0-5.el9_0                 @anaconda 
python3-librepo.x86_64                        1.14.2-1.el9                   @anaconda 
python3-libs.x86_64                           3.9.10-2.el9                   @anaconda 
python3-libselinux.x86_64                     3.3-2.el9                      @AppStream
python3-libsemanage.x86_64                    3.3-2.el9                      @AppStream
python3-libstoragemgmt.x86_64                 1.9.3-1.el9                    @AppStream
python3-libxml2.x86_64                        2.9.13-1.el9                   @anaconda 
python3-lxml.x86_64                           4.6.5-2.el9                    @AppStream
python3-nftables.x86_64                       1:0.9.8-12.el9                 @anaconda 
python3-pexpect.noarch                        4.8.0-7.el9                    @anaconda 
python3-pip-wheel.noarch                      21.2.3-6.el9                   @anaconda 
python3-policycoreutils.noarch                3.3-6.el9_0                    @AppStream
python3-psutil.x86_64                         5.8.0-12.el9                   @AppStream
python3-ptyprocess.noarch                     0.6.0-12.el9                   @anaconda 
python3-pysocks.noarch                        1.7.1-12.el9                   @anaconda 
python3-pyyaml.x86_64                         5.4.1-6.el9                    @anaconda 
python3-requests.noarch                       2.25.1-6.el9                   @anaconda 
python3-rpm.x86_64                            4.16.1.3-12.el9_0              @anaconda 
python3-setools.x86_64                        4.4.0-4.el9                    @anaconda 
python3-setuptools.noarch                     53.0.0-10.el9                  @anaconda 
python3-setuptools-wheel.noarch               53.0.0-10.el9                  @anaconda 
python3-six.noarch                            1.15.0-9.el9                   @anaconda 
python3-subscription-manager-rhsm.x86_64      1.29.26-3.el9_0                @anaconda 
python3-systemd.x86_64                        234-18.el9                     @anaconda 
python3-tracer.noarch                         0.7.5-4.el9                    @AppStream
python3-urllib3.noarch                        1.26.5-3.el9                   @anaconda 
(.venv) [admin@rhel90test ~]$ 

参考

RHEL 9.0 日本語版ドキュメント

access.redhat.com

ベータ時代

rheb.hatenablog.com

www.redhat.com

access.redhat.com

access.redhat.com

Python in RHEL 9

access.redhat.com

[Ansible/AAP] Automation mesh でコントロールノードと実行ノードの分離を試してみた

はじめに

Red Hat Ansible Automation Platform(以下AAP) 2.1 では、スケーラビリティと信頼性を向上させる Automation mesh という機能が導入されました。

AAP1.2 (Ansible Tower としては3.8) までにあった Isolated Node 相当の機能を備えつつ、さらに機能強化されたようなかたちでしょうか。

この記事では、簡単な構成で試したことをまとめます。はじめて調べて試して自分だまとめただけのレベルですので、なにか間違い等あれば @akira6592 までご連絡いただけると助かります。

なお、レッドハットさんの以下のウェビナーを聞いて概要をつかめたので、やってみようと思いました。めちゃくちゃ参考になりました、ありがとうございます!

最新 Ansible Automation Platform 2.1 (AAP 2.1 ) の概要紹介、最新アップデート、実機デモ

珍しく長い記事です。

■ 1. Automation mesh におけるノードの種類

Automation mesh の構成では、それぞれのノードに役割があります。

ノードの役割 説明
コントロールノード(Control node) 司令塔。Automation Controller の Web UI や API の提供し、実行ノード(後述)にジョブの実行を指示する。プロジェクトの更新のようなコントロールプレーンの処理はこのノード内で行われる
実行ノード(Execution node) 実際にジョブを実行するノード。コントロールノードからの指示を受ける
ホップノード(Hop node) コントロールノードと実行ノードの間を取り持つノード
ハイブリッドノード(Hybrid node) コントロールノードと実行ノードの役割を兼ね備えたノード。AAP 2.1 のインストーラーでは、デフォルトで localhost がハイブリッドノードになる

各ノードは必ず分離しといけないというわけではなく、環境の状況に応じて使い分けます。

たとえば、シンプルにハイブリッドノードだけで事が足りることもあるでしょうし、コントロールノード、と実行ノードを分けたほうがいいこともあるでしょう。はたまた、ホップノードを挟んで延伸したほうがいいここともあるでしょう。

■ 2. 今回の環境 (コントロールノードと実行ノードの分類)

この記事ではコントロールノードと実行ノードそれぞれ1台ずつの構成をとります。ホップノードは挟みません。

mesh と呼べるほどではないですが、これまでハイブリッドノード構成から役割を分離する構成として、最低限の一番シンプルな構成で試してみよう、というのが趣旨です。

登場人物やそれぞれのノードと役割は以下のとおりです。

役割と動作

各動作の説明です。

No. 動作 説明
(1) ブラウザからジョブテンプレート実行指示 Automation Controller の利用者が Web UI や API を利用して、ジョブテンプレートの実行を指示する
(2) ジョブテンプレート実行開始 利用者からの指示によってジョブテンプレートの実行を開始
(3) プロジェクト更新用EEイメージpull プロジェクト更新に利用する EE(Execution Environment) のイメージを(手元になければ)pullする。利用するイメージは Automation Controller の画面の [実行環境] > [Control Plane Execution Environment] で定義されている registry.redhat.io/ansible-automation-platform-21/ee-supported-rhel8:latest
(4) プロジェクト更新用EE起動 プロジェクト更新用EEを起動する
(5) プロジェクト更新 プロジェクトの SCM タイプが git の場合は、リポジトリからプロジェクトを更新する
(6) コレクションダウンロード プロジェクト内の collections/requirements.ymlに利用するコレクションが定義されている場合にコレクションをダウンロードする。デフォルトでは Ansible Galaxy から(今回の構成も)
(7) ジョブ実行指示 コントロールノードから実行ノードに対してジョブの実行を指示する。デフォルトでは TCP 27199 ポートを利用する
a. ダイナミックインベントリ更新用EEイメージpull ダイナミックインベントリ(インベントリ内の「ソース」)があり「起動時の更新」が有効の場合はイメージをpull。デフォルトでは Control Plane Execution Environment に定義の registry.redhat.io/ansible-automation-platform-21/ee-supported-rhel8:latest を利用?(Default Execution Environment と同じイメージなので区別が付かない・・ )
b. ダイナミックインベントリ更新用EE起動・更新 a. の続きでダイナミックインベントリを更新。(7) と a. b. の順序関係が分からずこのあたりは数字表記ではない・・。※またこの処理が実行ノードで実行されるのかどうかは少々自信なし
(8) ジョブ実行用EEイメージpull ジョブ実行に利用する EE のイメージを(手元になければ)pullする。利用するイメージは Automation Controller の画面の [実行環境] > [Default Execution Environment] で定義されている registry.redhat.io/ansible-automation-platform-21/ee-supported-rhel8:latest 。結果的にデフォルトでは Control Plane Execution Environment と同じイメージ
(9) ジョブ実行用EE起動 ジョブ実行用のEEを起動する
(10) Playbookによる操作 Playbook 実行による操作。今回は Cisco IOSルーターに対して SSH で操作する

今回は試せていませんが、ダイナミックインベントリの更新は、実行ノード側でされるそうです(少々自信なし)。

(2023/12/04 追記)ただ、AAP 2.1 の Automation mesh のドキュメントには control nodes run project and inventory updates and system jobs, but not regular jobs. とある。

なお、点線で示しているとおりコントロールノードからマネージドノードへ直接アクセスできない構成です。マネージドノードとアクセスできる側に実行ノードを置くことで、コントロールノードから間接的にマネージドノードを制御できるようになります。

今回構築するコントロールノードと実行ノード1台ずつの構成では、信頼性は特に向上しないと思いますが、事情があってAutomation Controller から直接マネージドノードにアクセスできないという場合には、解決策になりそうです(公式ブログ What's new: an introduction to automation mesh)でいうDesign for your enterprise)。

■ 3. 下準備

RHEL を2台(コントロールノード、実行ノード)用意した状態からはじめます。

3.1. subscription-manage による作業

subscription-managerregisterattach をして、AAP をインストールできる状態にしておきます。コントロールノード、実行ノードともに必要な作業です。(後述しますが今回AAPのインストーラーはバンドル版ではなく、通常版を利用します。)

# コントロールノード・実行ノード両方
sudo subscription-manager register           # 要ログイン
sudo subscription-manager list --available   # AAPが含まれるプールIDを控える
sudo subscription-manager attach --pool AAPが含まれるプールID

実行ログ

$ sudo subscription-manager register
Registering to: subscription.rhsm.redhat.com:443/subscription
Username: (ユーザー名を入力)
Password: (パスワードを入力)
The system has been registered with ID: xxxxx
The registered system name is: xxxxx
$ sudo subscription-manager list --available
  (いろいろPoolが表示される)
$ sudo subscription-manager attach --pool AAPが含まれるプールID
Successfully attached a subscription for: Red Hat Developer Subscription for Individuals

加えて、AWS 側に構築したコントロールノード側は明示的にリポジトリ有効化をしておきます。(参考ツイート、ありがとうございます)

# コントロールノード(AWS)側のみ
sudo subscription-manager config --rhsm.manage_repos=1

3.2. SSHキーの接続

あとのインストールの中で、コントロールノードからノードに Ansible による SSH 接続が行われます。そのため、認証できる状態にしておく必要があります。

今回は公開鍵認証方式で準備します。キーペアが未作成、未登録の状態から始めているので、以下コマンドでキーペアを作成して、実行ノードに登録します。

# コントロールノード側のみ
ssh-keygen -t rsa
ssh-copy-id admin@実行ノードのグローバルIP

実行ノードに対して Ansible からパスワード認証でログインできる状態であれば特にこの作業は不要です。

■ 4. インストール

コントロールノード側で作業します。

4.1. インストーラーの準備

Automation Controller のインストールには AAP のインストーラーを利用します。

AAP 2.1 の公式ドキュメントの「RED HAT ANSIBLE AUTOMATION PLATFORM インストーラーの選択および取得」を参考にして、インストーラーをダウンロードして「コントロールノード」に配置します。

今回はバンドル版ではないインストーラansible-automation-platform-setup-2.1.1-1.tar.gz を利用します。

配置後、解凍して、ディレクトリを移動します。

# コントロールノード側作業
tar xvzf ansible-automation-platform-setup-2.1.1-1.tar.gz
cd ansible-automation-platform-setup-2.1.1-1

4.2. inventory の修正(構成の指定)

AAP のインストーラーは、設定ファイルとしてインベントリファイル inventory を利用します。先ほど移動したディレクトansible-automation-platform-setup-2.1.1-1 にあります。

このファイルの中で、コントロールノード、実行ノードのホスト、各種パスワードなどの指定をします。

今回の構成は、公式ドキュメント「Red Hat Ansible Automation Platform 自動化メッシュガイド」内の「単一の実行ノードを持つ単一ノードのコントロールプレーン」と同じなので、その inventory をベースにしてます。

ポイントだけ抜粋します。

[automationcontroller]
localhost ansible_connection=local

[automationcontroller:vars]
node_type=control
peers=execution_nodes

[execution_nodes]
rhel84ace2 ansible_host=実行ノードのグローバルIP ansible_user=admin ansible_ssh_private_key_file=/home/ec2-user/.ssh/id_rsa  ansible_become=yes ansible_become_password=昇格パスワード

# ...(略)...
[all:vars]
admin_password='Automation Controllerへのadminパスワード'

# ...(略)...
pg_password='DBのパスワード'

# ...(略)...
registry_url='registry.redhat.io'
registry_username='registry.redhat.ioへのユーザー名'
registry_password='registry.redhat.ioへのパスワード'

各セクションでの指定の説明は以下のとおりです。なお、今回インストーラーはコントロールノードで実行するため localhost はコントロールノードを指します。

セクション 説明
[automationcontroller] localhost がデフォルトで定義されていてそのまま利用
[automationcontroller:vars] 今回は localhost をコントロールノードとして分離したいので node_type=control を指定。デフォルトは node_type=hybrid 相当で、ハイブリッドノード(コントロールノード兼実行ノード)になる
[execution_nodes] 実行ノードを指定する。インストーラー内部で Playbook が呼ばれ、ここで指定したノードに接続、インストールするため、Ansible的なお作法で接続できるようにしておく必要がある。要 root 権限。利用するユーザーや権限に応じて要変更
[all:vars] 特にノードの構成とは関係なく定義するもの。デフォルトのハイブリッドノードの構成でインストールするときと同じ

execution_nodes グループに所属するホストに対して、対応する SSH ホストキーがコントロールノード上に登録されていない場合、ホストキーチェックで一時停止します。これを防ぐには、あらかじめホストキーを登録しておくか、ansible.cfghost_key_checking=False を指定するなどして対策をしておきます。Ansibleの一般的な対応方法と同じです。

また、インストール中にコントロールノードから実行ノードへのレセプター経由の通信テストが行われます。そのため、あらかじめ実行ノードへの通信経路上で SSH だけでなくTCP 27199ポートが許可されるようにしておく必要があります。

4.3. インストーラーの実行

それでは、インストーラの実行です。ansible-automation-platform-setup-2.1.1-1 ディレクトリのまま以下のコマンドを実行します。

sudo ./setup.sh

今回の環境では、15-20分ほどかかりました。

初めて実行したときは以下のエラーで止まってしまいました。実行ノードへの TCP 27199 は開放していたのですが・・。

TASK [ansible.automation_platform_installer.receptor : Validate connectivity for Mesh peers] ***
FAILED - RETRYING: [localhost]: Validate connectivity for Mesh peers (10 retries left).
FAILED - RETRYING: [localhost]: Validate connectivity for Mesh peers (9 retries left).
FAILED - RETRYING: [localhost]: Validate connectivity for Mesh peers (8 retries left).
FAILED - RETRYING: [localhost]: Validate connectivity for Mesh peers (7 retries left).
FAILED - RETRYING: [localhost]: Validate connectivity for Mesh peers (6 retries left).
FAILED - RETRYING: [localhost]: Validate connectivity for Mesh peers (5 retries left).
FAILED - RETRYING: [localhost]: Validate connectivity for Mesh peers (4 retries left).
FAILED - RETRYING: [localhost]: Validate connectivity for Mesh peers (3 retries left).
FAILED - RETRYING: [localhost]: Validate connectivity for Mesh peers (2 retries left).
FAILED - RETRYING: [localhost]: Validate connectivity for Mesh peers (1 retries left).
failed: [localhost] (item=rhel84ace2) => {"ansible_loop_var": "item", "attempts": 10, "changed": true, "cmd": ["receptorctl", "--socket", "/var/run/awx-receptor/receptor.sock", "ping", "実行ノードのグロバル", "--count", "1"], "delta": "0:00:00.137918", "end": "2022-03-19 06:49:42.683413", "failed_when_result": true, "item": "rhel84ace2", "msg": "non-zero return code", "rc": 2, "start": "2022-03-19 06:49:42.545495", "stderr": "", "stderr_lines": [], "stdout": "Error: no route to node", "stdout_lines": ["Error: no route to node"]}
...ignoring

...(略)...

TASK [ansible.automation_platform_installer.receptor : Report error when mesh connectivity issue is detected] ***
fatal: [localhost]: FAILED! => {"changed": false, "msg": "An error was detected on Controller Mesh network. Please verify the task output above for further details."}
skipping: [rhel84ace2] => {"changed": false, "skip_reason": "Conditional result was False"}

...(略)...

PLAY RECAP *********************************************************************
localhost                  : ok=258  changed=129  unreachable=0    failed=1    skipped=141  rescued=0    ignored=7   
rhel84ace2                 : ok=77   changed=35   unreachable=0    failed=0    skipped=53   rescued=0    ignored=1  

特に何もせず、もう一度インストーラーを実行したら最後まで正常に完了したため、ポート開放状況の問題ではなさそうででした。

正常完了すると最後はこんなログが表示されました。

PLAY RECAP *********************************************************************
localhost                  : ok=244  changed=53   unreachable=0    failed=0    skipped=162  rescued=0    ignored=0   
rhel84ace2                 : ok=68   changed=10   unreachable=0    failed=0    skipped=62   rescued=0    ignored=0   

The setup process completed successfully.
Setup log saved to /var/log/tower/setup-2022-03-19-10:16:41.log.

権限昇格不足だとこんなエラーに

今回の inventory[execution_nodes] で指定したユーザーの場合、ansible_become による権限昇格が必要でしたが、指定し忘れたときは以下のエラーが表示されました。内部で uid でチェックしているようです。

TASK [ansible.automation_platform_installer.config_dynamic : Ensure user is root] ***
skipping: [localhost] => {"changed": false, "skip_reason": "Conditional result was False"}
fatal: [rhel84ace2]: FAILED! => {"changed": false, "msg": "UID on remote machine is 1000 (0 required). Check Ansible connection and become settings."}
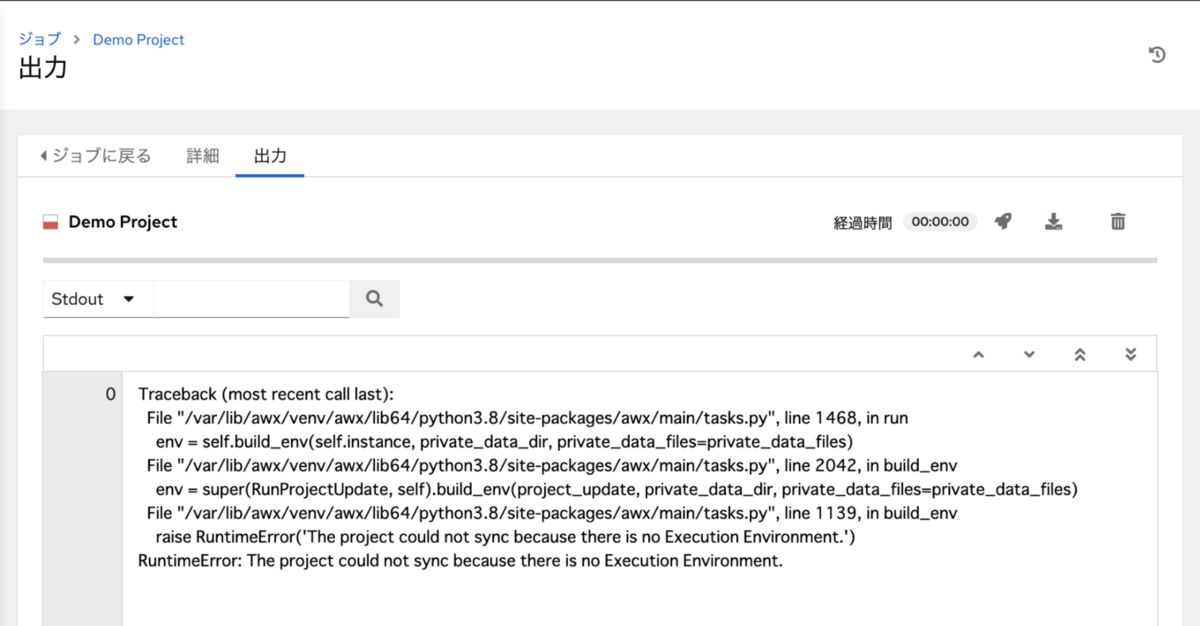
4.5. 構成図の出力(オマケ)

オマケ的な位置づけですが、inventory で指定した、各ノードの構成図を Graphviz の dot ファイルで生成する機能が、インストーラーにあります。

 ./setup.sh -- -t generate_dot_file

この方法は、インストーラー内で実行される Playbook の構成図作成処理に generate_dot_file タグが付いているため、そのタグを指定しています。インストーラーのコマンドの -- の後に、インストーラー内部の ansible-playbook コマンドのオプションを渡せる性質を利用しています。構成図作成処理には never タグも付いているため、デフォルトでは図が作成されません。

今回の構成の場合は、以下の mesh-topology.dot が生成されました。

$ cat mesh-topology.dot 
strict digraph "" {
    rankdir = TB
    node [shape=box];
    subgraph cluster_0 {
        graph [label="Control Nodes", type=solid];
        {
            rank = same;
            "localhost";
        }
    }

    "rhel84ace2";
    "localhost" -> "rhel84ace2";
}

描画するこのようになります。(こちらのサイトを利用)

コントロールノード、実行ノードそれぞれ1台のシンプルな構成

なお、inventory[automationcontroller:var] で、node_typehybridcontrol 以外の値を指定したときは以下のエラーが表示されました。実際はただのスペルミスでした。

TASK [Parse Mesh] **************************************************************
fatal: [localhost]: FAILED! => {"msg": "Receptor node localhost has an invalid node_type for group automationcontroller, it must be one of the following: hybrid, control"}

この構成図の作成機能でも、ファクト収集が実行され、実行ノードへのSSH接続がされます。そのため、実際のインストールの前に、構成図を出力して、接続や構成の確認するのはアリかもしれません。

■ 5. 状態確認

インストールが無事にできたようなので、いろいろ状態を確認します。すべてコントロールノードでの作業です。

5.1. API による状態確認

まず手始めに API での確認です。

API/api/v2/ping/を叩くと、インスタンスグループとして各ノードの情報が表示されます。認証情報も不要なので、とても手軽に確認できます。

コントロールノードに対してGETで実行します。

https://コントロールノードのグローバルIP/api/v2/ping/

結果は以下のとおりです。instances 配下にノードが2台あり、node_type が実行ノードでは、execution、コントロールノードでは control であることが分かります。

{
    "ha": false,
    "version": "4.1.1",
    "active_node": "localhost",
    "install_uuid": "xxx",
    "instances": [
        {
            "node": "実行ノードのグローバルIP",
            "node_type": "execution",   // ポイント
            "uuid": "yyy",
            "heartbeat": "2022-03-19T10:14:06.737391Z",
            "capacity": 57,
            "version": "ansible-runner-2.1.1"
        },
        {
            "node": "localhost",
            "node_type": "control",   // ポイント
            "uuid": "zzz",
            "heartbeat": "2022-03-19T10:14:06.678438Z",
            "capacity": 55,
            "version": "4.1.1"
        }
    ],
    "instance_groups": [
        {
            "name": "controlplane",
            "capacity": 55,
            "instances": [
                "localhost"
            ]
        },
        {
            "name": "default",
            "capacity": 57,
            "instances": [
                "実行ノードのグローバルIP"
            ]
        }
    ]
}

なお、ハイブリッドノードで構築(デフォルト)した場合、instancesnode_type の値は hybrid になります。

5.2. receptorctl コマンドによる状態確認

Automation mesh 内のノード感の通信状況のなどの操作をする receptorctl というコマンドがあります。 前述のウェビナーで知りました。

pingtraceroutestatus を確認します。

ping の結果は以下のとおりです。正常に返ってきています。

$ sudo su - awx   # awx ユーザーに切り替え
$ receptorctl --socket /var/run/awx-receptor/receptor.sock ping 実行ノードのグローバルIP
Reply from 実行ノードのグローバルIP in 139.429964ms
Reply from 実行ノードのグローバルIP in 140.613656ms
Reply from 実行ノードのグローバルIP in 139.723559ms
Reply from 実行ノードのグローバルIP in 139.933604ms

通信経路上で TCP 27199 を閉めたり、実行ノード上で sudo systemctl stop receptor すると、Error: timeoutError: no route to node になりました。

traceroute の結果は以下のとおりです。ホップノードを挟んでいないのであまりおもしろい結果ではないです。

$  receptorctl --socket /var/run/awx-receptor/receptor.sock traceroute 実行ノードのグローバルIP
0: localhost.localdomain in 76.941µs
1: 実行ノードのグローバルIP in 139.982863ms

あくまで Automation mesh のノードとしての経路を示すので、IPレベルの traceroute とは経路の見え方が異なります。

status の結果は以下のとおりです。正しく認識していそうな表示です。Cost は、メッシュ構成のどの経路を優先するかを決めるもののようです。ルーティングと似ていますね。

$ receptorctl --socket /var/run/awx-receptor/receptor.sock status
Node ID: localhost.localdomain
Version: 1.1.1
System CPU Count: 2
System Memory MiB: 7556

Connection            Cost
実行ノードのグローバルIP        1

Known Node            Known Connections
実行ノードのグローバルIP        {'localhost.localdomain': 1}
localhost.localdomain {'実行ノードのグローバルIP': 1}

Route                 Via
実行ノードのグローバルIP        実行ノードのグローバルIP

Node                  Service   Type       Last Seen             Tags
localhost.localdomain control   StreamTLS  2022-03-19 11:16:39   {'type': 'Control Service'}
実行ノードのグローバルIP        control   StreamTLS  2022-03-19 20:07:28   {'type': 'Control Service'}

Node                  Secure Work Types
localhost.localdomain local, kubernetes-runtime-auth, kubernetes-incluster-auth
実行ノードのグローバルIP        ansible-runner

なお、receptorctl --help を表示すると、他にも connectreloadversionwork というコマンドがありました。

Commands:
  connect     Connect the local terminal to a Receptor service on a remote...
  ping        Ping a Receptor node.
  reload      Reload receptor configuration.
  status      Show the status of the Receptor network.
  traceroute  Do a traceroute to a Receptor node.
  version     Show version information for receptorctl and the receptor node
  work        Commands related to unit-of-work processing

5.3. Web UI にる状態確認

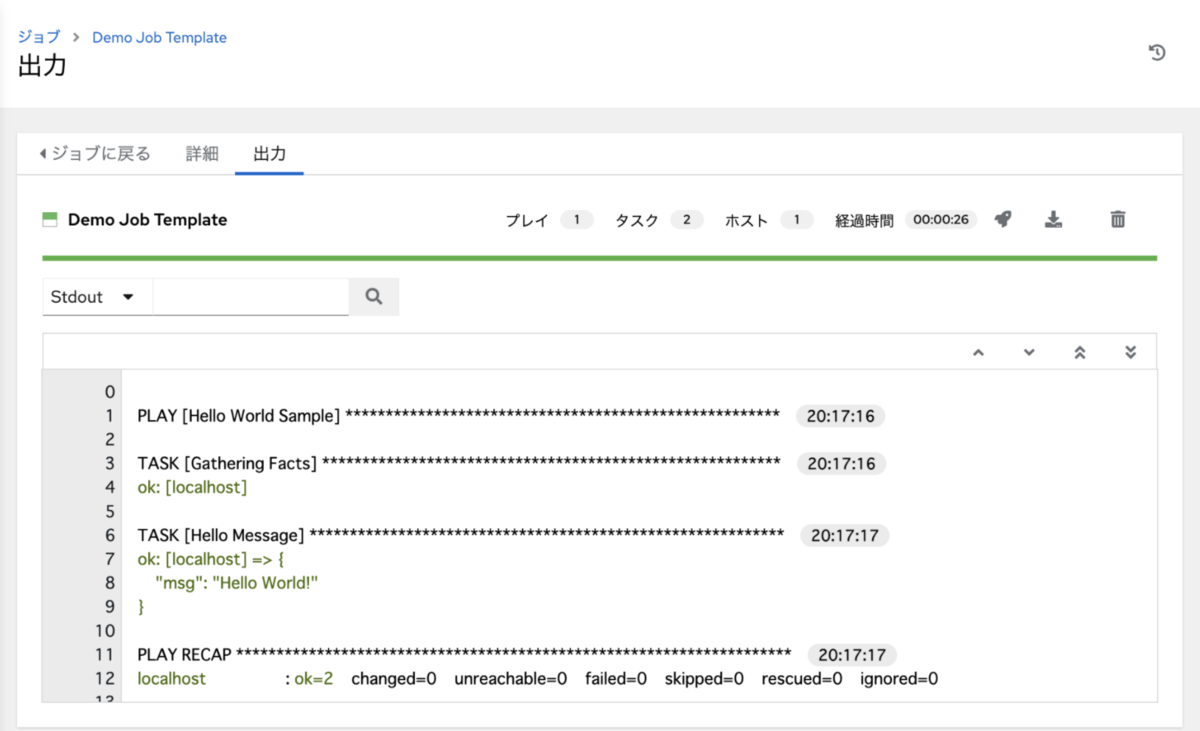
今度は、Automation Controller の Web UI(コントロールノード)での確認をします。

ライセンス認証がまだの場合は済ませておきます。今回はマニフェストファイルを利用しました。

パッと見はハイブリッドノードで構築したときと変わりませんが、違いはインスタンスグループ画面に出ます。

[管理] > [インスタンスグループ] 画面には、control planedefault というインスタンスグループが表示されます。この内 default をクリックします。

インスタンスグループ default をクリック

インスタンスグループの詳細画面が表示されるので、インスタンス タブをクリックします。

インスタンスグループ default で「インスタンス」をクリック

インスタンスの一覧が表示されます。実行ノードとして指定したノードがあることが分かります。インストーラーの inventoryansible_host 変数に指定した実行ノードのグローバルIPアドレスの値が、インスタンス名として利用されていました。

インスタンス一覧

なお、ハイブリッドノードとして構築した場合はこの画面では localhost のみでした。

更にインスタンス名をクリックすると、詳細が表示されます。定期的にヘルスチェックが行われるようで、状態は良好のようでした。眺めてるとヘルチェックは1分間隔のようでした。

実行ノードインスタンスの詳細

あくまで Web UI を持つのはコントロールノードなので、実行ノードには http アクセスできません。

5.4. パケットレベルのコマンドによる状態確認(オマケ)

これはオマケ的な扱いですが、実行ノード上で tcpdump を眺めていると、コントロールノードとコネクションがはられた状態のまま、10秒間隔でパケットが飛んでいました。 ポーリングのようなものでしょうか。Automation Controller の Web UI で確認できるヘルスチェックの間隔ともまた異なるようです。

契機となるパケットの向きは、以下のように [コントロールノード] > [実行ノード:27199] のときもあれば、逆の時もありました。なにか条件によって変わるのかもしれませんが、詳細は不明です。rhel84ace2 が実行ノードです。

19:56:34.311143 IP コントロールノードのグローバルIP.33580 > rhel84ace2.27199: Flags [P.], seq 341:574, ack 241, win 849, options [nop,nop,TS val 1363547663 ecr 2963536384], length 233
19:56:34.311176 IP rhel84ace2.27199 > コントロールノードのグローバルIP.33580: Flags [.], ack 574, win 1432, options [nop,nop,TS val 2963542674 ecr 1363547663], length 0
19:56:34.381586 IP rhel84ace2.27199 > コントロールノードのグローバルIP.33580: Flags [P.], seq 241:467, ack 574, win 1432, options [nop,nop,TS val 2963542744 ecr 1363547663], length 226
19:56:34.521230 IP コントロールノードのグローバルIP.33580 > rhel84ace2.27199: Flags [.], ack 467, win 849, options [nop,nop,TS val 1363547874 ecr 2963542744], length 0
19:56:44.310948 IP コントロールノードのグローバルIP.33580 > rhel84ace2.27199: Flags [P.], seq 574:807, ack 467, win 849, options [nop,nop,TS val 1363557663 ecr 2963542744], length 233
19:56:44.310969 IP rhel84ace2.27199 > コントロールノードのグローバルIP.33580: Flags [.], ack 807, win 1432, options [nop,nop,TS val 2963552674 ecr 1363557663], length 0
19:56:44.382521 IP rhel84ace2.27199 > コントロールノードのグローバルIP.33580: Flags [P.], seq 467:693, ack 807, win 1432, options [nop,nop,TS val 2963552745 ecr 1363557663], length 226
19:56:44.522032 IP コントロールノードのグローバルIP.33580 > rhel84ace2.27199: Flags [.], ack 693, win 849, options [nop,nop,TS val 1363557875 ecr 2963552745], length 0
19:56:54.311047 IP コントロールノードのグローバルIP.33580 > rhel84ace2.27199: Flags [P.], seq 807:1040, ack 693, win 849, options [nop,nop,TS val 1363567664 ecr 2963552745], length 233
19:56:54.311080 IP rhel84ace2.27199 > コントロールノードのグローバルIP.33580: Flags [.], ack 1040, win 1432, options [nop,nop,TS val 2963562674 ecr 1363567664], length 0
19:56:54.383541 IP rhel84ace2.27199 > コントロールノードのグローバルIP.33580: Flags [P.], seq 693:919, ack 1040, win 1432, options [nop,nop,TS val 2963562746 ecr 1363567664], length 226
19:56:54.523149 IP コントロールノードのグローバルip.33580 > rhel84ace2.27199: Flags [.], ack 919, win 849, options [nop,nop,TS val 1363567876 ecr 2963562746], length 0

逆のときの例(別の環境ですが rhel84ace が実行ノード) https://twitter.com/akira6592/status/1504827993528889344/photo/1

■ 6. 動作確認1: Demo Job Template

ようやく、ジョブテンプレートの実行です。なるべく単純なもので試したかったので、デフォルトで存在するジョブテンプレートを試しました。

デモプロジェクト Demo Project (リポジトリ https://github.com/ansible/ansible-tower-samples)を参照し、localhost で debug メッセージを表示するだけのものです。

6.1. プロジェクト更新がいつの間に失敗

さてジョブを実行しよう、と思ったのですが、プロジェクトの更新が失敗していることに気が付きました。とくに更新の操作はしていませんが。詳細は不明です。

Demo Project の初期のエラー

更新を再実行したら正常になりました。

6.2. ジョブテンプレート実行

気を取り直して、Web UI から Demo Job Template を起動します。

結果はこちら。

Demo Job Template の起動

うまくいったようです。

若干気になるのが、ジョブ実行画面の詳細画面で以下のメッセージが表示されている点です。

Task was marked as running but was not present in the job queue, so it has been marked as failed.

気になるメッセージ

再実行したら先のメッセージは表示されなくなりました。何度か試して見る限り、実行ノードにイメージがない状態でpullからはじめるとこのエラーが表示される傾向がありました。再実行で解消しても、イメージを削除して再実行すると再現しました。

再実行で解消

イメージpullなどの様子

ジョブテンプレート実行によってイメージが pull されることなどを確認しました。それぞれ awx ユーザーでの確認です。

コントロールノード上

ジョブの実行前は何もイメージがない状態です。

# コントロールノード
$ podman images
REPOSITORY  TAG         IMAGE ID    CREATED     SIZE

ジョブ実行中の podman ps です。これはプロジェクト更新によるもののはずです。特に利用するイメージを指定していないため、実行環境 Control Plane Execution Environment で指定された registry.redhat.io/ansible-automation-platform-21/ee-supported-rhel8:latest が利用されています。

# コントロールノード
$ podman ps
CONTAINER ID  IMAGE                                                                        COMMAND               CREATED       STATUS           PORTS       NAMES
16c6fdd371a7  registry.redhat.io/ansible-automation-platform-21/ee-supported-rhel8:latest  ansible-playbook ...  1 second ago  Up 1 second ago              ansible_runner_8

ジョブ実行後、イメージが残っています。

# コントロールノード
$ podman images
REPOSITORY                                                            TAG         IMAGE ID      CREATED     SIZE
registry.redhat.io/ansible-automation-platform-21/ee-supported-rhel8  latest      2fa77afffbf6  4 days ago  1.17 GB

実行ノード上

ジョブの実行前は何もイメージがない状態です。

# 実行ノード
$ podman images
REPOSITORY  TAG         IMAGE ID    CREATED     SIZE

ジョブ実行中の podman ps です。これはジョブ本体の実行によるもののはずです。特に利用するイメージを指定していないため、実行環境 Default Execution Environment で指定された registry.redhat.io/ansible-automation-platform-21/ee-supported-rhel8:latest が利用されています。結果的に Control Plane Execution Environment で指定したイメージと同じになっています。

# 実行ノード
$ podman ps
CONTAINER ID  IMAGE                                                                        COMMAND               CREATED                 STATUS                     PORTS       NAMES
36745a921bc9  registry.redhat.io/ansible-automation-platform-21/ee-supported-rhel8:latest  ansible-playbook ...  Less than a second ago  Up Less than a second ago              ansible_runner_9

ジョブ実行後、イメージが残ってます。

# 実行ノード
$ podman images
REPOSITORY                                                            TAG         IMAGE ID      CREATED     SIZE
registry.redhat.io/ansible-automation-platform-21/ee-supported-rhel8  latest      2fa77afffbf6  4 days ago  1.17 GB

■ 7. 動作確認2: 家の中のマネージドノードを操作するジョブテンプレート

いよいよ、本命のジョブテンプレートの実行を試します。マネージドノードとなる Cisco IOS の機器は、コントロールノードがら IP 的に直接アクセスできない家の中にあります。

7.1. 各種設定

先程試したデモ用とは異なり、以下の工夫を仕込みます。

  • ジョブの実行の EE には Minimal execution environment で定義している、registry.redhat.io/ansible-automation-platform-21/ee-minimal-rhel8:latestを利用
    • この EE には cisco.ios コレクションは含まれていない
  • collections/requirements.yml によるコレクションのダウンロード
    • これにより、Minimal execution environment でも cisco.ios コレクションが利用できるようになる
  • スタティックなインベントリ定義に加え、ダイナミックなインベントリプラグイン azure.azcollection.azure_rm を利用
    • マネージドノードが家の機器であることをわかりやすくするため、実際に操作するマネージドノードはスタティックに定義
    • azure.azcollection.azure_rm の方は、ダイナミックインベントリの更新がどのノードで行わるかの確認用

プロジェクト設定

git 連携のプロジェクトを作成します。

collections/requirements.yml には、cisco.ios コレクションをダウンロードするための定義をしてあります。コントロールノード上でこの定義にしたがってダウンロードされます。

---
collections:
  - name: cisco.ios
    version: 2.8.0

他、show コマンドを実行して debug 表示するだけの Playbook などがあります。

認証情報設定

2つの認証情報を作成します。

  1. Cisco IOSルーターへの接続に利用する認証情報(タイプ: マシン)
  2. azure.azcollection.azure_rm インベントリプラグイン用の認証情報(タイプ: Microsoft Azure Resource Manager)

インベントリー設定

インベントリーオブジェクトとして inv_main を作成し、その中にスタティック定義とダイナミックな定義(インベントリソース)をします。

  1. 家の Cisco IOSルーター ios01 を定義
    • ansible_host 変数に 192.168.1.11 を指定、このアドレスはコントロールノードからはアクセス不可だが、実行ノードからはアクセス可
  2. azure.azcollection.azure_rm インベントリプラグインを利用するインベントリソースを定義
    • 認証情報には、先程作成した タイプ Microsoft Azure Resource Manager の認証情報を指定
    • 「起動時の更新」にチェックを入れる
    • 実行環境は特に指定しない
    • 前述の通り、こちらはダイナミックインベントリ更新がどのノードでされるかの確認用なので、ジョブからは利用しない

ソースの設定

ジョブテンプレート設定

これまで作成した、インベントリー、プロジェクト、認証情報を指定します。

Playbook には、Cisco IOSルーターに show コマンドを実行して debug 表示するだけのものを指定します。show コマンドの実行には、cisco.ios コレクションのモジュールを利用します。

また、実行環境には Minimal execution environment を指定します。イメージは registry.redhat.io/ansible-automation-platform-21/ee-minimal-rhel8:latest です。 デフォルトの Default execution environment 定義したイメージ registry.redhat.io/ansible-automation-platform-21/ee-supported-rhel8:latest とは異なり、cisco.ios コレクションが入っていません。ですが、前述の通り、プロジェクト内の collections/requirements.ymlcisco.ios を定義しているため、動的にダウンロード後に利用可能になるという仕組みです。

ジョブテンプレートの設定として「インスタンスグループ」もありますが、今回は指定なしにしてみます。

ジョブテンプレートの作成

7.2. ジョブテンプレート実行

さて、実行です。通常通りジョブテンプレートを実行します。うまく実行できたようです。

ジョブテンプレートの実行結果 - 出力

ジョブテンプレート実行結果 - 詳細

実行ノード上での awx ユーザーでいくつか確認します。

イメージpullなどの様子

コントロードノード上

ジョブ実行中の podman ps は以下の通りです。おそらくプロジェクト更新と、collections/requirements.yml の定義に基づくコレクションのダウンロードしているものかと思います。

# コントロールノード
$ podman ps
CONTAINER ID  IMAGE                                                                        COMMAND               CREATED         STATUS             PORTS       NAMES
3cf5dcde1a65  registry.redhat.io/ansible-automation-platform-21/ee-supported-rhel8:latest  ansible-playbook ...  19 seconds ago  Up 19 seconds ago              ansible_runner_230

実行ノード上

ジョブ実行中の podman ps です。 2段階あります。

1段階目は、ダイナミックインベントリの更新です。COMMANDansible-inventory になっていることからそう判断しました(ドキュメントなどで正確に知りたいところ)。タイミング的には、コントロールノード側で処理のあとでした。

# 実行ノード
CONTAINER ID  IMAGE                                                                        COMMAND               CREATED        STATUS            PORTS       NAMES
5e0850bc6a5f  registry.redhat.io/ansible-automation-platform-21/ee-supported-rhel8:latest  ansible-inventory...  9 seconds ago  Up 9 seconds ago              ansible_runner_231

2段階目は、実際のジョブの実行です。ジョブテンプレートの実行環境で指定した、ee-minimal-rhel8 のほうのイメージのコンテナが起動していることが分かります。

# 実行ノード
CONTAINER ID  IMAGE                                                                      COMMAND               CREATED        STATUS            PORTS       NAMES
e663d893937f  registry.redhat.io/ansible-automation-platform-21/ee-minimal-rhel8:latest  ansible-playbook ...  3 seconds ago  Up 3 seconds ago              ansible_runner_229

ジョブ実行後、イメージが残ってます。

# 実行ノード
$ podman images
REPOSITORY                                                            TAG         IMAGE ID      CREATED     SIZE
registry.redhat.io/ansible-automation-platform-21/ee-supported-rhel8  latest      2fa77afffbf6  6 days ago  1.17 GB
registry.redhat.io/ansible-automation-platform-21/ee-minimal-rhel8    latest      d8b3521c4042  6 days ago  394 MB

インベントリーの確認

ジョブテンプレート実行後、想定通り azure.azcollection.azure_rm インベントリプラグインによるホストが追加されました。

Azure 上の VM が追加されている

collections/requirements.yml の定義 ないとエラー(オマケ)

なお、collections/requirements.yml を削除して再実行したら、想定通りモジュールが見つからない旨のエラーになりました。EE Minimal execution environment で実行されたことが、このことからも分かります。

まとめ・雑感

長くなりましたが、AAP 2.1 で導入された Automation mesh を試しました。シンプルにコントロールノード、実行ノードそれぞれ1台ずつの構成でした。

分離させることによって、なにがどちらのノードの実行させるのかが、調べたり試したりすることによって少し理解できいました。

今回の構成では、コントロールノードが直接アクセスできない構成でも、実行ノードを経由することによって制御可能になる、という点がメリットだと思います。

実行ノードが社内LANにより近い側に置かれると思いますが、依然としてコンテナレジストリへのアクセスが必要なのでインターネット接続性が必要です。もし何らかの事情で、インターネット接続性がない場合は、イメージ予めローカルに置いておくか、アクセスできる範囲に Private Automation Hub や GitLab などのコンテナレジストリを配置するかという形にになるかと思います。

今回はじめて Automation mesh を試しましたが、まだ以下の疑問が残っています。機会があれば調べてみたいと思います。

  • 実行ノードでコンテナレジストリにアクセスするための認証情報はどこからくるのか
    • 毎回 コントロールノードからくるのか、インストール時に実行ノード側に保存されるのか
  • 各ノードを追加、削除する方法
  • ジョブ実行時の例のメッセージの詳細
    • Task was marked as running but was not present in the job queue, so it has been marked as failed.

  • ダイナミックインベントリ更新に利用されるデフォルトイメージは Default Execution Environment のものか Control Plane Execution Environment のものか
    • 実質同じイメージであり、変更もできないのであまり気にする必要もなさそう

参考資料

www.ansible.com www.ansible.com access.redhat.com events.redhat.com

[Ansible] ansible-lint 6.0.0 のインストールで ansible-core 2.12.3 も一緒にインストールされる

はじめに

先日 ansible-lint 6.0.0 がリリースされました。

github.com

.config/ansible-lint.yml を読み込むようになったり、ansible 2.9 や Python3.6、3.7 がサポートされなくなったり、フォーマット機能がつくなど変更がありました。

また、インストールしたときにも気がついたのですが、ansible-core をセットでインストールするようになりました。

Made ansible-core a direct dependency (#1888) @ssbarnea

インストールのドキュメントからは、

You need to either install the desired version of Ansible yourself or mention one of the helper extras:

とういう記載がなくなりました

ansible-lint 6.0.0 をインストールすることによって、ansible-core 2.12.3 もインストールされることを試したので結果をまとめます。

  • 動作確認環境

検証1: ほぼ素の venv から

素の venv に pip install pip --upgrade だけした状態から始めます。

事前

% pip list
Package    Version
---------- -------
pip        22.0.4
setuptools 60.5.0

ansible-lint 6.0.0 インストールとその後

ansible-lint をインストールします。現在は私の環境(Python 3.9.10) 6.0.0 がインストールされます。

% pip install ansible-lint
Collecting ansible-lint
  Using cached ansible_lint-6.0.0-py3-none-any.whl (136 kB)
Collecting wcmatch>=7.0
  Using cached wcmatch-8.3-py3-none-any.whl (42 kB)
Collecting pyyaml
  Using cached PyYAML-6.0-cp39-cp39-macosx_10_9_x86_64.whl (197 kB)
Collecting ansible-core>=2.12.0
  Using cached ansible-core-2.12.3.tar.gz (7.8 MB)
...(略)...

インストール後、確認すると ansiblec-core 2.12.3 もインストールされたことが確認できます。

% pip list                
Package          Version
---------------- -------
ansible-compat   2.0.0
ansible-core     2.12.3   # ここ
ansible-lint     6.0.0
bracex           2.2.1
...(略)...
yamllint         1.26.3

別のchangelogにも記載がありましたが、yamllint 入りますね。

検証2: ansible-core 2.11 系インストールの状態から

次は pip install pip --upgrade 後に

pip install ansible-core==2.11.9 

を実行した状態から始めます。

事前

ansible-core 2.11.9 がインストールされています。

 % pip list
Package      Version
------------ -------
ansible-core 2.11.9
cffi         1.15.0
cryptography 36.0.2
Jinja2       3.0.3
MarkupSafe   2.1.1
packaging    21.3
pip          22.0.4
pycparser    2.21
pyparsing    3.0.7
PyYAML       6.0
resolvelib   0.5.4
setuptools   60.5.0

ansible-lint 6.0.0 インストールとその後

ansible-lint をインストールします。途中、もともと入っていた ansibl-core 2.11.9 がアンインストールされるログも見受けられます。

% pip install ansible-lint
Collecting ansible-lint
  Using cached ansible_lint-6.0.0-py3-none-any.whl (136 kB)
Collecting ansible-core>=2.12.0
  Using cached ansible-core-2.12.3.tar.gz (7.8 MB)
  Preparing metadata (setup.py) ... done
...(略)...
Using legacy 'setup.py install' for yamllint, since package 'wheel' is not installed.
Installing collected packages: commonmark, subprocess-tee, ruamel.yaml.clib, pygments, pathspec, bracex, yamllint, wcmatch, ruamel.yaml, rich, ansible-compat, enrich, ansible-core, ansible-lint
  Running setup.py install for yamllint ... done
  Attempting uninstall: ansible-core
    Found existing installation: ansible-core 2.11.9
    Uninstalling ansible-core-2.11.9:
      Successfully uninstalled ansible-core-2.11.9
...(略)...

インストール後、確認すると ansible-core 2.12.3 もインストールされたことが確認できます。

% pip list                
Package          Version
---------------- -------
ansible-compat   2.0.0
ansible-core     2.12.3   # ここ
ansible-lint     6.0.0
bracex           2.2.1
...(略)...
yamllint         1.26.3

ansibleコマンド の バージョン表記も 2.12.3 になります。

 % ansible --version
ansible [core 2.12.3]

検証3: ansible 2.9 系インストールの状態からだとエラーに

一応・・。

今度は pip install pip --upgrade 後に

pip install ansible==2.9.27

を実行した状態から始めます。ansible 2.9 系からです。

事前

ansible 2.9.27 がインストールされている状態です。

 % pip list
Package      Version
------------ -------
ansible      2.9.27
cffi         1.15.0
cryptography 36.0.2
Jinja2       3.0.3
MarkupSafe   2.1.1
pip          22.0.4
pycparser    2.21
PyYAML       6.0
setuptools   60.5.0

ansible コマンドのバージョン表記も 2.9.27 です。

% ansible --version
ansible 2.9.27

ansible-lint 6.0.0 インストール(エラー)とその後

ansible-lint をインストールしようと試みます。エラーになりました。ansible 2.10 でパッケージの分け方が変更された関係で、ansible 2.9 以前から 2.10 以降にアップグレードする際は、いったん ansible をアンインストールしてくださいという件です。なので、ansible-lint そのものの事情というより、ansible の事情ということかなと思います。

ansible

% pip install ansible-lint
Collecting ansible-lint
  Using cached ansible_lint-6.0.0-py3-none-any.whl (136 kB)
Collecting yamllint>=1.25.0
  Using cached yamllint-1.26.3.tar.gz (126 kB)
  Preparing metadata (setup.py) ... done
...(略)...
Installing collected packages: resolvelib, commonmark, subprocess-tee, ruamel.yaml.clib, pyparsing, pygments, pathspec, bracex, yamllint, wcmatch, ruamel.yaml, rich, packaging, ansible-compat, enrich, ansible-core, ansible-lint
  Running setup.py install for yamllint ... done
  Running setup.py install for ansible-core ... error
  error: subprocess-exited-with-error
  
  × Running setup.py install for ansible-core did not run successfully.
  │ exit code: 1
  ╰─> [28 lines of output]
      Traceback (most recent call last):
        File "<string>", line 2, in <module>
        File "<pip-setuptools-caller>", line 34, in <module>
        File "/private/var/folders/2s/h6djr0fn3773tj1zy4mg442c0000gn/T/pip-install-47xu8j2h/ansible-core_1efb8a412bd249b9a33bf132097bea90/setup.py", line 120, in <module>
          _validate_install_ansible_core()
        File "/private/var/folders/2s/h6djr0fn3773tj1zy4mg442c0000gn/T/pip-install-47xu8j2h/ansible-core_1efb8a412bd249b9a33bf132097bea90/setup.py", line 91, in _validate_install_ansible_core
          raise RuntimeError(
      RuntimeError:
      
          ****************************************************************************
      
          Cannot install ansible-core with a pre-existing ansible==2.9.27
          installation.
      
          Installing ansible-core with ansible-2.9 or older, or ansible-base-2.10
          currently installed with pip is known to cause problems. Please uninstall
          ansible and install the new version:
      
              pip uninstall ansible
              pip install ansible-core
      
          If you want to skip the conflict checks and manually resolve any issues
          afterwards, set the ANSIBLE_SKIP_CONFLICT_CHECK environment variable:
      
              ANSIBLE_SKIP_CONFLICT_CHECK=1 pip install ansible-core
      
          ****************************************************************************
      
      [end of output]
  
  note: This error originates from a subprocess, and is likely not a problem with pip.
error: legacy-install-failure

× Encountered error while trying to install package.
╰─> ansible-core

note: This is an issue with the package mentioned above, not pip.
hint: See above for output from the failure.

事後はこうなりました。ansible-lint はインストールされていません。ansible 2.9.27 は残ったままです。

% pip list
Package          Version
---------------- -------
ansible          2.9.27
ansible-compat   2.0.0
bracex           2.2.1
cffi             1.15.0
commonmark       0.9.1
cryptography     36.0.2
enrich           1.2.7
Jinja2           3.0.3
MarkupSafe       2.1.1
packaging        21.3
pathspec         0.9.0
pip              22.0.4
pycparser        2.21
Pygments         2.11.2
pyparsing        3.0.7
PyYAML           6.0
resolvelib       0.5.4
rich             12.0.0
ruamel.yaml      0.17.21
ruamel.yaml.clib 0.2.6
setuptools       60.5.0
subprocess-tee   0.3.5
wcmatch          8.3
yamllint         1.26.3

Python 3.6、3.7系の場合 は ansible-lint 5系まで

ansible-lint 6.0.0 の changelogに、

Remove support for py36 and py37 (#1850) @ssbarnea

とあるように、Python 3.6 と 3.7 はサポートされなくなりました

そのため、たとえば、Python 3.6.8 の環境で pip install ansible-lint を実行しても、現在の場合 5.4.0 までしかインストールされません。なので、ansible-core はセットでインストールされません。

終わりに

ansible-lint 6.0.0 をインストールすることによって、ansible-core 2.12.3 もインストールされることを確認しました。

インストール時は少し注意が必要かなと思います。lint用の別のvenvを用意するのがよいでしょうか。

また、 ansible 2.9 の環境には ansible-lint 5 系までとセットで使うべし、ということも分かりました(ansible-lint 6.0.0 の changelog でいう Remove support for ansible 2.9)。

調べ中のメモ

[Ansible] 「つまずき Ansible 【Part36】ansible-navigator」ふりかえり

はじめに

2022/03/12 に、YouTube Live で「つまずき Ansible 【Part36】ansible-navigator」という配信をしました。

tekunabe.connpass.com

これまで Playbook の実行といえば、ansible-playbook コマンドでした。 最近 ansible-navigator という新たなツールが出てきました。TUI または CLI のPlaybook 実行ツールです。今回はこれをさわりました。


動画

youtu.be

ansible-navigator とは

個人的に感じている特徴は以下の通りです。

  • TUI を備えている
  • Ansibleの実行環境コンテナ(Execution Environment)を利用できる
  • Playbook 実行だけなくドキュメントの参照などもできる

準備

インストール

今回は pip でインストールします。

pip install ansible-navigator

ansible-runner などの依存パッケージがインストールされます。ansible-navigator から ansible-runner を呼び出すような関係になっています。

$ pip list
Package             Version
------------------- -------
ansible-navigator   1.1.0
ansible-runner      2.1.2
...(略)...

ansibleansible-core はインストールされません。

TUI による Playbook 実行

まずは実行

Playbook の実行にはサブコマンド run を指定します。その後、Playbookファイル名とインベントリファイルを指定します。

$ ansible-navigator run debug.yml -i inventory 

以下のような画面になります。これはPlayの一覧です。

  PLAY NAME    OK  CHANGED   UNREACHABLE    FAILED   SKIPPED   IGNORED   IN PROGRESS     TASK COUNT        PROGRESS
0│localhost     1        0             0         0         0         0             0              1        COMPLETE

左にある番号を入力すると、そのPlay内のタスクの一覧が表示されます。

更に、タスクの番号を入力するとそのタスクの実行結果の詳細が表示されます。

動画を見ていただくほうが、分かりやすいと思います。

このTUIのモードは、設定上は interactive モードと呼ばれています。

ansible-playbook コマンドと同じ形式でもOK

デフォルトは interactive モードですが、ansible-playbook コマンド実行時と同じ形式の stdout モードにも変更できます。

指定は設定ファイル(後述)で行うか、ansible-navigator コマンドで --mode stdout を指定します。

$ ansible-navigator run debug.yml -i inventory --mode stdout

PLAY [localhost] ***************************************************************

TASK [debug] *******************************************************************
ok: [localhost] => {
    "msg": "sakana sakana sakana"
}

PLAY RECAP *********************************************************************
localhost                  : ok=1    changed=0    unreachable=0    failed=0    skipped=0    rescued=0    ignored=0   

アーティファクト(ログ)の保存とリプレイ機能

ansible-navigator にはアーティファクト保存機能があります。JSON形式で保存されます。

アーティファクトの例

以下は、ios_command でshow ip route を実行して debug 表示するPlaybookの実行したときのアーティファクトです。

▼クリックして開く

{
    "version": "1.0.0",
    "plays": [
        {
            "playbook": "/home/admin/stumble/ios_show.yml",
            "playbook_uuid": "6b70c8f8-4e21-4288-8fe0-53bc29178723",
            "play": "ios",
            "play_uuid": "a29dee92-8fae-871d-4141-000000000007",
            "play_pattern": "ios",
            "name": "ios",
            "pattern": "ios",
            "uuid": "a29dee92-8fae-871d-4141-000000000007",
            "__play_name": "ios",
            "tasks": [
                {
                    "playbook": "/home/admin/stumble/ios_show.yml",
                    "playbook_uuid": "6b70c8f8-4e21-4288-8fe0-53bc29178723",
                    "play": "ios",
                    "play_uuid": "a29dee92-8fae-871d-4141-000000000007",
                    "play_pattern": "ios",
                    "task": "exec show commands",
                    "task_uuid": "a29dee92-8fae-871d-4141-000000000009",
                    "task_action": "cisco.ios.ios_command",
                    "task_args": "",
                    "task_path": "/home/admin/stumble/ios_show.yml:6",
                    "host": "ios01",
                    "uuid": "8db1e3c2-ab2f-4ff7-917b-cd5bab31cfdb",
                    "__host": "ios01",
                    "__result": "OK",
                    "__changed": false,
                    "__duration": "1s",
                    "__number": 0,
                    "__task": "exec show commands",
                    "__task_action": "cisco.ios.ios_command",
                    "remote_addr": "ios01",
                    "res": {
                        "changed": false,
                        "stdout": [
                            "Codes: L - local, C - connected, S - static, R - RIP, M - mobile, B - BGP\n       D - EIGRP, EX - EIGRP external, O - OSPF, IA - OSPF inter area \n       N1 - OSPF NSSA external type 1, N2 - OSPF NSSA external type 2\n       E1 - OSPF external type 1, E2 - OSPF external type 2\n       i - IS-IS, su - IS-IS summary, L1 - IS-IS level-1, L2 - IS-IS level-2\n       ia - IS-IS inter area, * - candidate default, U - per-user static route\n       o - ODR, P - periodic downloaded static route, H - NHRP, l - LISP\n       a - application route\n       + - replicated route, % - next hop override, p - overrides from PfR\n\nGateway of last resort is not set\n\n      192.168.1.0/24 is variably subnetted, 2 subnets, 2 masks\nC        192.168.1.0/24 is directly connected, GigabitEthernet0/0\nL        192.168.1.11/32 is directly connected, GigabitEthernet0/0"
                        ],
                        "stdout_lines": [
                            [
                                "Codes: L - local, C - connected, S - static, R - RIP, M - mobile, B - BGP",
                                "       D - EIGRP, EX - EIGRP external, O - OSPF, IA - OSPF inter area ",
                                "       N1 - OSPF NSSA external type 1, N2 - OSPF NSSA external type 2",
                                "       E1 - OSPF external type 1, E2 - OSPF external type 2",
                                "       i - IS-IS, su - IS-IS summary, L1 - IS-IS level-1, L2 - IS-IS level-2",
                                "       ia - IS-IS inter area, * - candidate default, U - per-user static route",
                                "       o - ODR, P - periodic downloaded static route, H - NHRP, l - LISP",
                                "       a - application route",
                                "       + - replicated route, % - next hop override, p - overrides from PfR",
                                "",
                                "Gateway of last resort is not set",
                                "",
                                "      192.168.1.0/24 is variably subnetted, 2 subnets, 2 masks",
                                "C        192.168.1.0/24 is directly connected, GigabitEthernet0/0",
                                "L        192.168.1.11/32 is directly connected, GigabitEthernet0/0"
                            ]
                        ],
                        "invocation": {
                            "module_args": {
                                "commands": [
                                    "show ip route"
                                ],
                                "match": "all",
                                "retries": 10,
                                "interval": 1,
                                "wait_for": null,
                                "provider": null
                            }
                        },
                        "ansible_facts": {
                            "discovered_interpreter_python": "/usr/libexec/platform-python"
                        },
                        "_ansible_no_log": false
                    },
                    "start": "2022-03-12T10:48:19.084551",
                    "end": "2022-03-12T10:48:21.031434",
                    "duration": 1.946883,
                    "event_loop": null
                },
                {
                    "playbook": "/home/admin/stumble/ios_show.yml",
                    "playbook_uuid": "6b70c8f8-4e21-4288-8fe0-53bc29178723",
                    "play": "ios",
                    "play_uuid": "a29dee92-8fae-871d-4141-000000000007",
                    "play_pattern": "ios",
                    "task": "debug show commands",
                    "task_uuid": "a29dee92-8fae-871d-4141-00000000000a",
                    "task_action": "ansible.builtin.debug",
                    "task_args": "",
                    "task_path": "/home/admin/stumble/ios_show.yml:12",
                    "host": "ios01",
                    "uuid": "4ee85d46-5d0b-4a99-a806-4be244eb1fed",
                    "__host": "ios01",
                    "__result": "OK",
                    "__changed": false,
                    "__duration": "0s",
                    "__number": 1,
                    "__task": "debug show commands",
                    "__task_action": "ansible.builtin.debug",
                    "remote_addr": "ios01",
                    "res": {
                        "msg": [
                            "Codes: L - local, C - connected, S - static, R - RIP, M - mobile, B - BGP",
                            "       D - EIGRP, EX - EIGRP external, O - OSPF, IA - OSPF inter area ",
                            "       N1 - OSPF NSSA external type 1, N2 - OSPF NSSA external type 2",
                            "       E1 - OSPF external type 1, E2 - OSPF external type 2",
                            "       i - IS-IS, su - IS-IS summary, L1 - IS-IS level-1, L2 - IS-IS level-2",
                            "       ia - IS-IS inter area, * - candidate default, U - per-user static route",
                            "       o - ODR, P - periodic downloaded static route, H - NHRP, l - LISP",
                            "       a - application route",
                            "       + - replicated route, % - next hop override, p - overrides from PfR",
                            "",
                            "Gateway of last resort is not set",
                            "",
                            "      192.168.1.0/24 is variably subnetted, 2 subnets, 2 masks",
                            "C        192.168.1.0/24 is directly connected, GigabitEthernet0/0",
                            "L        192.168.1.11/32 is directly connected, GigabitEthernet0/0"
                        ],
                        "_ansible_verbose_always": true,
                        "_ansible_no_log": false,
                        "changed": false
                    },
                    "start": "2022-03-12T10:48:21.039585",
                    "end": "2022-03-12T10:48:21.544976",
                    "duration": 0.505391,
                    "event_loop": null
                }
            ]
        }
    ],
    "stdout": [
        "",
        "PLAY [ios] *********************************************************************",
        "",
        "TASK [exec show commands] ******************************************************",
        "\u001b[0;32mok: [ios01]\u001b[0m",
        "",
        "TASK [debug show commands] *****************************************************",
        "\u001b[0;32mok: [ios01] => {\u001b[0m",
        "\u001b[0;32m    \"msg\": [\u001b[0m",
        "\u001b[0;32m        \"Codes: L - local, C - connected, S - static, R - RIP, M - mobile, B - BGP\",\u001b[0m",
        "\u001b[0;32m        \"       D - EIGRP, EX - EIGRP external, O - OSPF, IA - OSPF inter area \",\u001b[0m",
        "\u001b[0;32m        \"       N1 - OSPF NSSA external type 1, N2 - OSPF NSSA external type 2\",\u001b[0m",
        "\u001b[0;32m        \"       E1 - OSPF external type 1, E2 - OSPF external type 2\",\u001b[0m",
        "\u001b[0;32m        \"       i - IS-IS, su - IS-IS summary, L1 - IS-IS level-1, L2 - IS-IS level-2\",\u001b[0m",
        "\u001b[0;32m        \"       ia - IS-IS inter area, * - candidate default, U - per-user static route\",\u001b[0m",
        "\u001b[0;32m        \"       o - ODR, P - periodic downloaded static route, H - NHRP, l - LISP\",\u001b[0m",
        "\u001b[0;32m        \"       a - application route\",\u001b[0m",
        "\u001b[0;32m        \"       + - replicated route, % - next hop override, p - overrides from PfR\",\u001b[0m",
        "\u001b[0;32m        \"\",\u001b[0m",
        "\u001b[0;32m        \"Gateway of last resort is not set\",\u001b[0m",
        "\u001b[0;32m        \"\",\u001b[0m",
        "\u001b[0;32m        \"      192.168.1.0/24 is variably subnetted, 2 subnets, 2 masks\",\u001b[0m",
        "\u001b[0;32m        \"C        192.168.1.0/24 is directly connected, GigabitEthernet0/0\",\u001b[0m",
        "\u001b[0;32m        \"L        192.168.1.11/32 is directly connected, GigabitEthernet0/0\"\u001b[0m",
        "\u001b[0;32m    ]\u001b[0m",
        "\u001b[0;32m}\u001b[0m",
        "",
        "PLAY RECAP *********************************************************************",
        "\u001b[0;32mios01\u001b[0m                      : \u001b[0;32mok=2   \u001b[0m changed=0    unreachable=0    failed=0    skipped=0    rescued=0    ignored=0   "
    ],
    "status": "successful",
    "status_color": 10
}

リプレイ機能で再現表示

そのまま表示するのも良いですが、リプレイ機能が便利です。

ansible-navigator replay アーティファクトファイル名

このように指定して実行すると、ansible-navigator run 実行を再現したような表示になります。Ansible Tower / Automation Controller でいうと過去のジョブ実行結果を後から表示するイメージです。

ansible-navigator runinteractive モードで実行したときのアーティファクトstdout モードで表示することもできますし、その逆もできます。


設定は ansible-navigator.yml

ansible-navigator の挙動を指定する設定ファイルは ansible-navigator.yml というファイルです。

厳密には、YAML でも JSON でも構いません。YAML の場合は、拡張子 は .yml または .yaml です。

  • 環境変数 ANSIBLE_NAVIGATOR_CONFIG で指定したパスのファイル
  • カレントディレクトリの ansible-navigator.yml
  • ~/.ansible-navigator.yml

ansible.cfg と似てますね。

この設定ファイルでは、利用するイメージの指定やモード、アーティファクトファイルの保存パスの指定などができます。設定項目の一覧は、公式ドキュメントに掲載されています。

ansible-navigator.readthedocs.io

なお、配信中にいじっていた設定ファイルは以下のようなものです。

---
ansible-navigator:

  # ansible:
  #   inventories:
  #     - inventory

  execution-environment:
    container-engine: podman
    enabled: true
    # image: quay.io/ansible/creator-ee:v0.2.0
    image: quay.io/ansible/ansible-runner:stable-2.12-latest
    # image: ghcr.io/akira6592/my-ee:latest
    pull-policy: missing

  # mode: stdout

  playbook-artifact:
    enable: True
    save-as: "artifacts/{playbook_name}-{ts_utc}.json"

Ansibleの実行環境コンテナの利用

利用イメージの定義

利用するイメージは、ansible-navigator.yml では以下のように image で指定します。

---
ansible-navigator:
  execution-environment:
    container-engine: podman
    enabled: true
    image: quay.io/ansible/ansible-runner:stable-2.12-latest

たとえば、このイメージに入っていないコレクションのモジュールを使おうとするとエラーになります。

イメージは、できあいの物を利用するか ansible-builder というツールを使って作成したものを利用します。

コンテナを使わなくてもOK

コンテナの実行環境を使わないで、ansible-navigator を実行している自身の環境の Ansible を利用できます。

---
ansible-navigator:
  execution-environment:
    enabled: false    # ここで無効を指定

コマンドのオプションで指定する場合は --ee false です。

Playbook 実行以外にも

ansible-navigator のサブコマンドを run 以外に切り替えることによって、ドキュメントの参照やコンフィグの参照などする機能もあります。

ansible-navigator のサブコマンドと、既存の ansible-* コマンドとの対応を以下のページにまとめられています。

ansible-navigator.readthedocs.io

ドキュメントの参照

ansible-doc コマンドに相当します。

モジュールを指定する場合、コマンド書式は以下のとおりです。

$ ansible-navigator doc モジュール名

おわりに

簡単ですが、ansible-navigator の紹介をしました。

コンテナによる実行環境が主流になってくると、コマンドとしては、ansible-navigator を使う機会も増えてくるかも知れません。

stdout モードが使えるのは気が利いているなと思います。

アーティファクトの保存とリプレイ機能も便利だと感じました。

参考


Part37にむけて

以下のネタを検討中です。気が向いたものをやります。 connpass申込時のアンケートでいただいたものも含めています。

  • ansible-builder
  • connection: local ななにか
  • Windows
  • cli_parse モジュール(Part15 の続き)
  • モジュールのテスト
  • Tower / AWX
  • role と Playbook のリポジトリ分割と読み込み
  • AWXとの共存を念頭に入れたDirectory構成

[Ansible] よく見る公式ドキュメントのページ5選

はじめに

チーム内で、Ansible の公式ドキュメントの見方についての話になったときに、よく参照するドキュメントはどこかという話に発展しました。

5つ紹介します。対象プラットフォームに限定しないものを取り上げています。

1. 各モジュールの説明ページ

おそらく多くの方も同じだと思います。

例えば ansible.builtin.debug モジュールであれば以下のページです。

docs.ansible.com

何をするモジュールか、どんなオプションがあってどんな値を指定できるか、使用例などが掲載されています。

私は初見のモジュールの場合は、まず例(Examples)を見て雰囲気を掴んでから、各オプションの説明を読む、という流れが多いです。

2. Using filters to manipulate data

フィルターの説明ページです。

docs.ansible.com

使い慣れているフィルターならいいのですが、たまに使うフィルターだと使い方を覚えていないのでここを起点に調べています。

あとは適当に眺めてると「こんなのがあったのか!」という発見もあります。

必要に応じてJinja2のドキュメントも参照します。

3. Ansible Configuration Settings

ansible.cfg環境変数などで設定できる設定項目の一覧です。

docs.ansible.com

例えば INTERPRETER_PYTHON であれば以下の箇所です。

docs.ansible.com

ini というのが ansible.cfg だと高設定するよという意味です。INTERPRETER_PYTHON であれば、section[defaults]なので、以下のように指定します。

[defaults]
interpreter_python=ここに設定値を指定

ansible.cfg で指定する場合、環境変数で指定する場合、変数で指定する場合、それぞれ名前が異なるので注意です。

これもやっぱり、眺めてると新しい発見があります。

4. Playbook Keywords

PlayやTask などの単位で、どういうキーワードを指定できるかの一覧です。

docs.ansible.com

たとえば、Taskに、become があるのであれば、以下のような指定ができるということが分かります。

# ...(略)...
  tasks:
    - name: yum
      ansible.builtin.yum:
        name: git
      become: true     # タスク単位でも指定可

5. Special Variables

予約変数の一覧です。

docs.ansible.com

ansible_ で始まるもの以外にもいろいろあることが分かります。

groups なんて、つい独自定義で使ってしまいそうですが・・

[Ansible] pip install ansible でバージョン5以降がインストールできないときはpythonバージョンを確認

とある環境で pipansible の 5系をインストールしようと思ったら、エラーになったことがありました。

$ pip install ansible==5.2.0
ERROR: Could not find a version that satisfies the requirement ansible==5.2.0 (from versions: 1.0, 1.1, 1.2, 1.2.1, 1.2.2, 1.2.3, 1.3.0, 1.3.1, 1.3.2, 1.3.3, 1.3.4, 1.4, 1.4.1, 1.4.2, 1.4.3, 1.4.4, 1.4.5, 1.5, 1.5.1, 1.5.2, 1.5.3, 1.5.4, 1.5.5, 1.6, 1.6.1, 1.6.2, 1.6.3, 1.6.4, 1.6.5, 1.6.6, 1.6.7, 1.6.8, 1.6.9, 1.6.10, 1.7, 1.7.1, 1.7.2, 1.8, 1.8.1, 1.8.2, 1.8.3, 1.8.4, 1.9.0.1, 1.9.1, 1.9.2, 1.9.3, 1.9.4, 1.9.5, 1.9.6, 2.0.0.0, 2.0.0.1, 2.0.0.2, 2.0.1.0, 2.0.2.0, 2.1.0.0, 2.1.1.0, 2.1.2.0, 2.1.3.0, 2.1.4.0, 2.1.5.0, 2.1.6.0, 2.2.0.0, 2.2.1.0, 2.2.2.0, 2.2.3.0, 2.3.0.0, 2.3.1.0, 2.3.2.0, 2.3.3.0, 2.4.0.0, 2.4.1.0, 2.4.2.0, 2.4.3.0, 2.4.4.0, 2.4.5.0, 2.4.6.0, 2.5.0a1, 2.5.0b1, 2.5.0b2, 2.5.0rc1, 2.5.0rc2, 2.5.0rc3, 2.5.0, 2.5.1, 2.5.2, 2.5.3, 2.5.4, 2.5.5, 2.5.6, 2.5.7, 2.5.8, 2.5.9, 2.5.10, 2.5.11, 2.5.12, 2.5.13, 2.5.14, 2.5.15, 2.6.0a1, 2.6.0a2, 2.6.0rc1, 2.6.0rc2, 2.6.0rc3, 2.6.0rc4, 2.6.0rc5, 2.6.0, 2.6.1, 2.6.2, 2.6.3, 2.6.4, 2.6.5, 2.6.6, 2.6.7, 2.6.8, 2.6.9, 2.6.10, 2.6.11, 2.6.12, 2.6.13, 2.6.14, 2.6.15, 2.6.16, 2.6.17, 2.6.18, 2.6.19, 2.6.20, 2.7.0.dev0, 2.7.0a1, 2.7.0b1, 2.7.0rc1, 2.7.0rc2, 2.7.0rc3, 2.7.0rc4, 2.7.0, 2.7.1, 2.7.2, 2.7.3, 2.7.4, 2.7.5, 2.7.6, 2.7.7, 2.7.8, 2.7.9, 2.7.10, 2.7.11, 2.7.12, 2.7.13, 2.7.14, 2.7.15, 2.7.16, 2.7.17, 2.7.18, 2.8.0a1, 2.8.0b1, 2.8.0rc1, 2.8.0rc2, 2.8.0rc3, 2.8.0, 2.8.1, 2.8.2, 2.8.3, 2.8.4, 2.8.5, 2.8.6, 2.8.7, 2.8.8, 2.8.9, 2.8.10, 2.8.11, 2.8.12, 2.8.13, 2.8.14, 2.8.15, 2.8.16rc1, 2.8.16, 2.8.17rc1, 2.8.17, 2.8.18rc1, 2.8.18, 2.8.19rc1, 2.8.19, 2.8.20rc1, 2.8.20, 2.9.0b1, 2.9.0rc1, 2.9.0rc2, 2.9.0rc3, 2.9.0rc4, 2.9.0rc5, 2.9.0, 2.9.1, 2.9.2, 2.9.3, 2.9.4, 2.9.5, 2.9.6, 2.9.7, 2.9.8, 2.9.9, 2.9.10, 2.9.11, 2.9.12, 2.9.13, 2.9.14rc1, 2.9.14, 2.9.15rc1, 2.9.15, 2.9.16rc1, 2.9.16, 2.9.17rc1, 2.9.17, 2.9.18rc1, 2.9.18, 2.9.19rc1, 2.9.19, 2.9.20rc1, 2.9.20, 2.9.21rc1, 2.9.21, 2.9.22rc1, 2.9.22, 2.9.23rc1, 2.9.23, 2.9.24rc1, 2.9.24, 2.9.25rc1, 2.9.25, 2.9.26rc1, 2.9.26, 2.9.27rc1, 2.9.27, 2.10.0a1, 2.10.0a2, 2.10.0a3, 2.10.0a4, 2.10.0a5, 2.10.0a6, 2.10.0a7, 2.10.0a8, 2.10.0a9, 2.10.0b1, 2.10.0b2, 2.10.0rc1, 2.10.0, 2.10.1, 2.10.2, 2.10.3, 2.10.4, 2.10.5, 2.10.6, 2.10.7, 3.0.0b1, 3.0.0rc1, 3.0.0, 3.1.0, 3.2.0, 3.3.0, 3.4.0, 4.0.0a1, 4.0.0a2, 4.0.0a3, 4.0.0a4, 4.0.0b1, 4.0.0b2, 4.0.0rc1, 4.0.0, 4.1.0, 4.2.0, 4.3.0, 4.4.0, 4.5.0, 4.6.0, 4.7.0, 4.8.0, 4.9.0, 4.10.0, 5.0.0a1, 5.0.0a2, 5.0.0a3, 5.0.0b1, 5.0.0b2, 5.0.0rc1)
ERROR: No matching distribution found for ansible==5.2.0

もちろんタイミング的にには、5系の正式版がリリースされてるのですが、バージョンの一覧に 5系の正式版が表示されません。

もしかしてと思ったら、Python 3.6 を使っていました。

ansible 5 の内部である ansible-core 2.12 では、コントロールノード(Ansibleをインストールするノード)の要件が Python 3.8 以上になりました。

Installing Ansible — Ansible Core Documentation

For your control node (the machine that runs Ansible), you can use any machine with Python 3.8 or newer installed.

ということで、Python 3.8 以上の環境で pip install ansible==5.2.0 を実行したら無事にインストールできました。

[Terraform] IOS XE Terraform provider で設定変更を試してみた

はじめに

Terraform の Cisco IOS XE 向けの Provider がリリースされたことを、先日知りました。

紹介ブログ https://blogs.cisco.com/developer/terraformiosxe01

内部的には CLI を実行するわけではく、RESTCONF ベースののようです。

Terraform はまだ慣れていないのですが、興味があったのでためしてみました。


■ 1. 共通 .tf ファイルの準備

1.1. terraform.tf の作成

利用するプロバイダーの指定です。Registry 上の iosxe providerUSE PROVIDER をクリックして表示されたものを参考しました。

terraform {
  required_providers {
    iosxe = {
      source  = "CiscoDevNet/iosxe"
      version = "0.1.1"
    }
  }
}

1.2. provider.tf の作成

iosxe プロバイダーの各種設定です。 GitHub リポジトリ上のサンプルを参考しました。

provider "iosxe" {
  host            = "https://ネットワーク機器のアドレス"
  device_username = "dummy_user"
  device_password = "dummy_password"

  insecure        = true
}

各種パラメーターの意味はこちらに記載があります。

接続先、ユーザー名、パスワードは、それぞれ以下の環境変数でも良いようです。

  • HOST_IOSXE
  • DEVICE_PASSWORD_IOSXE
  • DEVICE_USERNAME_IOSXE

insecure は、SSL/TLS 証明書の検証をしない指定です。デフォルトでも true です。

■ 2. NTP サーバー設定0台から3台へ (POST)

ここから、実際に実現したい処理の定義です。今回は、Terraform でネットワーク機器に参照先 NTP サーバーの設定(コマンドでいう ntp server)をしてみます。

ネットワーク機器側は NTP サーバーの設定がない状態から始めます。

csrv1000##sh run | inc ntp
csrv1000#

この状態から 3台分追加する処理を試します。

2.1. ntp_post.tf の作成

Getting Startedによると、aclbgpntpospfvlan などさまざまな設定を扱えるようです。[こちらにサンプルがたくさん]8https://github.com/CiscoDevNet/terraform-provider-iosxe/tree/main/examples/examples_tf)あります。どのサンプルを見ても、リソースは iosxe_rest なので、RESTCONF で設定できるものは設定できると思ってもいいのかもしれません。

今回はお試しということで、シンプルに試せそうという点で ntp にしました。

以下のファイルは、NTP サーバー 10.0.0.110.0.0.210.0.0.3 を追加するものです。

resource "iosxe_rest" "ntp_post" {
  method = "POST"
  path   = "/data/Cisco-IOS-XE-native:native/ntp/server"
  payload = jsonencode(
    {
      "Cisco-IOS-XE-ntp:server-list" : [
        {
          "ip-address" : "10.0.0.1",
        },
        {
          "ip-address" : "10.0.0.2",
        },
        {
          "ip-address" : "10.0.0.3",
        }
      ]
    }
}
パラメーター名 説明
method POSTPUTPATCHDELETE` などのような RESTCONF のメソッドを指定
path 設定するためのエンドポイントを指定
payload 設定刷るための body を指定

ということで、ほとんど RESTCONF で叩くとき同じ感覚ですね。

2.2. terraform init の実行

ここまで以下のファイルを作りました。

ntp_post.tf
provider.tf
terraform.tf

同じディレクトリで、terraform init を実行します

% terraform init 

Initializing the backend...

Initializing provider plugins...
- Finding ciscodevnet/iosxe versions matching "0.1.1"...
- Installing ciscodevnet/iosxe v0.1.1...
- Installed ciscodevnet/iosxe v0.1.1 (self-signed, key ID F8EC53CAB70CD366)
...(略)...

2.3. terraform plan の実行

続いて terraform plan を実行します。3台分追加しますよ、とのことです。

% terraform plan

Terraform used the selected providers to generate the following execution plan. Resource actions are indicated with the
following symbols:
  + create

Terraform will perform the following actions:

  # iosxe_rest.ntp_post will be created
  + resource "iosxe_rest" "ntp_post" {
      + id       = (known after apply)
      + method   = "POST"
      + path     = "/data/Cisco-IOS-XE-native:native/ntp/server"
      + payload  = jsonencode(
            {
              + Cisco-IOS-XE-ntp:server-list = [
                  + {
                      + ip-address = "10.0.0.1"
                    },
                  + {
                      + ip-address = "10.0.0.2"
                    },
                  + {
                      + ip-address = "10.0.0.3"
                    },
                ]
            }
        )
      + response = (known after apply)
    }

Plan: 1 to add, 0 to change, 0 to destroy.

2.4. terraform apply の実行

いよいよ terraform apply です。

% terraform apply

Terraform used the selected providers to generate the following execution plan. Resource actions are indicated with the
following symbols:
  + create

Terraform will perform the following actions:

  # iosxe_rest.ntp_post will be created
  + resource "iosxe_rest" "ntp_post" {
      + id       = (known after apply)
      + method   = "POST"
      + path     = "/data/Cisco-IOS-XE-native:native/ntp/server"
      + payload  = jsonencode(
            {
              + Cisco-IOS-XE-ntp:server-list = [
                  + {
                      + ip-address = "10.0.0.1"
                    },
                  + {
                      + ip-address = "10.0.0.2"
                    },
                  + {
                      + ip-address = "10.0.0.3"
                    },
                ]
            }
        )
      + response = (known after apply)
    }

Plan: 1 to add, 0 to change, 0 to destroy.

Do you want to perform these actions?
  Terraform will perform the actions described above.
  Only 'yes' will be accepted to approve.

  Enter a value: yes    # yes を入力

iosxe_rest.ntp_post: Creating...
iosxe_rest.ntp_post: Creation complete after 1s [id=4155581422]

Apply complete! Resources: 1 added, 0 changed, 0 destroyed.

ネットワーク機器側を確認すると無事に3台分が追加されていることが確認できました。

csrv1000(config)#do sh run | inc ntp   
ntp server 10.0.0.1
ntp server 10.0.0.2
ntp server 10.0.0.3

2.5. terraform apply の「再」実行

さて、この状態からもう一度 terraform apply を実行するとどうなるのだろうと思いました。

普通に RESTCONF で考えると、すでに設定が入ってる状態に 再度 POST すると 409 Conflict あたりになるかと思います。

ということで試しました。

% terraform plan 
iosxe_rest.ntp_post: Refreshing state... [id=4155581422]

No changes. Your infrastructure matches the configuration.

Terraform has compared your real infrastructure against your configuration and found no differences, so no changes are needed.

No changes. なので、特に何もしない結果になりました。

これは、Terraform 側の処理として手元に保管されている state ファイルと比較した結果、一致しているのでリクエストすら出さなかった、という状態だと思います。このあたりは、Terraform らしさでしょうか。


■ 3. NTP サーバー設定3台から2台 (POSTのまま、エラー)

続いて、エラーになるかなと思いつつも、tf ファイルで4台目を追加して POST のまま実行にする、というのを試しました。

3.1. ntp_post.tf の修正

ntp_post.tf を以下ように、4台目の分を追記します。

resource "iosxe_rest" "ntp_post" {
  method = "POST"
  path   = "/data/Cisco-IOS-XE-native:native/ntp/server"
  payload = jsonencode(
    {
      "Cisco-IOS-XE-ntp:server-list" : [
        {
          "ip-address" : "10.0.0.1"
        },
        {
          "ip-address" : "10.0.0.2"
        },
        {
          "ip-address" : "10.0.0.3"
        },
        {
          "ip-address" : "10.0.0.4"     # 4台目追加
        }
      ]
    }
  )
}

3.2. terraform plan の実行

terraform plan を実行します。

これだけ見ると 4台目だけいい感じに追加されるようにみえますが・・・。

% terraform plan
iosxe_rest.ntp_post: Refreshing state... [id=4155581422]

Terraform used the selected providers to generate the following execution plan. Resource actions are indicated with the
following symbols:
  ~ update in-place

Terraform will perform the following actions:

  # iosxe_rest.ntp_post will be updated in-place
  ~ resource "iosxe_rest" "ntp_post" {
        id      = "4155581422"
      ~ payload = jsonencode(
          ~ {
              ~ Cisco-IOS-XE-ntp:server-list = [
                    # (2 unchanged elements hidden)
                    {
                        ip-address = "10.0.0.3"
                    },
                  + {
                      + ip-address = "10.0.0.4"
                    },
                ]
            }
        )
        # (2 unchanged attributes hidden)
    }

Plan: 0 to add, 1 to change, 0 to destroy.

3.3.terraform apply の実行

実際に terraform apply を実行するとエラーになります。

% terraform apply
iosxe_rest.ntp_post: Refreshing state... [id=4155581422]

Terraform used the selected providers to generate the following execution plan. Resource actions are indicated with the
following symbols:
  ~ update in-place

Terraform will perform the following actions:

  # iosxe_rest.ntp_post will be updated in-place
  ~ resource "iosxe_rest" "ntp_post" {
        id      = "4155581422"
      ~ payload = jsonencode(
          ~ {
              ~ Cisco-IOS-XE-ntp:server-list = [
                    # (2 unchanged elements hidden)
                    {
                        ip-address = "10.0.0.3"
                    },
                  + {
                      + ip-address = "10.0.0.4"
                    },
                ]
            }
        )
        # (2 unchanged attributes hidden)
    }

Plan: 0 to add, 1 to change, 0 to destroy.

Do you want to perform these actions?
  Terraform will perform the actions described above.
  Only 'yes' will be accepted to approve.

  Enter a value: yes

iosxe_rest.ntp_post: Modifying... [id=4155581422]
╷
│ Error: failed: status code: 409 - error: {
│   "errors": {
│     "error": [
│       {
│         "error-message": "object already exists: /ios:native/ios:ntp/ios-ntp:server/ios-ntp:server-list[ios-ntp:ip-address='10.0.0.1']",
│         "error-path": "/Cisco-IOS-XE-native:native/ntp/Cisco-IOS-XE-ntp:server",
│         "error-tag": "data-exists",
│         "error-type": "application"
│       }
│     ]
│   }
│ }
│ 
│ 
│   with iosxe_rest.ntp_post,
│   on ntp_post.tf line 1, in resource "iosxe_rest" "ntp_post":
│    1: resource "iosxe_rest" "ntp_post" {
│ 
╵

Terraform 的に、差分ありと判断してリクエストを出した結果、すでにある設定を POST してるので、エラーになったということだと思います。ステータスコード409、また "error-tag": "data-exists" とあります。

3.4. 仕切り直し

さて、こうなると少々厄介です。 state ファイルには 4台目がある状態で、ネットワーク機器側3台分のままです。

今回は挙動をいろいろ確認するためなので、だいぶ乱暴ですがいったん state ファイル類を削除します(通常は推奨されることではないと思います)。

rm -fr .terraform .terraform.lock.hcl terraform.tfstate terraform.tfstate.backup

ネットワーク機器側も NTP サーバーの設定を削除します。

csrv1000(config)#no ntp server 10.0.0.1
csrv1000(config)#no ntp server 10.0.0.2
csrv1000(config)#no ntp server 10.0.0.3
csrv1000(config)#do sh run | inc ntp   
csrv1000(config)#


■ 4. NTP サーバー設定0台から3台へ (PUT)

Terraform 側もネットワーク機器側も状態をもとに戻したところで、仕切り直しです。

4.1. ntp_put.tf の作成

ntp_post.tf は削除して、別途 ntp_put.tf を作成します。ntp_post.tf と比較すると、method"POST" にしている他、pathpayload も微妙に変更しています。

resource "iosxe_rest" "ntp_put" {
  method = "PUT"
  path   = "/data/Cisco-IOS-XE-native:native/ntp"
  payload = jsonencode(
    {
      "Cisco-IOS-XE-native:ntp" : {
        "Cisco-IOS-XE-ntp:server" : {
          "server-list" : [
            {
              "ip-address" : "10.0.0.1"
            },
            {
              "ip-address" : "10.0.0.2"
            },
            {
              "ip-address" : "10.0.0.3"
            }
          ]
        }
      }
    }
  )
}

4.2. terraform init の実行

先程、自動生成されたファイルを削除したので、terraform init を実行します。

4.3. terraform plan の実行

PUT 版で terraform plan を実行します。

3台分追加するよ、と示される点は POST のときとだいたい同じように見えます。

% terraform plan

Terraform used the selected providers to generate the following execution plan. Resource actions are indicated with the
following symbols:
  + create

Terraform will perform the following actions:

  # iosxe_rest.ntp_put will be created
  + resource "iosxe_rest" "ntp_put" {
      + id       = (known after apply)
      + method   = "PUT"
      + path     = "/data/Cisco-IOS-XE-native:native/ntp"
      + payload  = jsonencode(
            {
              + Cisco-IOS-XE-native:ntp = {
                  + Cisco-IOS-XE-ntp:server = {
                      + server-list = [
                          + {
                              + ip-address = "10.0.0.1"
                            },
                          + {
                              + ip-address = "10.0.0.2"
                            },
                          + {
                              + ip-address = "10.0.0.3"
                            },
                        ]
                    }
                }
            }
        )
      + response = (known after apply)
    }

Plan: 1 to add, 0 to change, 0 to destroy.

4.4 terraform apply の実行

terraform apply を実行します。

% terraform apply

Terraform used the selected providers to generate the following execution plan. Resource actions are indicated with the
following symbols:
  + create

Terraform will perform the following actions:

  # iosxe_rest.ntp_put will be created
  + resource "iosxe_rest" "ntp_put" {
      + id       = (known after apply)
      + method   = "PUT"
      + path     = "/data/Cisco-IOS-XE-native:native/ntp"
      + payload  = jsonencode(
            {
              + Cisco-IOS-XE-native:ntp = {
                  + Cisco-IOS-XE-ntp:server = {
                      + server-list = [
                          + {
                              + ip-address = "10.0.0.1"
                            },
                          + {
                              + ip-address = "10.0.0.2"
                            },
                          + {
                              + ip-address = "10.0.0.3"
                            },
                        ]
                    }
                }
            }
        )
      + response = (known after apply)
    }

Plan: 1 to add, 0 to change, 0 to destroy.

Do you want to perform these actions?
  Terraform will perform the actions described above.
  Only 'yes' will be accepted to approve.

  Enter a value: yes

iosxe_rest.ntp_put: Creating...
iosxe_rest.ntp_put: Creation complete after 1s [id=4117814902]

Apply complete! Resources: 1 added, 0 changed, 0 destroyed.

ネットワーク機器側の設定を確認すると無事に設定が入っていました。

csrv1000(config)#do sh run | inc ntp
ntp server 10.0.0.1
ntp server 10.0.0.2
ntp server 10.0.0.3


■ 5. NTP サーバー設定3台から4台へ (PUT)

3台分設定されている状態から、PUTで4台分にします。

5.1. ntp_put.tf の修正

PUT で 3台追加したところで、今度は先程使った ntp_put.tf を編集して、4台の設定にします。

resource "iosxe_rest" "ntp_put" {
  method = "PUT"
  path   = "/data/Cisco-IOS-XE-native:native/ntp"
  payload = jsonencode(
    {
      "Cisco-IOS-XE-native:ntp" : {
        "Cisco-IOS-XE-ntp:server" : {
          "server-list" : [
            {
              "ip-address" : "10.0.0.1"
            },
            {
              "ip-address" : "10.0.0.2"
            },
            {
              "ip-address" : "10.0.0.3"
            },
            {
              "ip-address" : "10.0.0.4"    # 4台目
            }
          ]
        }
      }
    }
  )
}

5.2. terraform plan の実行

terraform plan を実行します。4台目 10.0.0.4 を追加しますよ、と表示されます。

% terraform plan 
iosxe_rest.ntp_put: Refreshing state... [id=4117814902]

Terraform used the selected providers to generate the following execution plan. Resource actions are indicated with the
following symbols:
  ~ update in-place

Terraform will perform the following actions:

  # iosxe_rest.ntp_put will be updated in-place
  ~ resource "iosxe_rest" "ntp_put" {
        id      = "4117814902"
      ~ payload = jsonencode(
          ~ {
              ~ Cisco-IOS-XE-native:ntp = {
                  ~ Cisco-IOS-XE-ntp:server = {
                      ~ server-list = [
                            # (2 unchanged elements hidden)
                            {
                                ip-address = "10.0.0.3"
                            },
                          + {
                              + ip-address = "10.0.0.4"
                            },
                        ]
                    }
                }
            }
        )
        # (2 unchanged attributes hidden)
    }

Plan: 0 to add, 1 to change, 0 to destroy.

5.3. terraform apply の実行

terraform apply を実行します。

% terraform apply
iosxe_rest.ntp_put: Refreshing state... [id=4117814902]

Terraform used the selected providers to generate the following execution plan. Resource actions are indicated with the
following symbols:
  ~ update in-place

Terraform will perform the following actions:

  # iosxe_rest.ntp_put will be updated in-place
  ~ resource "iosxe_rest" "ntp_put" {
        id      = "4117814902"
      ~ payload = jsonencode(
          ~ {
              ~ Cisco-IOS-XE-native:ntp = {
                  ~ Cisco-IOS-XE-ntp:server = {
                      ~ server-list = [
                            # (2 unchanged elements hidden)
                            {
                                ip-address = "10.0.0.3"
                            },
                          + {
                              + ip-address = "10.0.0.4"
                            },
                        ]
                    }
                }
            }
        )
        # (2 unchanged attributes hidden)
    }

Plan: 0 to add, 1 to change, 0 to destroy.

Do you want to perform these actions?
  Terraform will perform the actions described above.
  Only 'yes' will be accepted to approve.

  Enter a value: yes

iosxe_rest.ntp_put: Modifying... [id=4117814902]
iosxe_rest.ntp_put: Modifications complete after 2s [id=477754463]

Apply complete! Resources: 0 added, 1 changed, 0 destroyed.

無事に設定されました。

csrv1000(config)#do sh run | inc ntp
ntp server 10.0.0.1
ntp server 10.0.0.2
ntp server 10.0.0.3
ntp server 10.0.0.4


■ 6. NTP サーバー設定4台から1台へ (PUT)

4台分設定されている状態から、PUTで1台分にします。

6.1. ntp_put.tf の修正

ntp_put.tf を以下のように、1台分(10.0.0.1)だけになるように修正します。method"PUT" のままです。

resource "iosxe_rest" "ntp_put" {
  method = "PUT"
  path   = "/data/Cisco-IOS-XE-native:native/ntp"
  payload = jsonencode(
    {
      "Cisco-IOS-XE-native:ntp" : {
        "Cisco-IOS-XE-ntp:server" : {
          "server-list" : [
            {
              "ip-address" : "10.0.0.1"
            }
          ]
        }
      }
    }
  )
}

他の3台を削除する、といった指定はせず、とにかく指定した1台分(10.0.0.1)になってほしい、意味合いの指定です。

6.2. terraform plan の実行

terraform plan を実行します。10.0.0.210.0.0.310.0.0.4 は削除しますよと示されます。

% terraform plan
iosxe_rest.ntp_put: Refreshing state... [id=477754463]

Terraform used the selected providers to generate the following execution plan. Resource actions are indicated with the
following symbols:
  ~ update in-place

Terraform will perform the following actions:

  # iosxe_rest.ntp_put will be updated in-place
  ~ resource "iosxe_rest" "ntp_put" {
        id      = "477754463"
      ~ payload = jsonencode(
          ~ {
              ~ Cisco-IOS-XE-native:ntp = {
                  ~ Cisco-IOS-XE-ntp:server = {
                      ~ server-list = [
                            {
                                ip-address = "10.0.0.1"
                            },
                          - {
                              - ip-address = "10.0.0.2"
                            },
                          - {
                              - ip-address = "10.0.0.3"
                            },
                          - {
                              - ip-address = "10.0.0.4"
                            },
                        ]
                    }
                }
            }
        )
        # (2 unchanged attributes hidden)
    }

Plan: 0 to add, 1 to change, 0 to destroy.

6.3. terraform apply の実行

terraform apply を実行します。

% terraform apply
iosxe_rest.ntp_put: Refreshing state... [id=477754463]

Terraform used the selected providers to generate the following execution plan. Resource actions are indicated with the
following symbols:
  ~ update in-place

Terraform will perform the following actions:

  # iosxe_rest.ntp_put will be updated in-place
  ~ resource "iosxe_rest" "ntp_put" {
        id      = "477754463"
      ~ payload = jsonencode(
          ~ {
              ~ Cisco-IOS-XE-native:ntp = {
                  ~ Cisco-IOS-XE-ntp:server = {
                      ~ server-list = [
                            {
                                ip-address = "10.0.0.1"
                            },
                          - {
                              - ip-address = "10.0.0.2"
                            },
                          - {
                              - ip-address = "10.0.0.3"
                            },
                          - {
                              - ip-address = "10.0.0.4"
                            },
                        ]
                    }
                }
            }
        )
        # (2 unchanged attributes hidden)
    }

Plan: 0 to add, 1 to change, 0 to destroy.

Do you want to perform these actions?
  Terraform will perform the actions described above.
  Only 'yes' will be accepted to approve.

  Enter a value: yes

iosxe_rest.ntp_put: Modifying... [id=477754463]
iosxe_rest.ntp_put: Modifications complete after 1s [id=1111786887]

Apply complete! Resources: 0 added, 1 changed, 0 destroyed.

無事に 10.0.0.1 のみになりました。

csrv1000(config)#do sh run | inc ntp
ntp server 10.0.0.1
csrv1000(config)#

method としては、他にも PATCHDELETE もしてできますが、今回はこの辺にしたいと思います。


まとめ・所感

Terraform の IOS XE Provider を利用して、IOS XE の機器にのNTPサーバー設定を試してみました。

以下、まとめと所感です。

  • RESTCONF ベースなのでCLIベースの自動化の悩み(noコマンドの生成)はなさそう
    • その代わり RESTCONF の知識が必要
  • 手続き型に考えが染まっているので、宣言型の良さをまだ活かせる自身がない
    • リソースをどう扱えばよいか悩みそう
    • method をどうすればよいか悩みそう。PUT が一番相性がいいように思う
    • 本格的に使う上では考慮事項がそれなりにありそう
  • 同じ内容のPOST を2回 実行してもエラーにならなかったのは Terraform らしさを感じた
  • Terraform か RESTCONF のどちらかに慣れていないと、エラーが発生したときにどちらの問題か判断しにくい
  • Terraform なのでWindowsからも実行できるはず(今回はmacOSから)

参考資料

紹介ブログ https://blogs.cisco.com/developer/terraformiosxe01

GitHub リポジトリ https://github.com/CiscoDevNet/terraform-provider-iosxe

tf ファイルのサンプル https://github.com/CiscoDevNet/terraform-provider-iosxe/tree/main/examples/examples_tf

動画 Cisco IOS XE Terraform provider introduction and demo https://www.youtube.com/watch?v=oB_QZ2mDiW0

上記動画の資料 https://github.com/CiscoDevNet/terraform-provider-iosxe/blob/main/docs/resources/intro_to_terraform_video.pdf

Terraform Registry https://registry.terraform.io/providers/CiscoDevNet/iosxe/latest