はじめに
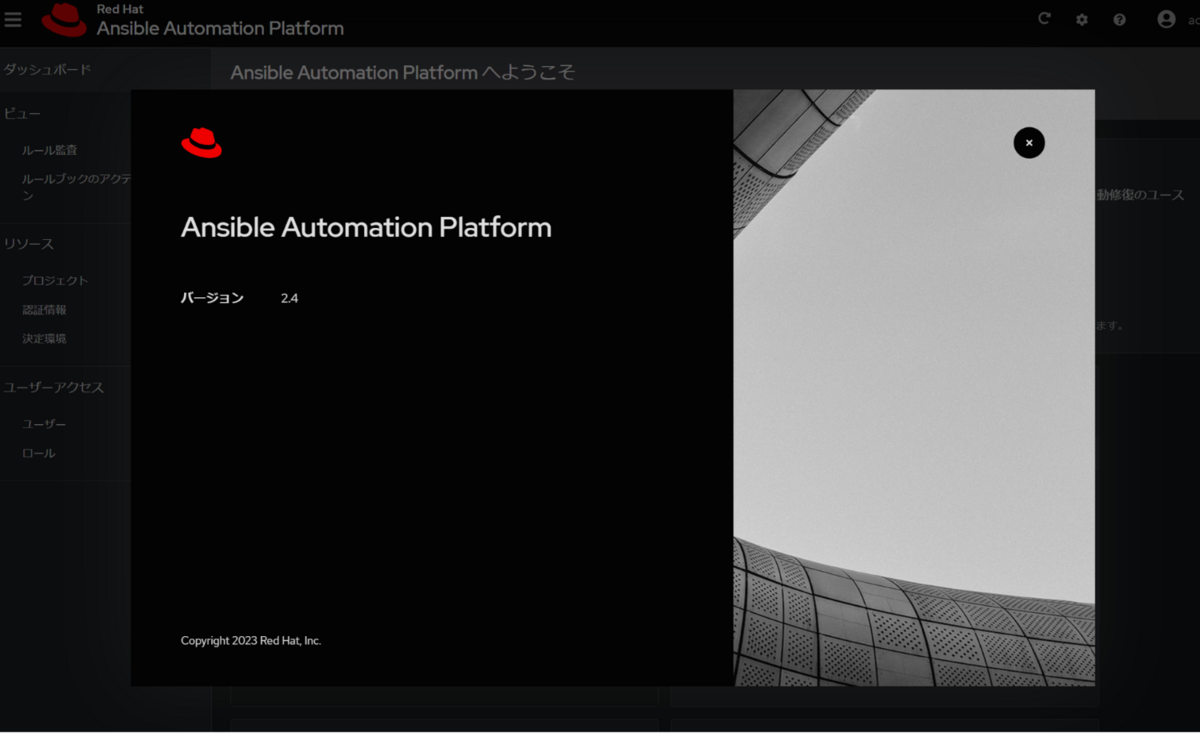
Red Hat Ansible Automation Platform (AAP) 2.4 がリリースされました。
大きなアップデートの一つに、 Event-Driven Ansible Controller の登場があります。
本ブログでもこれまで、AAP のプロダクトとしてではなく ansible/eda-server を利用してデプロイと簡単な検証をしました。これまでの記事では区別するために eda-server と表記していました。
- [Ansible] EDA (Evnet-Driven Ansible) Controller / eda-server 経由で Automation Controller のジョブテンプレートを実行してみる - てくなべ (tekunabe)
- [Ansible] EDA (Evnet-Driven Ansible) Controller / eda-server を docker compose でデプロイして画面を探索してみる - てくなべ (tekunabe)
いよいよ AAP 2.4 がリリースされて AAP のプロダクトとしての Event-Driven Ansible Controller (以下 EDA Controller) が利用できるようになりました。気になっていたのでこちらもインストールして簡単な検証をします。
- 環境
- オンライン版インストーラー(
ansible-automation-platform-setup-2.4-1-x86_64.tar.gz)- バンドル版ではなく
- ansible-rulebook 1.0.0
- VM(Red Hat Enterprise Linux 9.2、メモリ 8GB)2台
- Automation Controller 4.4 * 1台(ハイブリッドノード・内部DB)
- EDA Controller * 1台(内部DB)
- オンライン版インストーラー(
本記事では、以前試したパブリックリポジトリ ansible/eda-server でインストールしたものを eda-server、今回試す AAP 2.4 に含まれるものを EDA Controller と表記します。
また、簡単な検証目的であるため、セキュリティを含む運用上の考慮はなされていませんのでご了承ください。
■ 1. インストール
大まかな流れは以下の通りです。それぞれ別のサーバーにインストールします。
- インストーラーのダウンロードと配置
- Automation Controller のインストール(サーバー
aap24-acへ) - EDA Controller のインストール(サーバー
aap24-edaへ)
1.1. インストーラーのダウンロードと配置
今回は Automation Controller をインストールする VM をインストール作業の起点にして、Automation Controller と EDA Controller をインストールします。
まず Red Hat Customer Portal から AAP 2.4 のインストーラーをダウンロードします。
ダウンロードページ(要ログイン): https://access.redhat.com/downloads/content/480/ver=2.4/rhel---9/2.4/x86_64/product-software
今回は、バンドル版ではない Ansible Automation Platform 2.4 Setup を選択します。
インストーラーの tar.gz をAutomation Controller のサーバーの任意のディレクトリに配置し、解凍して、ディレクトリに移動します。
tar xvzf ansible-automation-platform-setup-2.4-1.tar.gz
cd ansible-automation-platform-setup-2.4-1
1.2. Automation Controller のインストール
先に Automation Controller をインストールします。
inventory の編集
インストーラーの設定ファイルである inventory を編集します。
基本的に公式ドキュメントの以下のページに従います。(日本語ドキュメントは、EDA Controller は イベント駆動型 Ansible コントローラーと表記されるようです)
デフォルトから変更した個所を中心に以下に抜粋します。
[automationcontroller]
aap24-ac ansible_connection=local ansible_host=localhost  # インストーラーから見て自分にインストール
# 略

[all:vars]
admin_password='xxx_dummy_password_xxx'   # Automation Controller の admin パスワードを指定

pg_host=''
pg_port=5432

pg_database='awx'
pg_username='awx'
pg_password='xxx_dummy_password_xxx'     #  Automation Controller の DB パスワードを指定
# 略

registry_url='registry.redhat.io'
registry_username='<上記コンテナレジストリのユーザー名>'    # コンテナレジトリのユーザー名
registry_password='<同、パスワード>'                      # コンテナレジトリのパスワード
各変数の以下の公式ドキュメントに説明があります。
なお、各サーバーには sudo 可能な一般ユーザー admin がいる状態で、インストーラーも admin で実行する想定です。
インストーラーの実行
sudo ./setup.sh
私の環境では 6 分ほどで完了しました。
(...略...)
PLAY RECAP *********************************************************************
localhost           : ok=0    changed=0    unreachable=0    failed=0    skipped=1    rescued=0    ignored=0
aap24-ac            : ok=334  changed=146  unreachable=0    failed=0    skipped=225  rescued=0    ignored=6

The setup process completed successfully.
Setup log saved to /var/log/tower/setup-2023-06-28-17:07:04.log.
Automation Controller のインストールは今までと同じですね。
確認
ブラウザで https://<Automation ControllerのIPアドレス> を開いて、admin でログインして、ライセンス適用を適用します。
インストール方法の違いからか、今回は新しいUIへの切り替えるメッセージは表示されませんでした。
ドキュメントにも書いてありますが、 Ansible 2.9 を含む EE はデフォルトでは表示されませんでした。
あとで EDA Controller 経由でジョブテンプレートを実行しますが、デフォルトで存在する Demo Job Template を利用します。
1.3. EDA Controller のインストール
続いて、EDA Controller をインストールします。
作業は引き続き、インストーラーを配置した Automation Controller で行います。
inventory の編集
Automation Controller インストール時に使用した inventory をさらに編集します。
基本的に公式ドキュメントの以下のページに従います。(日本語ドキュメント上は、EDA Controller は イベント駆動型 Ansible コントローラーという表記される)
[automationcontroller]
# aap24-ac ansible_connection=local ansible_host=localhost    # コメントアウトする
# 略

[automationedacontroller]
aap24-eda ansible_host=<EDAControllerのIPアドレス> ansible_user=admin ansible_ssh_private_key_file=<adminの秘密鍵のパス> ansible_become=yes ansible_become_password=<adminパスワード>   # 追加。認証情報は環境に合わせる

# 略

[all:vars]
# 略

automationedacontroller_admin_password='xxx_dummy_password_xxx'   # EDA Controller の admin のパスワード

automationedacontroller_pg_host=''
automationedacontroller_pg_port=5432

automationedacontroller_pg_database='automationedacontroller'
automationedacontroller_pg_username='automationedacontroller'
automationedacontroller_pg_password='xxx_dummy_password_xxx'      # EDA Controller の DB のパスワード

# The full routeable URL used by EDA to connect to a controller host.
# This URL is required if there is no Automation Controller configured
# in inventory.
#
automation_controller_main_url = 'https://<Automation ControllerのIPアドレス>'  # Automation Controller のURLを指定
各変数の以下の公式ドキュメントに説明があります。
意外とポイントなのは、[automationcontroller] グループ内のホストを空の状態にしておくことです(後述のおまけ参照)。
(おまけ)個人的つまずきポイント
ここまで、あたかも一発でうまくインストールできたかのように書いていますが、ドキュメントの確認不足などによりエラーでつまずいた点もありました。
具体的には以下の通りです。
- 現象: 変数
automationedacontroller_pg_hostの値が未設定というエラーautomationedacontroller_pg_host is currently empty, ensure automationedacontroller_pg_host is defined and pointing to a database.が発生する
インストーラーの実行
Automation Controller のときと同様にインストーラーを実行します。
sudo ./setup.sh
私の環境では 3 分ほどで完了しました。
(...略...)
PLAY RECAP *********************************************************************
localhost           : ok=0    changed=0    unreachable=0    failed=0    skipped=1    rescued=0    ignored=0
aap24-eda           : ok=176  changed=24   unreachable=0    failed=0    skipped=186  rescued=0    ignored=0

The setup process completed successfully.
Setup log saved to /var/log/tower/setup-2023-06-28-17:44:01.log.
確認
ブラウザで https://<EDA ControllerのIPアドレス> を開いて、admin でログインします。特にライセンス適用画面はありませんでした。
なお、ログインボタンを押すと、Danger alert:Request failed with status code 502 Bad Gateway のエラーになったときがありました。その際は、EDA Controller で sudo systemctl start automation-eda-controller を実行することでエラーが解消されました。実際は検証のため何度かインストールしましたが、この対処が不要なときもあり、いまいち再現しませんでした。
ここまでぱっと見の eda-server との違いは、ロゴなどの表記レベルです。
ここまでで Automation Controller と EDA Controller をそれぞれのサーバーにインストールできました。
■ 2. 検証(Automation Controller との連携)
ここから EDA Controller と Automation Controller の連携を試します。
具体的には、 Webhook をイベントソースにした Rulebook を EDA Controller で動かし、特定の条件の Webhook を受け取ったら、Automation Controller のジョブテンプレートを実行する、というものです。
以前 eda-server で試したこととほぼ同じです。
連携先の Automation Controller は inventory の automation_controller_main_url で指定した URLになります。automationedacontroller_controller_verify_ssl のデフォルトは false なので、Automation Controller へのSSL検証は無効化のままです。
2.1. EDA Controller の設定
eda-server のときとは異なり、日本語画面でやってみます。ほとんど同じ設定ですが、仕様上一部異なります。
プロジェクトの作成
eda-server のときと同じく、自分で用意したリポジトリ https://github.com/akira6592/rulebook-sample.git を利用するプロジェクトを作成します。
画面左メニューから プロジェクト を開き、`プロジェクトの作成ボタンをクリックします。
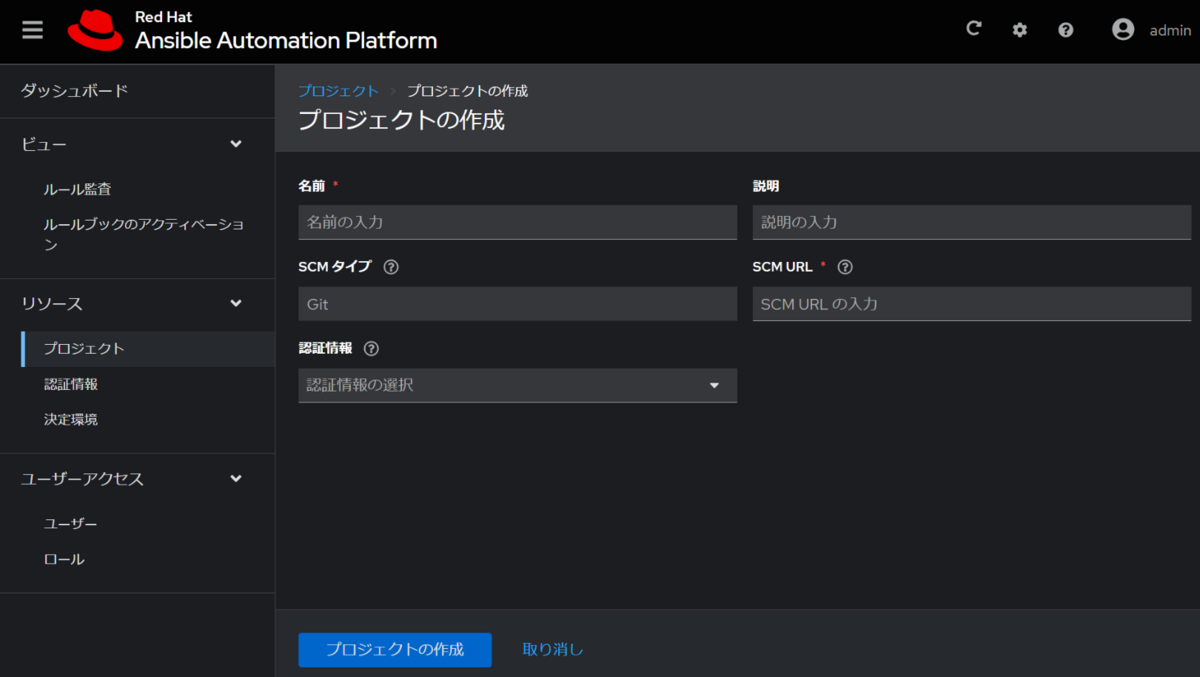
以下の必要事項を入力して、プロジェクトを作成します。
| 項目 | 意味 | 今回の設定値 | 備考 |
|---|---|---|---|
名前 |
プロジェクトの名前 | my_project01 |
|
SCM URL |
Rulebook がある SCM の URL | https://github.com/akira6592/rulebook-sample.git |
現状 SCM Type が Git のみなのため、実質的に git clone したい URL(本記事を書いた後リポジトリの内容は変更する可能性があります。試したときのコミットはこの時点) |
eda-server のときと同じく、以下の Rulebook (rulebooks/hello_jt.yml)をあとで利用します。
---
- name: Hello Events
  hosts: all

  sources:
    - ansible.eda.webhook:
        host: 0.0.0.0
        port: 5000

  rules:
    - name: Say Hello
      condition: event.payload.message == "sakana"
      action:
        run_job_template:
          name: Demo Job Template    # 実行したいジョブテンプレート名
          organization: Default
TCP/5000 で Webhook を待ち受けて、飛んできたペイロード内の「message が sakana だったら、Automation Controller のジョブテンプレート Demo Job Template を実行する」という Rulebook です。action には run_job_template を利用しています。
また、EDA Controller 側 で 5000 のインバウント通信が通るように許可しておきます。
認証情報について(確認のみ)
デフォルトで Decision Environment Container Registry が定義されていました。
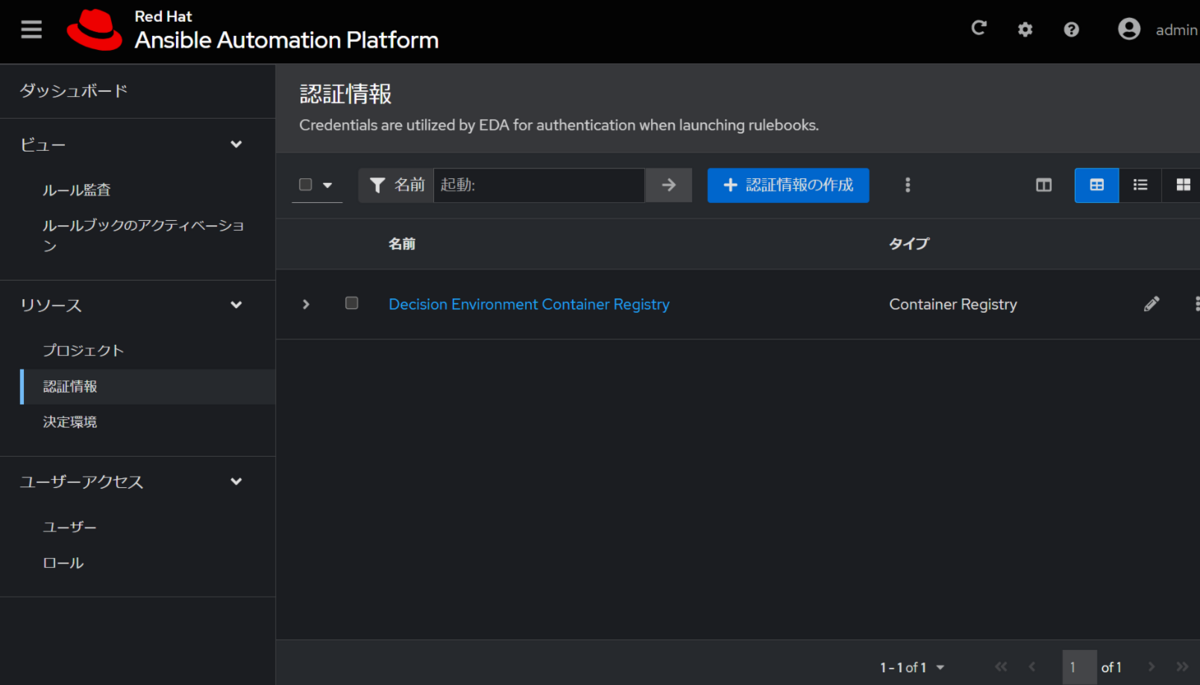
これはコンテナレジストリに対するもので、インストール時に使用した inventory に指定した registry_url、registry_username、registry_password の値が利用されているはずです。
後述する決定環境(Decision Environment)、Default Decision Environment に適用されています。
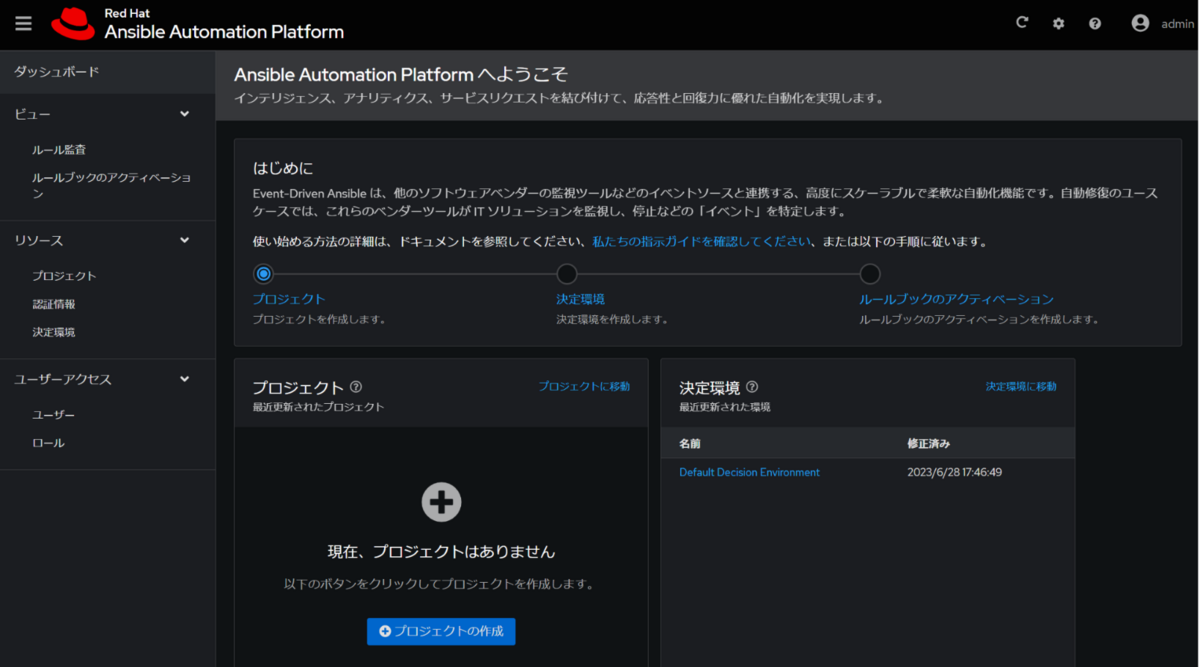
決定環境について(確認のみ)
eda-server とは異なり、デフォルトで決定環境(Decision Environment)が定義されていました。これを利用することにします。
Default Decision Environment という名前で、イメージとして registry.redhat.io/ansible-automation-platform-24/de-supported-rhel8:latest です。
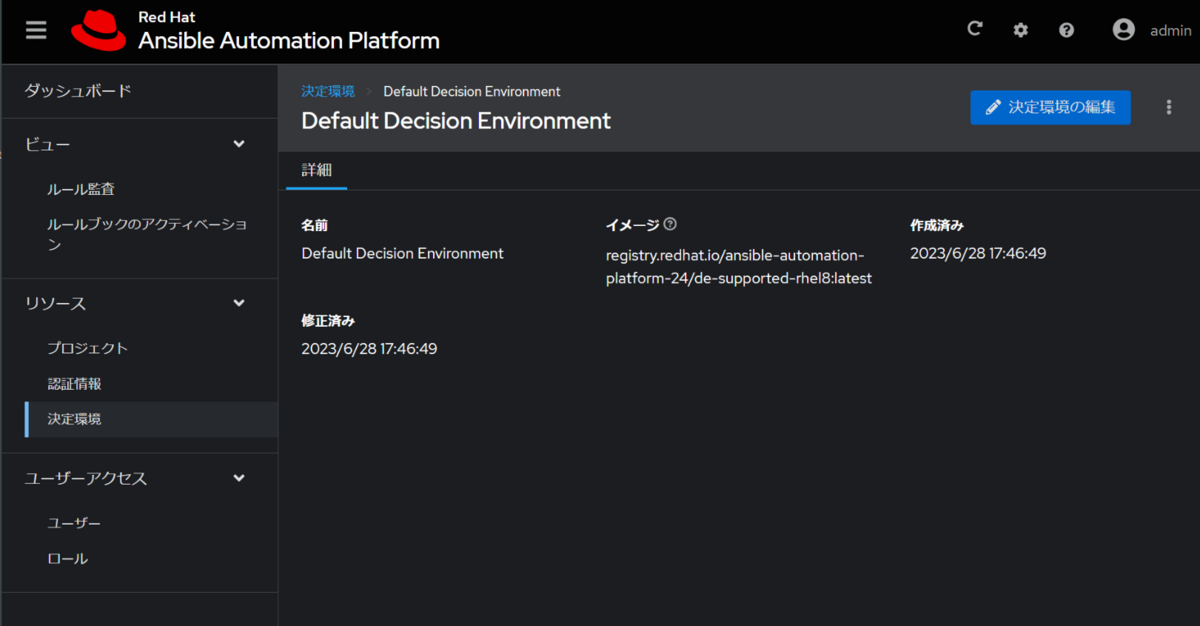
このイメージに ansible-rulebook が入っています。eda-server の時に使った quay.io/ansible/ansible-rulebook の AAP 版といったところでしょうか。
bash-4.4# pip3 list
Package             Version
------------------- ---------
aiobotocore         2.5.0
aiodns              3.0.0
aiohttp             3.8.1
aioitertools        0.11.0
aiokafka            0.8.0
aiosignal           1.2.0
ansible-core        2.15.0
ansible-rulebook    1.0.0
ansible-runner      2.3.2
...(略)...
bash-4.4# ansible-galaxy collection list

# /usr/share/ansible/collections/ansible_collections
Collection  Version
----------- -------
ansible.eda 1.3.8
Automation Controller へのトークンの作成、取得
あらかじめ Automation Controller 側でトークンを作成、取得しておきます。
今回は awxkit の awx login コマンド でトークンを作成、取得しました。
% awx login \
  --conf.host https://(Automation ControllerのIPアドレス) \
  --conf.username (Automation Controllerのユーザー) \
  --conf.password (Automation Controllerパスワード) -k

{
     "token": "ここにトークンが表示されるのでコピーしておく"
}
続いて、EDA Controller の画面左メニューから ユーザー を開き、admin ユーザー、コントローラートークン の順に開きます。コントローラートークンの一覧画面が表示されるので、コントローラートークンの作成 ボタンを押します。
コントローラートークン作成画面が表示されるので必要事項を入力します。
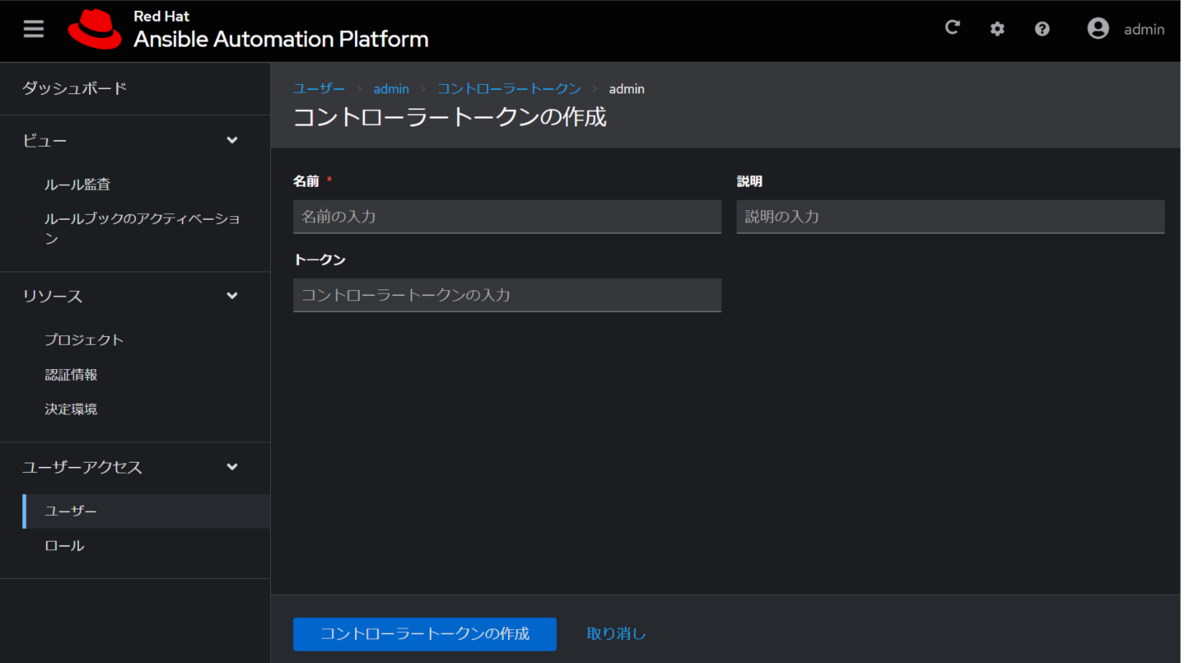
| 項目 | 意味 | 今回の設定値 | 備考 |
|---|---|---|---|
名前 |
トークンの設定名 | my_token01 |
|
トークン |
Automation Controller にアクセスするためのトークン | (あらかじめ取得したトークン) |
ルールブックのアクティベーションの作成
ルールブックを動作可能状態にするために、ルールブックのアクティベーションを作成します。
画面左メニューから ルールブックのアクティベーション を開いて、ルールブックのアクティベーションの作成 ボタンをクリックします。
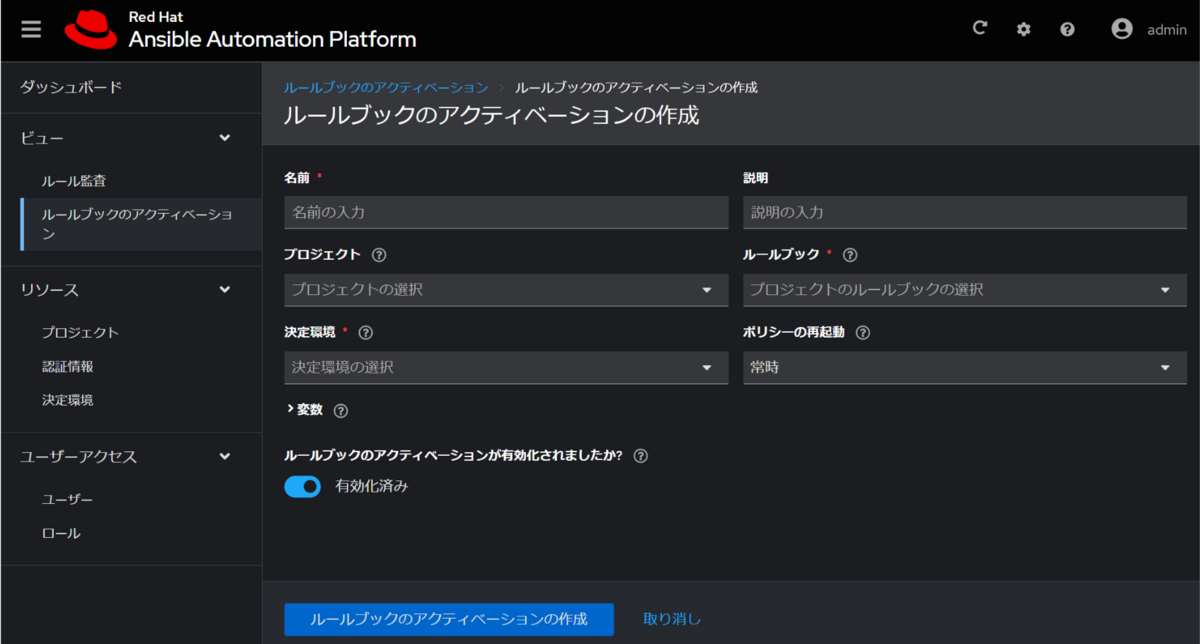
以下の必要事項を入力して、ルールブックのアクティベーションを作成します。
| 項目 | 意味 | 今回の設定値 | 備考 |
|---|---|---|---|
名前 |
ルールブックアクティベーション の名前 | my_activation01 |
|
プロジェクト |
Rulebook があるプロジェクト | my_project01 |
事前に作成したもの。プロジェクトを選択しなくてもルールブック一覧は表示されたがわかりやすくするために明示的に選択 |
ルールブック |
プロジェクト内の Rulebook のファイル名 | hello_jt.yml |
今回は rulebooks ディレクトリ配下 |
決定環境 |
Rulebook を実行する環境 | Default Decision Environment |
デフォルトで定義されていたもの |
作成後の画面で、アクティベーションステータス が 起動 から 実行中 に変わることを確認します。
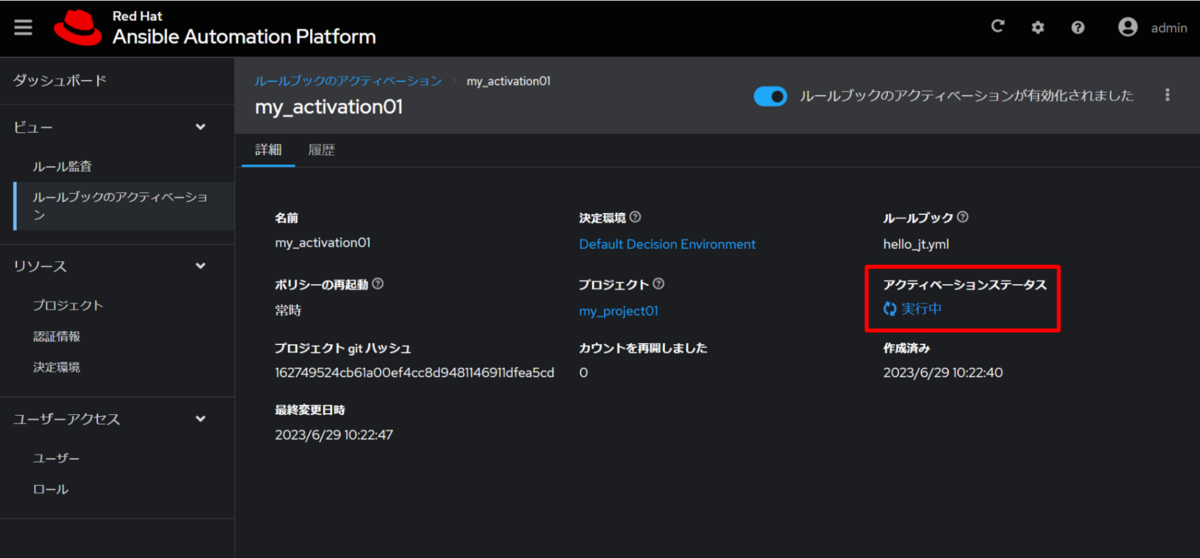
この段階で EDA Controller で Listen 状態を調べてみると、Rulebook で指定した Webhook の待ち受けポート 5000 が Listen いせていました。
[admin@aap24-eda ~]$ ss -na | grep 5000
tcp   LISTEN    0      4096                   *:5000                    *:*
ここまで、EDA Controller と Automation Controller の連携の準備ができました。
2.2. EDA Controller 経由でジョブテンプレートの実行を試す
いよいよ、EDA Controller と Automation Controller の連携を試します。
具体的には、EDA Controller に特定の条件の Webbhook を投げると Automation Controller のジョブテンプレートが実行される仕組みです。
EDA Controller に https 通信できる環境から、以下の curl コマンドを実行します。
curl -H 'Content-Type: application/json' -d "{\"message\": \"sakana\"}" 192.168.1.144:5000
Automation Controller のジョブ画面では、ジョブが動いていることが確認できます。
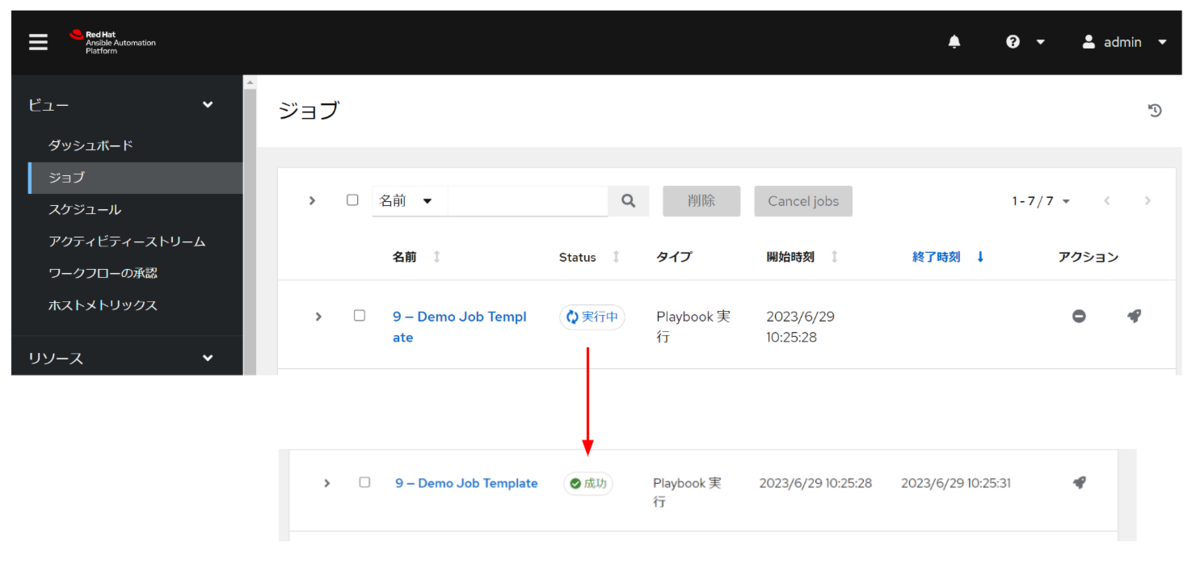
無事に Rulebook (rulebooks/hello_jt.yml) で指定したジョブテンプレートDemo Job Template が実行できたことが分かります。

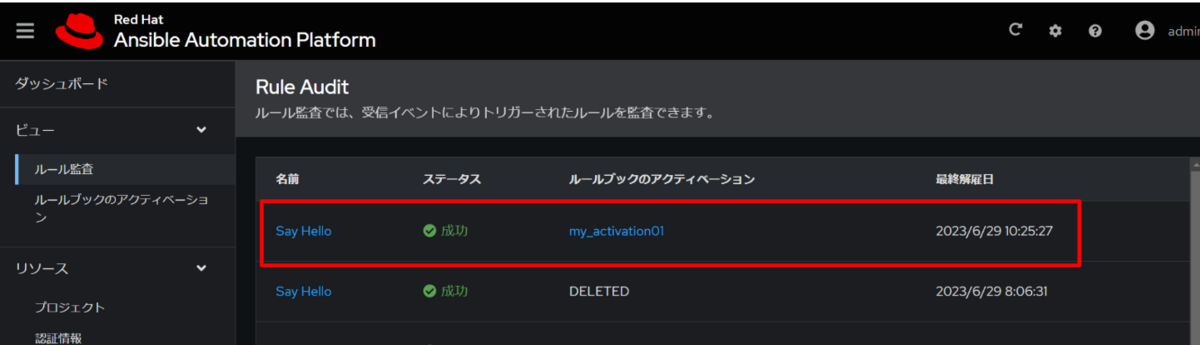
EDA Controller の ルール監査 画面` にはトリガーが引かれた結果が表示されます。
なお、EDA Controller のサーバーごと再起動したら、アクティベーションのステータスは 実行中 なものの、実際は 5000 を Listen していないようでした。アクティベーションを再開したところ Listen しました。このあたりの詳細はまだよくわかっていません。
おわりに
AAP 2.4 の Automation Controller と EDA Controller をそれぞれのサーバーにインストールして、連携を試しました。
今回は、Webhook を叩くと EDA Controller 経由でジョブテンプレートを実行する単純な Rulebook でした。なので、直接 Automation Controller の API にリクエストするのと機能的にはあまり変わりません。
Rulebook の作り込みや、イベントソースの多様化によって、可能性が広がる予感がします。
Arriving soon: Red Hat Ansible Certified and validated Content Collections for Event-Driven Ansible
eda-server と今回試した EDA Controller の大きな差は、デフォルトで Decision Environment とそれに伴う認証情報が定義されることでした。
まだまだ eda-server で少し試したときと同じレベルのことしかできていませんので、以下の公式ドキュメントも参照してみたいと思います。
- Event-Driven Ansible スタートガイド Red Hat Ansible Automation Platform 2.4 | Red Hat Customer Portal
- Event-Driven Ansible Controller ユーザーガイド Red Hat Ansible Automation Platform 2.4 | Red Hat Customer Portal
Automation Controller も 4.4 のリリースノートが公開されていました。
いい意味で気になる点もあるので確認してみたいと思います。