
はじめに
AAP を自然言語で操作できるようになる AAP MCP サーバー(現状Technical Preview 段階)を以前の記事で書きました(以降「前回の記事」)。前回の記事では、AAP のドキュメントをベースにしながら、AAP のインストラーを利用して AAP とセットで構築しました。
一方で、既存で構築済みの AAP 本体は手を加えずそのまま利用して、別途 MCP サーバーを構築したいな、とも思いました。
思いついたのは、GitHub リポジトリ ansible/aap-mcp-server のもの(以降 aap-mcp-server)を利用する方法です。ということで、今回は aap-mcp-server を使ってみました。
なお、前回の記事と同様に検証環境での検証目的なので、権限類は全体的にゆるいです。aap-mcp-server はまだバージョン管理もされていないことや、AAP のプロダクトとしての AAP MCP サーバーが Technology preview 段階であることもあり、本記事は運用を想定した内容ではありません。
- 検証環境
- aap-mcp-server コミット
9a95289ab1ef5ae42f918576a54010fc17400399(2026/01/06) - 手元は macOS、node v25.4.0
- 別途 AAP 本体は構築済み。
adminユーザーのWrite権限で API トークンを作成済み- AAP MCP サーバーが AAP 2.6 の 2025/12/10 パッチリリースの段階で登場したので、AAP 2.6 が前提かもしれません(未検証)
- aap-mcp-server コミット
※ 他にもAAP のインストラーを実行したときにデプロイされたコンテナ を利用する方法もあるかもしれませんが試していません。
構成
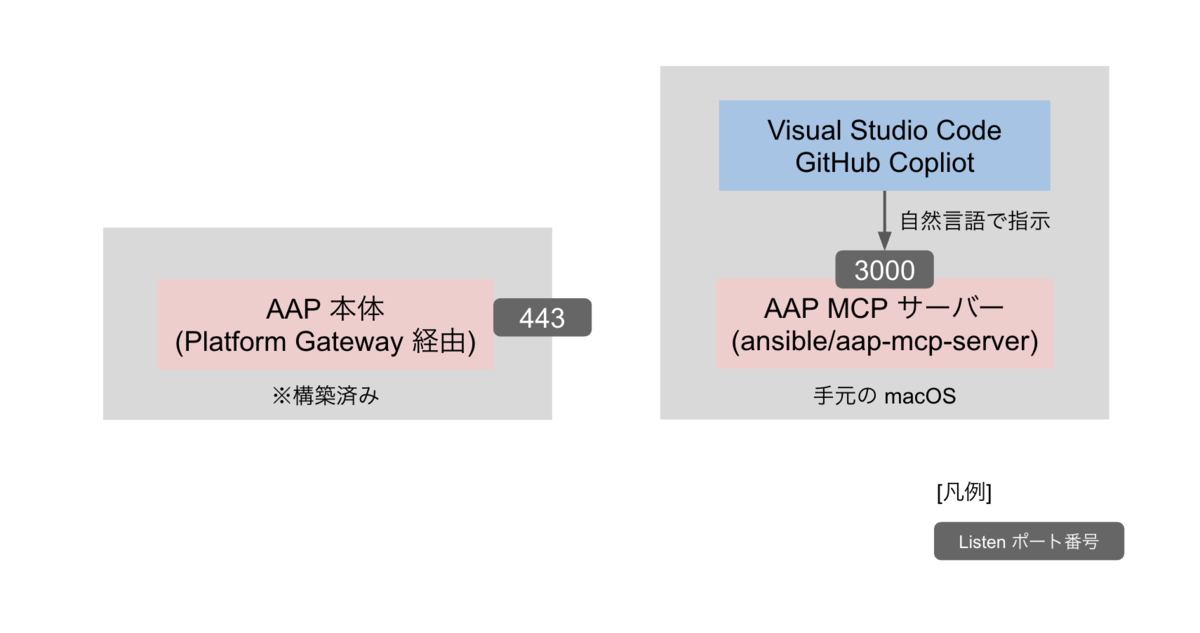
前回は AAP 本体も MCP サーバーも一つの VM にコンテナとして構築しましたが、今回は AAP は構築済みのものを利用し、手元の macOS の環境に直接 MCP サーバーを起動させます。
手順
リポジトリの README.md にある手順を参考にして、今回は基本的なことだけやっていきます。
インストール
まず、上記のリポジトリを clone してディレクトリを移動します。
git clone https://github.com/ansible/aap-mcp-server.git
cd aap-mcp-server
依存パッケージをインストールします。
npm install
ビルドします。
npm run build
設定
続いて設定ファイルの準備です。aap-mcp.sample.yaml というファイル名でサンプルがあるので、まず aap-mcp.yaml としてコピーします。aap-mcp.yaml というファイル名を自動で読み取るようです。
cp aap-mcp.sample.yaml aap-mcp.yaml
ファイルの上部の方でコメントとして設定項目が説明されています。環境変数でも設定できるようですが、今回はファイルに書きます。
今回追加するのは以下の設定です。
base_url: https://aap.sakana.local
allow_write_operations: true    # 書き込み操作を許可するか
base_url は AAP 本体側の URL です。後で試した限り、最後のスラッシュ(/)はつけない 形が正解のようです。最後のスラッシュをつけると、AAP への API リクエスト結果が Not Found になってしまうようなログが見て取れました。
allow_write_operations はおそらく、AAP のインストーラーのインベントリファイルでいう mcp_allow_write_operations=true に相当する設定。
MCP サーバーのポート番号は aap-mcp.yaml では設定できないようで、別途環境変数 MCP_PORT で指定します。今回はデフォルト 3000 のままです。この設定値は、あとで mcp.json で利用します。
ほか、services や toolsets は大事な部分のようで、特に意図がなければ修正する必要は無さそうです。
起動
今回は README.md に書かれている手順のうち Development mode と表現されている方で起動します。
$ npm run dev

> aap-mcp-server@1.0.0 dev
> tsx src/index.ts

[dotenv@17.2.3] injecting env (0) from .env -- tip: ⚙️  specify custom .env file path with { path: '/custom/path/.env' }
Loading OpenAPI specs for services: controller, galaxy, gateway, eda (4 specs)
Loading OpenAPI spec from local file: data/controller-schema.json
Successfully loaded OpenAPI spec from local file: data/controller-schema.json
Loading OpenAPI spec from local file: data/galaxy-openapi.json
Successfully loaded OpenAPI spec from local file: data/galaxy-openapi.json
Loading OpenAPI spec from local file: data/gateway-schema.json
Successfully loaded OpenAPI spec from local file: data/gateway-schema.json
Loading OpenAPI spec from local file: data/eda-openapi.json
Successfully loaded OpenAPI spec from local file: data/eda-openapi.json
Number of OpenAPIv3 files loaded=4
2026-01-25T13:17:09Z   Loading controller...
2026-01-25T13:17:09Z   Loading galaxy...
2026-01-25T13:17:09Z   Loading gateway...
2026-01-25T13:17:09Z   Loading eda...

═══════════════════════════════════════════════════════════
           AAP MCP Server Starting
═══════════════════════════════════════════════════════════

Configuration:
  Base URL: https://aap.sakana.local
  Services: controller, galaxy, gateway, eda
  Toolsets: 7 enabled
  Write operations: ENABLED
  Certificate validation: ENABLED
  Metrics: DISABLED

───────────────────────────────────────────────────────────
Loading OpenAPI specifications...

  ✓ controller: 629 tools
  ✓ gateway: 202 tools
  ✓ galaxy: 50 tools
  ✓ eda: 118 tools

Total tools loaded: 999
  job_management: 25
  inventory_management: 7
  system_monitoring: 13
  user_management: 32
  security_compliance: 12
  platform_configuration: 18
  all: 100

═══════════════════════════════════════════════════════════
Server ready on port 3000

Available endpoints:
  • MCP endpoint: http://localhost:3000/mcp

═══════════════════════════════════════════════════════════

(フォアグラウンドで実行のまま)
軽い確認のため、Web ブラウザで http://localhost:3000/api/v1/health を開いて、以下の応答があることを確認します。
{"status":"ok"}
mcp.json の設定
前回の記事と同様、Visual Studio Code の .vscode/mcp.json に設定します。
違いは以下の通りです。
urlのベースをhttp://localhost:3000にnpm run devで実行中のものへ
- エンドポイントを
/{toolset}/mcp/ではなく/mcp/{toolset}- AAP のドキュメントでは前者、
aap-mcp-serverの README.md(リンクは本記事で利用したコミット時点) では後者なので念の後者に
- AAP のドキュメントでは前者、
{
    "inputs": [
        {
            "type": "promptString",
            "id": "aap-api-token",
            "description": "AAP API token",
            "password": true
        }
    ],
    "servers": {
        "aap-mcp-inventory-management": {
          "type": "http",
          "url": "http://localhost:3000/mcp/inventory_management",
          "headers": {
            "Authorization": "Bearer ${input:aap-api-token}"
          }
        },
        "aap-mcp-job-management": {
          "type": "http",
          "url": "http://localhost:3000/mcp/job_management",
          "headers": {
            "Authorization": "Bearer ${input:aap-api-token}"
          }
        },
        "aap-mcp-system-monitoring": {
          "type": "http",
          "url": "http://localhost:3000/mcp/system_monitoring",
          "headers": {
            "Authorization": "Bearer ${input:aap-api-token}"
          }
        },
        "aap-mcp-user-management": {
          "type": "http",
          "url": "http://localhost:3000/mcp/user_management",
          "headers": {
            "Authorization": "Bearer ${input:aap-api-token}"
          }
        },
        "aap-mcp-security-compliance": {
          "type": "http",
          "url": "http://localhost:3000/mcp/security_compliance",
          "headers": {
            "Authorization": "Bearer ${input:aap-api-token}"
          }
        },
        "aap-mcp-platform-configuration": {
          "type": "http",
          "url": "http://localhost:3000/mcp/platform_configuration",
          "headers": {
            "Authorization": "Bearer ${input:aap-api-token}"
          }
        }
    }
}
各ツールセットの分を起動します。続いて Visual Studio Code 上に表示されたプロンプト("type": "promptString" によるもの)に、あらかじめ作成しておいたAAP API トークンを入力します。このあたり操作は、前回の記事内の「mcp.json の設定(図中のC)」と同じです。
AAP API トークンの作成は前回の記事内の「AAP の API Token を作成 (図中のB)」と同じです。
おためし
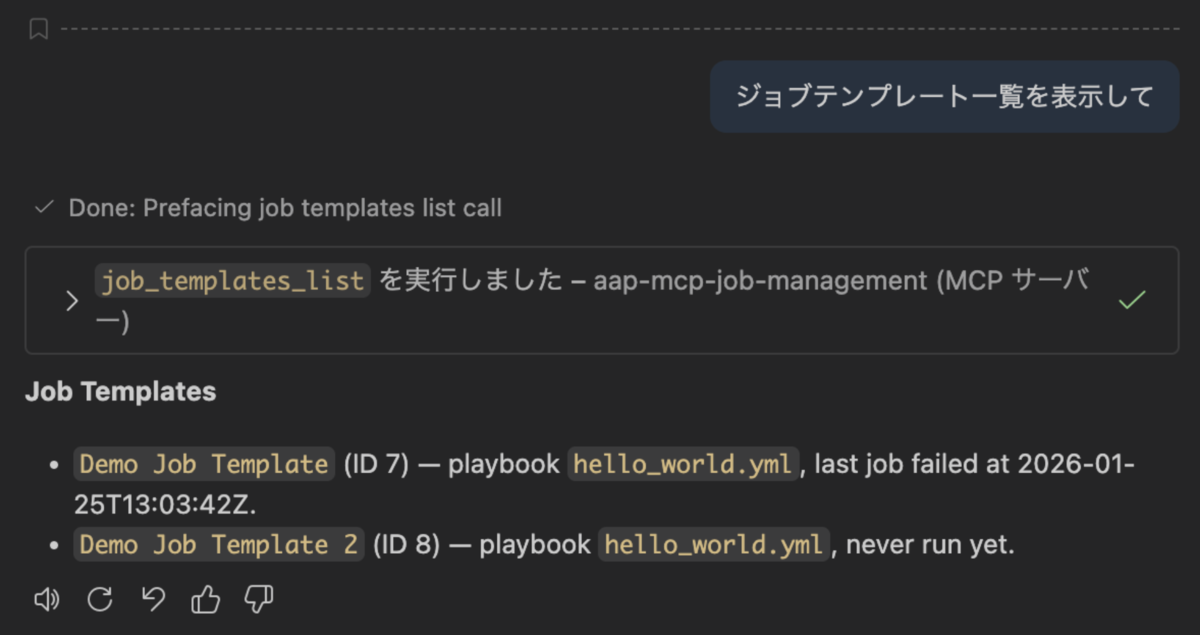
手始めに、参照系の操作である、ジョブテンプレート一覧を表示してもらいました。
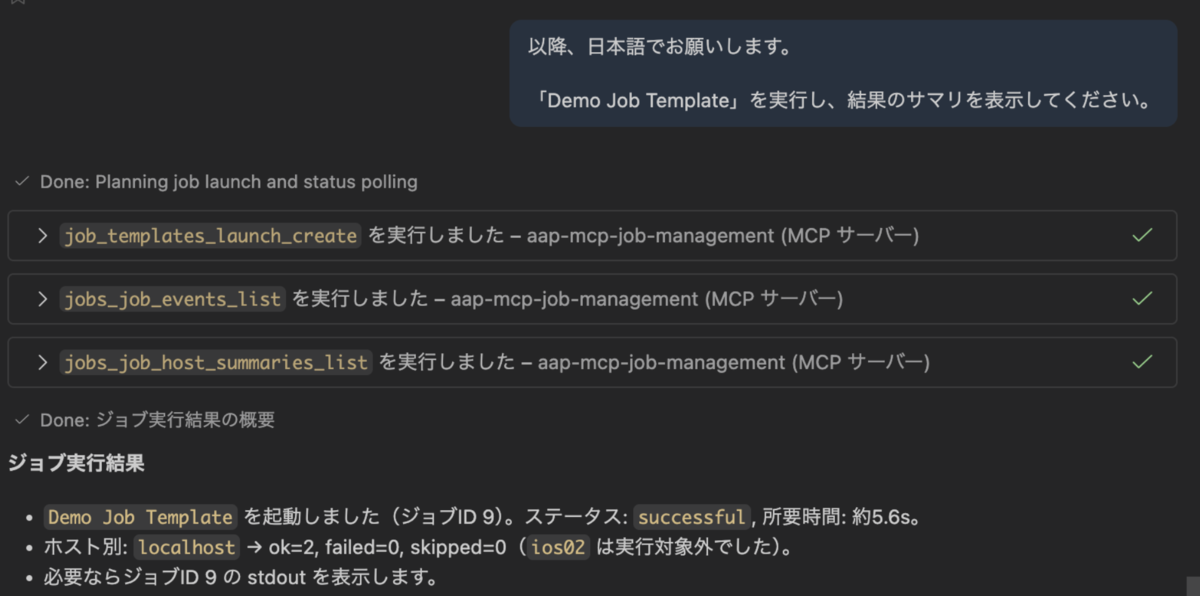
続いて、ジョブテンプレートを実行してもらいます。この操作は allow_write_operations: true を指定しているからできることのはずです。
ほか、前回の記事内の「おためし」と似たようなことを試しました。
ちなみに、フォアグラウンドで実行中の npm run dev のターミナルには、やり取りらしきログが表示されていました。
2026-01-25T13:13:47Z Toolset-specific GET request for toolset: job_management
2026-01-25T13:13:47Z Establishing new SSE stream
2026-01-25T13:13:47Z Toolset-specific POST request for toolset: job_management
2026-01-25T13:13:47Z Received MCP request
2026-01-25T13:13:47Z Toolset-specific POST request for toolset: job_management
2026-01-25T13:13:47Z Received MCP request
2026-01-25T13:13:47Z Toolset-specific POST request for toolset: job_management
2026-01-25T13:13:47Z Received MCP request
2026-01-25T13:13:47Z [toolset:job_management] job_templates_launch_retrieve → 200 OK (509ms)
2026-01-25T13:14:12Z Toolset-specific POST request for toolset: job_management
2026-01-25T13:14:12Z Received MCP request
2026-01-25T13:14:13Z [toolset:job_management] job_templates_launch_create → 201 Created (1638ms)
2026-01-25T13:14:28Z Toolset-specific POST request for toolset: job_management
2026-01-25T13:14:28Z Received MCP request
2026-01-25T13:14:29Z [toolset:job_management] jobs_retrieve → 200 OK (983ms)
2026-01-25T13:14:47Z Toolset-specific POST request for toolset: job_management
2026-01-25T13:14:47Z Received MCP request
2026-01-25T13:14:48Z [toolset:job_management] jobs_job_host_summaries_list → 200 OK (937ms)
補足: AAP サーバーアクセス時の証明書検証の有無について
今回は AAP 本体へのアクセス時に証明書検証が成功するような環境でしたが、意図的に検証が失敗するようにしたら mcp.json でサーバーを起動したときに以下のエラーが表示されました(抜粋)。VS Code の [出力] パネルではなく、npm run dev を起動しているターミナル上です。
2026-01-26T02:01:55Z Token validation failed: TypeError: fetch failed
    at node:internal/deps/undici/undici:16416:13
    at process.processTicksAndRejections (node:internal/process/task_queues:104:5)
    at async validateToken (/Users/sakana/aap-mcp-server/src/index.ts:120:22)
    at async StreamableHTTPServerTransport.onsessioninitialized (/Users/sakana/aap-mcp-server/src/index.ts:477:17)
    at async StreamableHTTPServerTransport.handlePostRequest (/Users/sakana/aap-mcp-server/node_modules/@modelcontextprotocol/sdk/src/server/streamableHttp.ts:591:21)
    at async StreamableHTTPServerTransport.handleRequest (/Users/sakana/aap-mcp-server/node_modules/@modelcontextprotocol/sdk/src/server/streamableHttp.ts:267:13)
    at async mcpPostHandler (/Users/sakana/aap-mcp-server/src/index.ts:541:9) {
  [cause]: Error: unable to verify the first certificate; if the root CA is installed locally, try running Node.js with --use-system-ca
      at TLSSocket.onConnectSecure (node:internal/tls/wrap:1648:34)
      at TLSSocket.emit (node:events:508:20)
      at TLSSocket._finishInit (node:internal/tls/wrap:1094:8)
      at ssl.onhandshakedone (node:internal/tls/wrap:880:12) {
    code: 'UNABLE_TO_VERIFY_LEAF_SIGNATURE'
  }
}
以下がポイントでしょうか。
[cause]: Error: unable to verify the first certificate; if the root CA is installed locally, try running Node.js with --use-system-ca
事情があって証明書検証のエラーを無視したい場合は、README.md にも説明がある通り aap-mcp.yaml で、ignore-certificate-errors: true を指定して npm run dev を起動しなおします。
おわりに
既存の AAP 環境はそのままにして、MCP サーバーを立ててみました。思ったより手軽に試せて良かったです。
aap-mcp-server はまだこれから色々な変更があるかもしれませんので、引き続きウォッチしていきたいと思います。
