■ はじめに
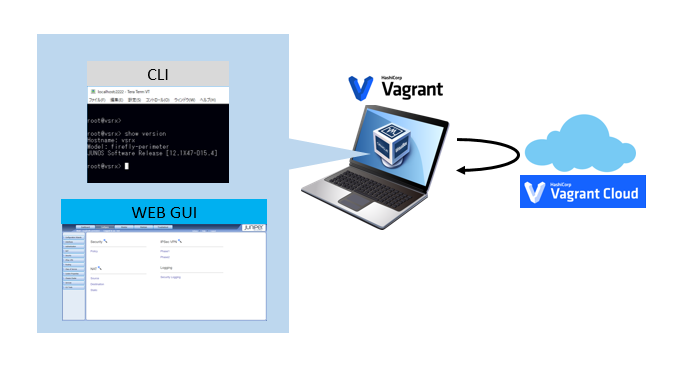
Juniper社は、検証用に仮想ファイアウォール(firefly perimeter/vSRX)のイメージファイルを提供しています。 イメージファイルはVagrant Cloud上(旧Atlas)にあります。 app.vagrantup.com
この記事では、ちょっとした操作感を簡単に試したり、ネットワーク自動化ツールとの連携を試したりする目的でローカルに環境を構築してCLI、Web GUIでログインできるところまでの手順を説明します。
環境
- OS: Windows 10 64 bit
- 仮想化ソフトウェア: Virtualbox
- 仮想環境構築ソフトウェア: Vagrant
■ Virtual Box のインストール
今回は仮想化ソフトウェアとして Virtualboxを利用します。インストールしていない場合は以下のページからダウンロードしてインストールしておきます。 https://www.virtualbox.org/wiki/Downloads
■ Vagrant のインストール
仮想環境構築ソフトウェアとして Vagrant を利用します。インストールしていない場合は以下のページからダウンロードしてインストールしておきます。 https://www.vagrantup.com/downloads.html
■ 仮想マシンの準備と起動
JUNOS用 vagrant プラグインのインストール
・コマンド
vagrant plugin install vagrant-junos
vagrant plugin install vagrant-host-shell
・ログ
D:\users\user\Documents\VirtualBox VMs\srx>vagrant plugin install vagrant-junos
Installing the 'vagrant-junos' plugin. This can take a few minutes...
Installed the plugin 'vagrant-junos (0.2.1)'!

D:\users\user\Documents\VirtualBox VMs\srx>vagrant plugin install vagrant-host-shell
Installing the 'vagrant-host-shell' plugin. This can take a few minutes...
Installed the plugin 'vagrant-host-shell (0.0.4)'!
Vagrantfileの作成(vagrant init)
以下のコマンドで Vagrantfile を作成します。
・コマンド
vagrant init juniper/ffp-12.1X47-D15.4
・ログ
D:\users\user\Documents\VirtualBox VMs\srx>vagrant init juniper/ffp-12.1X47-D15.4
A `Vagrantfile` has been placed in this directory. You are now
ready to `vagrant up` your first virtual environment! Please read
the comments in the Vagrantfile as well as documentation on
`vagrantup.com` for more information on using Vagrant.
仮想マシンの起動(vagrant up)
以下のコマンドで仮想マシンを起動します。
・コマンド
vagrant up
・ログ
D:\users\user\Documents\VirtualBox VMs\srx>vagrant up
Bringing machine 'default' up with 'virtualbox' provider...
==> default: Importing base box 'juniper/ffp-12.1X47-D15.4'...
==> default: Matching MAC address for NAT networking...
==> default: Checking if box 'juniper/ffp-12.1X47-D15.4' is up to date...
==> default: Setting the name of the VM: srx_default_1500081122453_26114
==> default: Clearing any previously set network interfaces...
==> default: Preparing network interfaces based on configuration...
    default: Adapter 1: nat
==> default: Forwarding ports...
    default: 22 (guest) => 2222 (host) (adapter 1)
==> default: Booting VM...
==> default: Waiting for machine to boot. This may take a few minutes...
    default: SSH address: 127.0.0.1:2222
    default: SSH username: root
    default: SSH auth method: private key
    default:
    default: Vagrant insecure key detected. Vagrant will automatically replace
    default: this with a newly generated keypair for better security.
    default:
    default: Inserting generated public key within guest...
    default: Removing insecure key from the guest if it's present...
    default: Key inserted! Disconnecting and reconnecting using new SSH key...
==> default: Machine booted and ready!
Sorry, don't know how to check guest version of Virtualbox Guest Additions on this platform. Stopping installation.
==> default: Checking for guest additions in VM...
    default: No guest additions were detected on the base box for this VM! Guest
    default: additions are required for forwarded ports, shared folders, host only
    default: networking, and more. If SSH fails on this machine, please install
    default: the guest additions and repackage the box to continue.
    default:
    default: This is not an error message; everything may continue to work properly,
    default: in which case you may ignore this message.
なお、 イメージファイルが見つからない旨のエラーメッセージが表示された場合は、ffp-12.1X47-D15.4 の箇所があっているか、Vagrant Cloud上で確認してください。
https://app.vagrantup.com/juniper/
しばらくすると、Virtualbox マネージャーでも仮想環境が起動したことが確認できます

■ Web GUIアクセスログインのための設定
ユーザ作成とパスワード設定
SSHで localhost:2222 に接続します。(デフォルトで「2222→22」にポートフォワーディングが設定されています)
なお、ログインのためのrootの秘密鍵は、vagrant up したフォルダの .vagrant\machines\default\virtualbox\private_key にあります。
ログインできたら、ユーザーの作成とパスワードの設定を行います。設定を反映するための commit も忘れずに行います。
root@vsrx% cli

root@vsrx> configure
Entering configuration mode

[edit]
root@vsrx# set system login user [ユーザー名] class super-user

[edit]
root@vsrx# set system login user [ユーザー名] authentication plain-text-password
New password: [パスワードを入力]
Retype new password: [パスワードを入力]

[edit]
root@vsrx# commit
commit complete
ポートフォワーディング設定
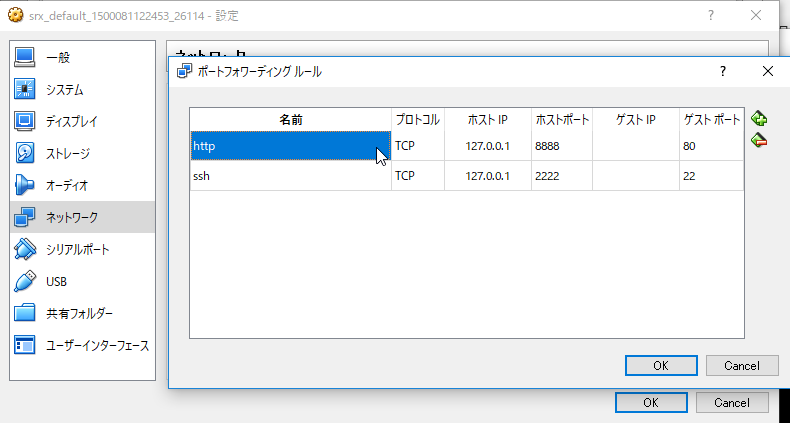
デフォルトだど仮想インターフェースがNATモードなので、WEB GUIアクセスするためにはポートフォワーディングの設定が必要になります。ここではVirtual Box側の設定として以下のように「8888→80」に設定します。

■ Web GUIログイン確認
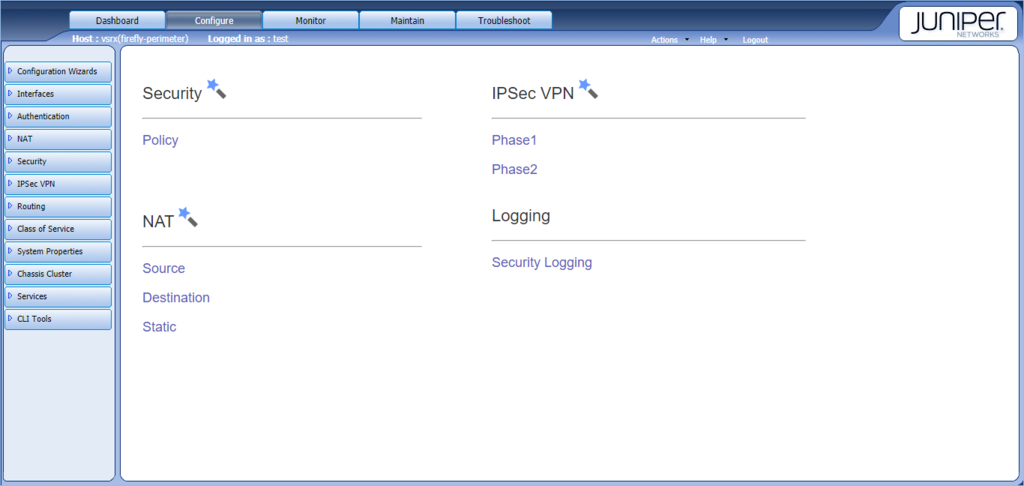
Webブラウザで http://localhost:8888 にアクセスして、先ほど作成したユーザーでログインでします。

無事ログインできました。
■ 仮想マシンのシャットダウン
vagrant halt
するか、通常のSRXと同じように
root@vsrx> request system power-off
のようにしてシャットダウンします。
■ さいごに
今回はなるべく少ない手順で構築したため、インターフェースが1つだったりとファイアウォールとしては体をなしていない状態ですが、とにかく「JUNOSのコマンド体系に慣れたい」「SRXのWeb GUI画面に慣れたい」といった用途には利用できるのではないでしょうか。 必要に応じてカスタマイズしていただければと思います。